C o n d e n s e r D r y e r Operating Instructions EDC 5375 822 944 179 - 01 - 1101 g
Dear customer, Please read these operating instructions through carefully. Please make sure you read the safety instructions on the first pages of these operating instructions! Keep the operating instructions for future reference. Pass them on to any future owners. 1 With the warning triangle and/or by means of key words (Danger!, Caution!, Attention!), information is emphasized which is important for your safety or the correct functioning of the appliance.
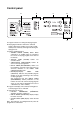
Contents Important Safety Information . . . . . . . . . . . . . . . 4 Program tables . . . . . . . . . . . . . . . . . . . . . . . . . 18 General Information . . . . . . . . . . . . . . . . . . . . . . . 5 A small glossary of textile information . . . . . . 19 Disposal . . . . . . . . . . . . . . . . . . . . . . . . . . . . . . . . 5 Care symbols . . . . . . . . . . . . . . . . . . . . . . . . . . . 19 Packaging . . . . . . . . . . . . . . . . . . . . . . . . . . . . . . .
1 Important Safety Information The safety of Electrolux electrical appliances complies with the established technical principles and statutory equipment safety regulations. Nevertheless, as manufacturer we have to draw your attention to the following safety instructions. General safety • • • • • • • • • • • Repairs of the dryer may be carried out only by trained personnel. Incompetently carried out repairs can entail considerable hazards for the user.
• • • If the dryer is placed adjacent to a gas, coal or electric cooking stove, interpose a thermally insulating non-combustible plate between the dryer and the stove (dimensions: 85x57,5cm). Do not place the dryer on high-pile carpet floors! This would hinder air circulation at the ventilation slots! The electric power plug connector of the appliance must remain accessible even after installation. • • Check that the tumble dryer is not standing on the mains cable.
2 Environmental protection tips • • • Your laundry will become light and soft in the tumble dryer even without a fabric softening agent. Loosen your laundry before loading it into the dryer. This helps to prevent lengthy running times and creasing. Ensure your laundry is well spun. Remove as much water as possible from the washing before drying! This is based on the principle: the better you spin the washing before drying the more economical the dryer is.
The key features of your appliance • • • • • • • • Program or time setting via the program selector AUDIBLE SIGNAL (SIGNAL) can be selected in addition; an intermittent audible signal is sounded after the end of the program. SPECIAL CARE (SCHON) button for gentle drying of sensitive fabrics DELAY TIMER (ZEITVORWAHL): Program start delayed by 1 to 19 hours (e.g.
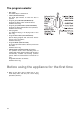
Description of the appliance Front view Control panel Water reservoir with handle flap Fluff filter Interior Light Rating plate Vent Feet (all height-adjustable) 8 Condenser Unit behind Removal Plinth Reversable door
Control panel A B C D E A Program selector: for setting the drying program B Drying degree indicator: Shows the achieved extent of drying; this enables you to take-out individual pieces of laundry at the right time during the drying process. C Buttons and display block – AUDIBLE SIGNAL (SIGNAL) button: When switched-on, an audible signal is sounded at the end of the drying program; then take-out the laundry – SPECIAL CARE (SCHON) button: For sensitive fabrics.
The program selector • • • • • • • • OFF (AUS): The tumble dryer is switched off. LIGHT (BELEUCHTUNG): The drum light switches on when the door is opened. Program group COTTON (BAUMWOLLE): Programs for drying cotton and linen fabrics; maximum load 5 kg. Program group DELICATES (MISCHGEWEBE): Programs for drying mixed fabrics and synthetics; maximum load 2.5 kg. Time programs: For additional drying or for drying loads of less than 1 kg.
Brief instructions • Ensure the laundry is well spun before tumble drying. • Prepare the laundry. • Open the door and insert washing. • Shut the door. Attention! Do not catch washing in the door. • Select the drying program – on the program selector. – If required press the buttons AUDIBLE SIGNAL (SIGNAL) or SPECIAL CARE (SCHON). • Pre-select the start time? • Start the program by pressing the START/PAUSE (START/PAUSE)-button.
Drying Prepare the laundry • • • To prevent tangled bundles of laundry: Close zip fasteners; button-up bed linen and pillow cases; tie-together loose tapes, e.g. aprons. Empty all pockets. Remove all metal objects (paper clips, pins, etc.). Open the door To open the door: • Press firmly against the door (Press position ) or • while the dryer is switched-on: Press the DOOR (TÜR) button. Load the laundry • Load the prepared laundry into the dryer.
Select the drying program 1. Select the suitable drying program using the program selector (see "Program tables"). 2. If required, select the button AUDIBLE SIGNAL (SIGNAL) or SPECIAL CARE (SCHON). • • • • AUDIBLE SIGNAL (SIGNAL) button During the crease-protection phase (immediately after the drying process), an acoustic signal is sounded at certain intervals (see "End of drying process"). SPECIAL CARE (SCHON) button This program operates with reduced heat.
Start the drying program 1. Press the PAUSE). button START/PAUSE (START/ The drying programme begins. You can check the progress of the drying procedure in the programme progress display. Removing laundry or loading laundry when necessary You can interrupt the drying process at any time to remove some of the laundry or to add more laundry. 1. Open the door. 1 Caution! The laundry and the drum may be hot. 2. Remove or add more laundry. 3. Close the door. 4.
Empty the water reservoir Caution! The condensed water is not suitable for drinking or for use with foodstuffs. The water reservoir should be emptied after every drying programme. This avoids interruption of a programme when the water reservoir is full. 1 1. Grasp the handle flap of the water reservoir and pull-out completely. 2. Push the cover of the water reservoir to the side and pour-out the condensed water. 3. Re-insert the water reservoir into the control panel.
Clean the fluff filter To ensure efficient operation of the tumble dryer, clean the fluff filter after each drying program. Also check whether there are any remnants or fluff from the washing in the drum; remove immediately. 1. Press the catch of the filter lid downwards. The filter lid will open. 2. Take-out the fluff filter. 3. Remove fluff out of the fluff filter, with a moistened hand. 4. Re-insert the fluff filter. 5. Press against the filter lid until it catches into the locking device.
Cleaning the condenser Important! When the CONDENSER (WÄRMETAUSCHER) display lights, it is essential to clean the condenser. Otherwise your dryer might suffer damage. In addition energy consumption will be increased if the condenser unit is covered with fluff. 1. Open the door. 1 2. Press on the two tabs to unlatch and take off the removable plinth. 3. Turn the two securing disks through a quarter turn each outwards. 4. Pull the condenser out of the base by the handle. 5.
Program tables Program group COTTONS (BAUMWOLLE), care symbols R, Q; maximum load 5 kg Program Laundry Type Examples for EXTRA DRY (EXTRATROCKEN) Heavy weight or mult-layered fabrics Towelling material, bath robes VERY DRY (STARKTROCKEN) thick textiles that are to be thoroughly dried.
Program WOOL (WOLLPFLEGE), maximum load 1kg To freshen up the wool fibres of woollen garments after they have been line dried, worn or stored for longer periods they can be treated briefly using warm air. The wool emerges beautifully soft. Recommendation: remove fabrics immediately after drying.
Cleaning and maintenance Cleaning the condenser 1 Important! When the CONDENSER (WÄRMETAUSCHER) display lights, it is essential to clean the condenser. Otherwise your dryer might suffer damage. In addition energy consumption will be increased if the condenser unit is covered with fluff. For information on cleaning the condenser see section "Cleaning and maintenance, cleaning the condenser".
Something not working? If the tumble dryer is not working correctly please carry out the following checks before calling an engineer. Symptom The tumble dryer will not start The results are unsatisfactory The drying result is unsatisfactory; the washing is still damp.
Symptom Possible cause Solution The remaining running time is adjusted automatically depending Automatic process. There is no unit The remaining running time display on the type of items being washed, fault. changes rapidly. the washing time and the degree of dampness. Display EMPTY WATER (BEHÄLTER) is lit Condensate container full Empty the condensate container With the container pulled out, switch Foreign bodies, e. g. animal hairs, on the appliance momentarily.
Door Reversal Instructions The door opening direction can be changed if required. Warning! Before reversing the door, isolate the appliance from the mains supply. Proceed as follows to reverse the door opening direction: 1 A C B F E H D J G J G F E A C B 1. Un-screw the screws A on the front panel of the appliance. 2. Take-off the door by displacing it horizontally. 3. Un-screw the screws B on the inside of the door and take-off the hinges C. 4. Unscrew and take-off the locking block D. 5.
Programming possibilities The electronic control system of your laundry dryer provides you with the possibility to adapt some functions of the dryer permanently to your requirements.
Technical data Height x Width x Depth 85x60x60cm Depth with the door open 117cm Height adjustable from Empty weight 1.0/–0.4cm approx. 46 kg Load (depending on the program) max. 5kg (Different loads in some countries are due to different measuring methods) Power consumption in acc. with IEC 1121 s.e. kWh (5 kg Cotton, spun at 800 revolutions per minute, program COTTON CUPBOARD DRY - BAUMWOLLE SCHRANKTROCKEN) Area of use Permissible ambient temperature +5°C up to +35°C ; 3.
Stacking kit With these kits you can combine your laundry dryer with any LAVAMAT automatic washing machine to a washing and drying column. The appliances are stacked in space-economising manner in this arrangement, the washing machine at the bottom and the laundry dryer at the top. Service In the chapter "Something not working" some disturbances have been summarised, which you can solve yourself. If you do not find any helpful information there, please contact your local customer service centre.
Servicestellen Points de Service 6032 Emmen Buholzstrasse 1 1028 Préverenges Le Trési 6 9000 St.