Instruction booklet EDE 421 E TUMBLE DRYER EDE 401 E GB 125996820
i CONGRATULATIONS ON YOUR NEW TUMBLE DRYER Before using your new tumble dryer, please read this instruction booklet carefully. To avoid risks ensuing from the use of an electrical appliance, please make sure that the tumble dryer is installed correctly and that you read the information regarding safety contained in this instruction booklet, in order to avoid mistakes and unnecessary risks. Please keep this booklet in the vicinity of the appliance.
INDEX Warnings Installation ■ Using your tumble dryer ■ Disposing of tumble dryer ■ 4 4 4 4 INSTRUCTIONS FOR USER Description of tumble dryer INSTALLATION INSTRUCTIONS 5 Description of control panel Programme selector dial ■ Control buttons and lights 6 6 Programme chart 7 ■ How to use your tumble dryer Programming ■ Options ■ Start the programme ■ End of drying cycle ■ Switch off the dryer ■ Technical specifications 13 Installation 13 13 14 15 15 15 Positioning ■ Fitting the vent hose ■ Door
WARNINGS Please read all the information contained in this instruction booklet before installing and using your tumble dryer. By doing so, the tumble dryer will function correctly and to the highest degree of efficiency. All those using the appliance must be familiar with the relevant safety information. Please store this instruction booklet with care.
i DESCRIPTION OF THE APPLIANCE 1 1 2 3 4 5 6 7 8 9 10 11 12 13 Worktop Programme chart Door Opening Button Mains-On Light ON/OFF Button Low Temperature Button Buzzer Off Button Start Button Control Lights Programme Selector Dial Rating Plate Fluff filter Adjustable feet 3 4 67 10 EDE 401 E 2 5 8 9 11 12 13 14 Side vent outlets 15 Ring nut 16 Rear vent outlet 14 16 15 5
USE Control panel EDE 421 E 1 2 3 4 5 6 1 Programme Chart This will help you to select the correct programme or time for drying. 7 8 9 b) Interrupting the programme To interrupt a programme which has already started, depress this button for a few seconds until the control light on the panel which is alight goes out. 2 Door Opening Button 8 Control lights Depress this button to open the door. If you open the door during drying the machine stops. The programme will continue by closing the door.
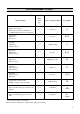
PROGRAMME CHART Max. load kg Degree of drying required Programme 5.0 Extra dry A Terry towels Knitwear Babywear 5.0 Store dry B (*) Bed linen Table linen Kitchen towels 5.0 Slightly damp C Bed linen Table linen Kitchen towels 5.0 Iron dry D (*) Bed linen Table linen Kitchen towels 5.0 Machine iron dry E 2.0 Extra dry F Bed linen Kitchen towels Babywear 2.0 Store dry G (*) Temperature sensitive items Blankets, Jumpers made by acrylic 2.0 Slightly damp H 1.
i HOW TO USE YOUR TUMBLE DRYER Before using your tumble dryer for the first time There may be dust or dirt inside a brand new tumble dryer. Place a few damp cloths inside the appliance and dry for approximately 15 minutes (programme “I”). 1. Loading laundry Open the door by pressing the relevant button. Load spun laundry. Do not press laundry in appliance. Close door making sure that there are no laundry items preventing the door from being closed. 2. Depress ON/OFF button . 3.
6. End of cycle Drying is completed when the control light illuminates: you can remove the laundry from the appliance. If you do not remove immediately the laundry, the machine will automatically carry out the anti-crease phase which lasts approx. 20 minutes. During this period the drum will rotate at regular intervals to avoid creasing and the buzzer will sound unless you have depressed button . To remove the laundry during this phase, depress start button until control light goes out. 7.
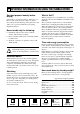
i IMPORTANT INFORMATION ON USING THE TUMBLE DRYER Sort and prepare laundry before drying Sort laundry to be dried according to fabric type (see label on each item) and desired degree of dryness. Close all zips and tie all strings. Close pillowcases and quilt covers to prevent small items from getting tangled inside them. Never tumble dry the following: ■ ■ ■ Particularly delicate items such as synthetic curtains, silk and nylon stockings. Items containing rubber foam or materials similar to rubber foam.
MAINTENANCE You must disconnect the appliance from the electricity supply, before you can carry out any cleaning or maintenance work. External cleaning Use only soap and water and then dry thoroughly. Important: do not use methylated spirit, diluents or similar products. Cleaning the door Clean periodically the interior part of the door to remove any fluff. Accurate cleaning ensures correct drying. P0328 Cleaning the filter Your dryer will only function well if the filter is clean.
YOUR TUMBLE DRYER IS NOT WORKING ■ TYPE OF FAILURE ■ ■ The tumble dryer does not start. ■ ■ ■ ■ ■ Drying takes too long or laundry is not dry enough. ■ ■ ■ ■ ■ ■ ■ Space surrounding the appliance is overheating. SERVICE AND SPARE PARTS Should there be a failure of any kind, please consult the ‘Your tumble dryer is not working....’ chapter in order to see whether you can rectify the fault yourself.
i TECHNICAL SPECIFICATIONS Height Width Depth Depth with door open 850 mm 600 mm 570 mm 920 mm Weight Maximum load (cotton) Maximum load (synthetics) 34 kg 5 kg dry garments 2 kg dry garments Drum volume 108 l Power supply voltage Total power 230 V, 50 Hz 2200 W, 10 Amp INSTALLATION Positioning It is recommended that, for your convenience, the machine is positioned close to your washing machine.
Important When operating the tumble dryer, the room temperature must not exceed 35°C, as it may affect the performance of the appliance. Fitting the vent hose To simplify the installation, there is a choice of vent outlets: one at the back, the others in the left and righthand side. Connect the hose to whichever is the more convenient by pulling the ring nut (A) from the vent outlet at the back, screwing it on to the hose and pushing it firmly back into place.
Door reversal To make it easier to load or unload the laundry the door can be reversed. This operation must be carried out by qualified personnel. Operate as follows: - Remove the door by unscrewing the two screws (1) fastening the hinge to the cabinet (Fig. A). - Remove the safety catch (2) and the plug (3) by bending the two fastening tags (Fig. A). - Refit the safety catch (2) and plug (3) on the door by reversing their positions (Fig. B).
Z