
User manual


What to do if ...
Problem Possible cause Remedy
Dryer does not work.
Mains plug is not plugged in or
fuse is not working correctly.
Plug in at mains socket. Check
fuse in fuse box (domestic in-
stallation).
Loading door is open. Close loading door.
Have you pressed the START
PAUZE (START PAUSE) but-
ton?
Press the START PAUZE
(START PAUSE) button again.
Drying results unsatisfactory.
Wrong programme selected.
Select a different programme
the next time you dry (see “Pro-
gramme chart” chapter).
Fluff filter clogged. Clean fluff filter.
Overloading of laundry.
Observe recommended loading
volumes.
Ventilation slots covered up. Uncover ventilation slots.
Residue on inside surface of
drum or drum ribs.
Clean inside surface of drum
and drum ribs.
Conductance of water at instal-
lation site differs from standard
setting of machine.
Re-programme standard setting
for degree of drying (see ‘Pro-
gramming options’ chapter).
Loading door does not close. Filter not in place. Install filter into place.
Drying cycle ends shortly after
programme starts.
Not enough washing loaded or
washing loaded is too dry for se-
lected programme.
Select time programme or high-
er drying level (e.g. EXTRA
DROOG (EXTRA DRY) instead
of KASTDROOG (STORAGE
DRY)).
Drying cycle lasts an unusually
long time. Note: After around 5
hours the drying cycle ends au-
tomatically.
Filter clogged. Clean filter.
Load volume too big. Reduce load volume.
Laundry insufficiently spun.
Laundry must be adequately
spun.
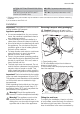
Changing the bulb for interior lighting
Only use a special bulb which is designed
specially for dryers. The special bulb can be
obtained from your local Service Force cen-
tre.
Warning! When the appliance is
switched on, the interior lighting
switches itself off after 4 minutes when
the door is open.
Warning! Do not use standard bulbs!
These develop too much heat and may
damage the machine!
Warning! Before replacing the bulb,
disconnect the mains plug.
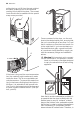
1. Unscrew cover above the bulb (this can
be found directly behind the loading aper-
ture, at the top; refer to “Description of
machine” section.)
2. Replace defective bulb.
3. Screw cover back down.
Check the correct positioning of o-ring gas-
ket before screwing back the door light cov-
er. Do not operate the dryer when missing o-
ring gasket on door light cover.
Warning! For safety reasons, the cover
must be screwed down tightly. If this is
not done, the dryer must not be
operated.
electrolux 27