
User manual


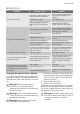


KATOEN (COTTON) STRIJKDROOG (IRON
DRY)
2)
3.05 / 75 (7 kg load pre-drained at 1000
rpm)
SYNTHETISCH (SYNTHETICS) KAST-
DROOG (STORAGE DRY)
2)
1.15 / 30 (3 kg load pre-drained at 1200
rpm)
1) Different loading volume data may be needed in some countries as a result of different measuring
methods.
2) in accordance with EN 61121
Installation
Important! The appliance must be moved in
vertical position for transport.
Appliance positioning
• It is recommended that, for your conven-
ience, the machine is positioned close to
your washing machine.
• The tumble dryer must be installed in a
clean place, where dirt does not build up.
• Air must be able to circulate freely all round
the appliance. Do not obstruct the front
ventilation grille or the air intake grilles at
the back of the machine.
• To keep vibration and noise to a minimum
when the dryer is in use, it should be
placed on a firm, level surface.
• Once in its permanent operating position,
check that the dryer is absolutely level with
the aid of a spirit level. If it is not, raise or
lower the feet until it is.
• The feet must never be removed. Do not
restrict the floor clearance through deeply
carpets, strips of wood or similar. This
might cause heat built-up which would in-
terfere with the operation of the appliance.
Important! The hot air emitted by the tumble
dryer can reach temperatures of up to 60°C.
The appliance must therefore not be installed
on floors which are not resistant to high
temperatures.
When operating the tumble dryer, the room
temperature must not be lower than +5°C
and higher than +35°C, as it may affect the
performance of the appliance.
Warning! Should the appliance be
moved, it must be transported vertically.
Warning! The appliance must not be
installed behind the lockable door, a
sliding door or a door with a hinge on the
opposite side to that of the appliance.
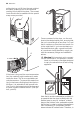
Removing transport safety packaging
Caution! Before use all parts of the
transport packaging must be removed.
1. Open loading door.
2. Pull off adhesive strips from inside ma-
chine on top of drum.
3. Remove foil hose and polystyrene padding
from the machine.
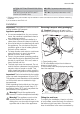
Fitting the vent hose
To simplify the installation, there is a choice
of vent outlets: one at the back, the others in
the left and right-hand side. Connect the
hose to whichever is the more convenient by
electrolux 29