user manual manual de instrucciones Iron Aid EDI 96150
We were thinking of you when we made this product
electrolux 3 Welcome to the world of Electrolux Thank you for choosing a first class product from Electrolux, which hopefully will provide you with lots of pleasure in the future. The Electrolux ambition is to offer a wide variety of quality products that make your life more comfortable. You will find some examples on the cover in this manual. Please take a few minutes to study this manual so that you can take advantage of the benefits of your new machine.
electrolux Contents Safety Disposal Environmental tips Appliance description Control panel Prior to using for the first time Sorting and preparing laundry Starting up for the first time Iron AidTM - Steam-System Overview of Iron AidTM programmes Starting an Iron AidTM programme Drying Overview of drying programmes Starting a drying programme Cleaning and maintenance What to do if… Technical data Consumption values 5 7 8 9 10 12 12 13 14 16 21 23 23 27 28 36 38 38 Installation safety instructions Removi
safety electrolux 5 Important: Only operate the Iron Aid programmes with distilled water! Mains water causes damage to the appliance. Safety Before first starting up • Note the ”Installation and connection instructions” • Important! The appliance must be moved in vertical position for transport. • Before first starting up, check the machine for any damage incurred during transport. Never connect up a damaged machine. If parts are damaged, contact your supplier.
electrolux safety • Only fill the water reservoir with distilled water. Do not use tap water or any additives! The condensed water from this appliance’s condensed water container can also be used, if it is filtered first (e. g. with a coffee filter). • Clean the heat exchanger regularly. • With stacked washer and Iron Aid appliance: Do not place objects on the appliance. These may fall off during operation. • The covering bonnet of the bulb for the drum light must be screwed down tightly.
disposal electrolux 7 Disposal Packaging material The packaging materials are environmentally friendly and can be recycled. The plastic components are identified by markings, e.g. >PE<, >PS<, etc. Please dispose of the packaging materials in the appropriate container at the community waste disposal facilities. Old appliance W The symbol on the product or on its packaging indicates that this product may not be treated as household waste.
electrolux environmental tips Environmental tips • During the drying process, laundry becomes fluffy and soft. Fabric softeners are not therefore needed when washing. • Condensed water can be used for iron aid programmes after beeing filtered. • Your appliance will function most economically if you: – spin the laundry well before drying. Example: Consumption data – depending on spinning speed – for 6kg of laundry, dried using the COTTON CUPBOARD (ALGODÓN SECO ARMARIO) programme.
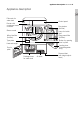
appliance description electrolux 9 Appliance description Filler neck for water tank Drawer with condensed water container Control panel Fine strainer (lint filter) Steam nozzle Lamp for inside light Micro-fine filter (lint filter) Large mesh filter (lint filter) Button for opening door in plinth Type plate Heat exchanger Loading door (interchangeable stop) Door in plinth Drainage hose for water tank Air slots Screwed feet (with height adjustment)
electrolux control panel Control panel Programme knob and On/Off switch Display DELAY TIMER button Function buttons Maintenance displays - HEAT EXCHANGER - CLEAN FILTER - CONTAINER START/PAUSE-button What is shown in the display Start time preselection LOAD (CARGA) Iron Aid programme Drying DRYNESS (GRADO DE SECADO) DELICATE (DELICADO) Cooling Anticrease BUZZER (ALARMA) Steam display Child safety device Degree of dryness Display Water tank indicator Start time / programme duration displa
control panel electrolux 11 Function overview: Iron AidTM Steam System IRON AID DRYING Programmes Laundry type This appliance can be used both as a dryer and to condition clothes (Iron Aid) to treat garments using steam. When it is operating as a dryer, there are 9 available programmes.
electrolux prior to using for the first time Prior to using for the first time IIn order to remove any residues which may have been produced during production, wipe the dryer drum with a damp cloth or carry out a brief drying cycle ( TIME (TIEMPO) programme of 30 min.) with damp cloths in the machine. 1. Turn the programme knob to TIME (TIEMPO). 2. Press the TIME (TIEMPO) button repeatedly until 0.30 appears in the display. 3. Press the START/PAUSE (INICIO/ PAUSA) button.
starting up for the first time electrolux 13 Special notes about Iron Aid • The following textiles cannot be treated using an Iron Aid programme: woollen knitwear, leather, textiles with large metal, wooden or plastic parts, textiles with rusting metal parts, oilskins or wax cotton garments. • To smooth or freshen laundry with an Iron Aid programme, sort laundry by size, weight, material and colour. Only smooth textiles together that are similar in terms of size, weight, material and colour.
electrolux iron aidTM - steam-system Iron AidTM - Steam-System Fill water tank You must fill up the water tank before using an Iron Aid programme for the first time. Use the distilled water provided if there is not yet any condensed water from previous drying programmes (see chapter on ‘Cleaning and Maintenance, Emptying condensed water container’).
iron aidTM - steam-system electrolux 15 2. Fill with distilled water from the canister provided, up to the MAX mark inside the container. 3. Push filler neck and drawer with condensed water container back in. When dry, all textiles not specifically prohibited in the chapter ‘Sorting and preparing laundry’ may be treated with the Iron Aid Steam System. Wet textiles may only be treated if they are labelled as suitable for dry programmes.
electrolux overview of iron aidtm programmes Additional functions BUZZER (ALARMA) Application/properties LOAD (CARGA) Programmes Max. load * (Weight when dry) Overview of Iron AidTM programmes COTTON (ALGODÓN) 1,0kg • • For 1- 5 cotton shirts. Min. 80% natural fibres (cotton, linen etc). wet, dry SYNTHETICS (SINTÉTICOS) 1.0kg • • For 1- 5 synthetic shirts. Max. 20% natural fibres (cotton, linen etc). wet, dry COTTON (ALGODÓN) 3,0kg • • For smoothing cotton garments. Min.
overview of iron aidtm programmes electrolux 17 Programme COTTON (ALGODÓN) SYNTHETICS (SINTÉTICOS) COTTON (ALGODÓN) SYNTHETICS (SINTÉTICOS) REFRESH (VENTILACIÓN) LOAD (CARGA) Loading volume MIN 1 - 2 items MED 3 - 4 items MAX 5 items MIN 1 - 2 items MED 3 - 4 items MAX 5 items MIN 0.5 - 1 kg MED 1 - 2 kg MAX 2 - 3 kg MIN 0,2 - 0,5 kg MED 0.5 - 1 kg MAX 1 – 1.
electrolux overview of iron aidtm programmes Selecting the programme Use the programme selector to set the programme you require. The estimated programme duration without drying cycle (in minutes) appears in the display. Select steam level (LOAD - CARGA) To achieve the best results, different steam levels are required for different volumes of laundry. The LOAD (CARGA) button is used to set the required steam level: MIN, MED or MAX.
overview of iron aidtm programmes electrolux 19 Important: If in doubt, always select a lower steam level first until you have more experience with load volumes, fabric types and the corresponding optimum steam level. If too high a steam level is selected, garments may lose their shape. If too low a steam level is selected, creases may remain.
electrolux overview of iron aidtm programmes Delay timer With the DELAY (INICIO DIFERIDO) button, you can delay the start of a programme by between 30 minutes (30') and a maximum of 20 hours (20h). 1. Select the programme and additional functions. 2. Press the DELAY (INICIO DIFERIDO) button as many times as necessary until the required start delay appears on the display, e.g. 12h if the programme is to be started in 12 hours.
starting an iron aidtm programme electrolux 21 Starting an Iron AidTM programme Press the START/PAUSE (INICIO/PAUSA) button. The programme is started. First, the drying phase indicator appears in the display. The display will also show the programme duration for the selected Iron Aid programme, not including the additional drying phase. With wet laundry, after a few minutes the appliance will show the correct programme duration for the Iron Aid programme including the preceding drying programme.
electrolux starting an iron aidtm programme Iron Aid programme complete / removing laundry After the Iron Aid phase has ended, 0.00 is illuminated and the message ANTICREASE appears in the display. If the BUZZER (ALARMA) has been activated, an audible signal sounds at regular intervals. The Iron Aid programme is automatically followed by an anti-crease phase, including brief steam phases, which lasts around 90 minutes. The drum rotates during the anti-crease phase.
drying electrolux 23 Drying Overview of drying programmes COTTON (ALGODÓN) SYNTHETICS (SITÉTICOS) DAMP (SEMISECO) SPECIAL (ESPECIAL) DAMP (SEMISECO) mn • Thorough drying of thick or multilayered fabrics, e.g. terry towelling items, bathrobes. 6kg • • • Thorough drying of fabrics of even m n thicknesses, e.g. terry towelling items, knitwear, towels. 6kg • • • For normal thickness cotton or lin- m n en laundry, e.g.
electrolux overview of drying programmes Selecting the programme Use the programme selector to set the programme you require. The probable programme run time is displayed (in minutes) on the multidisplay. Selecting additional functions You can choose from the additional functions DRYNESS (GRADO DE SECADO), DELICATE (DELICADO), BUZZER (ALARMA) and TIME (TIEMPO) (if a TIME (TIEMPO) programme has been selected). The symbols of the functions available for the selected programme are shown in the display.
overview of drying programmes electrolux 25 Caution: Make sure that by selecting the DRYNESS (GRADO DE SEC.) function, you do not over-dry your wool or silk. DELICATE (DELICADO) For especially gentle drying of sensitive fabrics with the l care label and for temperature-sensitive textiles (e.g. acrylic, viscose). Programme is executed with reduced heat. DELICATE (DELICADO) is only suitable for use with loads of up to 3kg. 1. Press the DELICATE (DELICADO) button. The DELICATE symbol appears in the display.
electrolux overview of drying programmes TIME (TIEMPO) To select the programme duration after setting the TIME (TIEMPO) programme. You can select a programme duration from 10 mins to 3 hrs in 10minute steps. 1. Turn the programme knob to the TIME (TIEMPO) programme. The display will show 0.10 (corresponding to the COOLING programme). 2. Press the TIME button repeatedly until the desired programme duration is shown in the display, e.g. 00.20 for a programme of 20 minutes.
starting a drying programme electrolux 27 Starting a drying programme Press the START/PAUSE (INICIO/PAUSA) button. The programme is started. The programme progress display shows drying progress. The symbols for DRYING and COOLING appear in the display one after the other. The number of droplets in the dryness indicator gradually goes down as the drying process progresses.
electrolux cleaning and maintenance Cleaning and maintenance Cleaning lint filters To ensure that the appliance works perfectly, the lint filters in the door and in front of the drum must be cleaned after every Iron Aid or drying cycle. Important Never operate the dryer without the lint filter or with a damaged or blocked lint filter. 1. Open the door. 2. Use a damp hand to clean the lint filter, which is built into the lower part of the loading aperture. 3.
cleaning and maintenance electrolux 29 Cleaning the filter area The filter area does not have to be cleaned after every drying cycle, but should be checked regularly and cleaned of fluff, if necessary. You will need to undertake the following (to clean the filter area: 1. Remove lint filter (see chapter on ‘Cleaning lint filters’). 2. Remove fluff from the entire filter area. It is best to use a vacuum cleaner for this purpose. 3. Replace the filter. Clean the door seal.
electrolux cleaning and maintenance Emptying the condensed water container Empty condensed water container after every drying cycle. If the condensate tank is full, an active programme will break off automatically and the CONTAINER display will light up. In order to continue the programme, the condensed water container must first be emptied. Warning! The condensate is not suitable for drinking or for preparing foodstuffs. 1.
cleaning and maintenance electrolux 31 4. The condensed water be used as distilled water, e.g. for steam irons. However, first filter the condensed water to remove any residues and small pieces of fluff. Using the attached canister to filter: Pour the water out of the container straight through the filter at the top of the canister. Fill water tank You must fill up the water tank before using an Iron Aid programme for the first time.
electrolux cleaning and maintenance 2. Fill with distilled water from the canister provided, up to the MAX mark inside the container. 3. Push filler neck and drawer with condensed water container back in. The water tank has a volume of approx. 1.3 litres. This is sufficient for around 4 – 10 Iron Aid programmes with garment steaming, depending on the selected volume of steam, programme and the corresponding steam phases during the crease guard phase.
cleaning and maintenance electrolux 33 Emptying the water tank for long periods of disuse If Iron Aid programmes are not run for more than three weeks, the tank should be emptied and refilled with fresh distilled water if required. 1. Open door in plinth in front of heat exchanger (see chapter on ‘Cleaning the heat exchanger’) and place a collecting container in front of the appliance. 2. Pull out the drainage hose underneath the heat exchanger (1). 3.
electrolux cleaning and maintenance Cleaning heat exchanger If the HEAT EXCHANGER display is illuminated, the heat exchanger needs to be cleaned. Caution! Operating when the heat exchanger is clogged with lint can damage the appliance. This also increases energy consumption. 1. Open loading door 2. Open base door. To do this, press the release button located beneath the loading aperture and open the base door to the left. 3. Remove lint from the inside of the door and the heat exchange chamber.
cleaning and maintenance electrolux 35 Cleaning the drum Caution! Do not use sharp objects to clean the heat exchanger. You could damage it an cause leaks. 7. Clean heat exchanger. It is best to use a brush or to rinse thoroughly with a shower head. 8. Replace heat exchanger and lock into place (turn both lock washers outwards until they snap into place). 9. Close base door. The appliance will not operate if the HEAT EXCHANGER indicator is still lit.
electrolux what to do if… What to do if… Remedying small malfunctions If, during operation, the error code (E plus number or letter) appears on the multi-display: Switch the appliance off and on again. Reset programme. Press the START/PAUSE (INICIO/PAUSA) button. Problem Washing machine does not work. Drum light is not working. If the error appears again, please contact the Customer Care Department, stating the error code. Possible cause Plug in at mains socket.
what to do if… electrolux 37 Problem Possible cause Remedy Wrong programme selected. Select a different programme the next time you dry (see section “Overview of programmes”). Lint filter blocked. Clean lint filter. Heat exchanger blocked with fluff. Clean heat exchanger. Incorrect amount of washing. Drying results unsatisfacVentilation slots in base area tory. covered up. Residue on inside surface of drum or drum paddles. Observe recommended loads. Uncover ventilation slots in base area.
electrolux technical data Technical data 5 This appliance conforms with the following EU Directives: – 73/23/EEC dated 19.02.1973 Low Voltage Directive – 89/336/EEC dated 03.05.1989 EMC Directive inclusive of Amending Directive 92/31/EEC – 93/68/EEC dated 22.07.1993 CE Marking Directive Height x width x depth 85 x 60 x 60 cm Depth with loading door open 109 cm Height can be adjusted by 1.5 cm Weight when empty Load (depends on programme) approx. 46kg 1) max.
installation safety instructions electrolux 39 Installation safety instructions • Important! The appliance must be moved in vertical position for transport. • Before first starting up, all parts of the transport safety equipment must be removed. The machine may otherwise be damaged. • The appliance must not be built-in.
electrolux removing transport safety equipment Removing transport safety equipment Caution! Before first starting up, all parts of the transport safety equipment must be removed. 1. Open loading door 2. Pull off adhesive strips from inside machine on top of drum. 3. Remove foil hose and polystyrene padding from the machine.
special accessories electrolux 41 Levelling the appliance Door reversal instructions The four feet of the appliance are preadjusted. Large degrees of unevenness can be compensated for by individually adjusting the height adjustable screw feet. To do this lift the appliance and turn the adjustable feet in or out. Important Do not use pieces of wood, cardboard or such like to level out unevenness in the floor, but adjust the height adjustable screw feet instead.
electrolux guarantee/customer service Guarantee/Customer Service European Guarantee This appliance is guaranteed by Electrolux in each of the countries listed at the back of this user manual, for the period specified in the appliance guarantee or otherwise by law.
service electrolux 43 Service In the event of technical faults, please first check whether you can remedy the problem yourself with the help of the operating instructions (section “What to do if…”). If you were not able to remedy the problem yourself, please contact the Customer Care Department or one of our service partners. In order to be able to assist you quickly, we require the following information: – Model description – Product number (PNC) – Serial number (S No.
electrolux Bienvenido al mundo Electrolux Gracias por elegir un producto Electrolux de primera clase, el cual esperamos le proporcione una gran satisfacción en el futuro. Electrolux ambiciona ofrecerle una amplia variedad de productos de calidad que haga su vida más cómoda. Usted encontrará algunos ejemplos en la portada de este manual. Por favor, tómese unos minutos para estudiar este manual de modo que pueda aprovecharse de los beneficios de su nueva máquina.
electrolux 45 Índice de materias Seguridad Eliminación de desechos Consejos para la protección del medio ambiente Descripción del aparato Panel de mando Antes de la primera puesta en servicio Clasificar y preparar la ropa Puesta en marcha Sistema de vapor Iron AidTM Resumen de programas Iron Aid Iniciar el programa Iron Aid Secado Resumen de programas de secado Iniciar el programa de secado Limpieza y mantenimiento Qué hacer cuando...
electrolux seguridad Atención: ¡Los programas Iron Aid sólo se deben utilizar con agua destilada! El agua del grifo origina daños en el aparato. Seguridad Antes de la primera puesta en servicio • Observe las “Instrucciones de instalación y conexión”. • ¡Atención! El aparato sólo se debe transportar en posición vertical. • Antes de la puesta en servicio, examine el aparato con respecto a daños de transporte. Un aparato defectuoso no se debe conectar bajo ningún concepto.
seguridad electrolux 47 • Los objetos explosivos (como son los encendedores, los aerosoles, etc.) no deben introducirse en el aparato junto con la ropa. Existe el riesgo de incendio o de explosión. • Si utiliza kits de limpieza en seco, utilice únicamente productos en los que el fabricante haya reconocido la compatibilidad para el uso en secadora. • Los agentes ablandadores y productos similares sólo deben utilizarse conforme a sus instrucciones correspondientes.
electrolux eliminación de desechos • No se apoye en la puerta cuando esté abierta, pues el aparato podría volcarse. • Una vez finalizado el programa de secado y alisado (Iron Aid), la ropa y el tambor pueden estar calientes. Existe, pues, el peligro de sufrir quemaduras, por lo que deberá tener cuidado al extraer las prendas. • Tenga cuidado al interrumpir el programa Iron Aid: no abra la puerta del aparato durante la fase de vaporización. El vapor caliente puede provocar quemaduras.
consejos para la protección del medio ambiente electrolux 49 Consejos para la protección del medio ambiente • Durante el secado, la ropa queda suave y esponjosa. Por esta razón, no es necesario el uso de suavizante en el lavado. • Se puede utilizar agua de condensación filtrada para los programas Iron Aid. • El aparato funciona de manera más económica en los programas de secado si: – se centrifuga bien la ropa antes del secado.
electrolux descripción del aparato Descripción del aparato Valvula de llenado para el depósito de agua Panel de mando Cajón con depósito para el agua de condensación Filtro fino (filtro de pelusa) Tobera de vapor Lámpara para la iluminación interior Filtro microfino (filtro de pelusa) Placa de características Condensador Filtro grueso (filtro de pelusa) Tecla para abrir la puerta del zócalo Puerta del zócalo Puerta de carga (lado de apertura reversible) Manguera de vaciado para el depósito de
panel de mando electrolux 51 Panel de mando Programador e interruptor ON/OFF Display Tecla de preselección de la hora de inicio Teclas de función Indicadores de mantenimiento - CONDENSADOR - FILTRO - DEPÓSITO Tecla INICIO/PAUSA Indicadores en el display Preselección de la hora de inicio CARGA Programa Iron Aid Enfriamiento Secado Protección antiarrugas Indicador del grado de secado Indicador del depósito de agua GRADO DE SECADO DELICADO Indicador de evaporación ALARMA Seguro contra la manipu
electrolux panel de mando Resumen de funciones del sistema de vapor Iron AidTM IRON AID SECADO Programas Características de la ropa Este aparato se puede utilizar como secadora y aparato de mantenimiento (Iron Aid) para tratar la ropa aplicando vapor. En la función de secadora hay 9 programas disponibles.
antes de la primera puesta en servicio electrolux 53 Antes de la primera puesta en servicio Para eliminar posibles residuos de fabricación, limpie el tambor del aparato con un paño húmedo o realice un secado corto (programa TIEMPO, 30 min.) con trapos húmedos. 1. Coloque el programador en el programa TIEMPO. 2. Pulse la tecla TIME hasta que aparezca 0.30 en el display. 3. Pulse la tecla INICIO/PAUSA.
electrolux puesta en marcha • Para alisar o refrescar la ropa en los programas Iron Aid, clasificarla según el tamaño, peso, material y color: Alise juntas sólo aquellas prendas de tamaño, peso, material y color similar. • No alise prendas de color nuevas junto con prendas de color claro. Los materiales textiles pueden desteñir (compruebe la solidez del color bajo la influencia de la humedad en un lugar poco visible). • No utilice juegos de limpieza en seco (dry cleaning sets, p.ej.
sistema de vapor iron aidTM electrolux 55 Sistema de vapor Iron AidTM Rellenar el depósito de agua Antes de la primera puesta en servicio de un programa Iron Aid, se debe rellenar primero el depósito de agua. Para ello, utilice el agua destilada suministrada adjunta si no hay agua de condensación disponible de los programas anteriores de secado (véase el capítulo “Limpieza y mantenimiento, Vaciar el depósito para el agua de condensación”).
electrolux sistema de vapor iron aidTM 2. Llene el depósito de agua destilada hasta la marca MÁX con la jarra que se suministra adjunta. 3. Vuelva a introducir la valvula de llenado y el cajón con el depósito para el agua de condensación. Todas las prendas que no se hayan excluido en el capítulo “Clasificar y preparar la ropa” se pueden tratar en seco con el sistema de vapor Iron Aid. Las prendas húmedas sólo se deben tratar si son aptas para programas de secado.
resumen de programas iron aid electrolux 57 Funciones adicionales ALARMA Aplicación/características CARGA Programas Carga máx. * (peso en seco) Resumen de programas Iron Aid ALGODÓN 1,0kg • • Para 1 - 5 camisas de algodón. Mín. 80% fibras naturales (algodón, lino, etc.). húmeda, seca SINTÉTICOS 1,0kg • • Para 1 - 5 camisas sintéticas. Máx. 20% fibras naturales (algodón, lino, etc.). húmeda, seca ALGODÓN 3,0kg • • Para alisar ropa de algodón. Mín.
electrolux resumen de programas iron aid Programa ALGODÓN SINTÉTICOS ALGODÓN SINTÉTICOS VENTILACIÓN CARGA Carga MIN 1 - 2 unidades MED 3 - 4 unidades MAX 5 unidades MIN 1 - 2 unidades MED 3 - 4 unidades MAX 5 unidades MIN 0,5 - 1 kg MED 1 - 2 kg MAX 2 - 3 kg MIN 0,2 - 0,5 kg MED 0,5 - 1 kg MAX 1 - 1,5 kg MIN 1 pantalón MED 1 chaqueta MAX 1 traje Toda la información sobre la selección del nivel de evaporación (CARGA) y de la carga correspondiente son únicamente suger
resumen de programas iron aid electrolux 59 Seleccionar el programa Ajuste el programa Iron Aid deseado con el programador. En el display múltiple aparece la duración prevista del programa sin proceso de secado (en minutos). Seleccionar el nivel de evaporación (CARGA) En función de las diferentes cargas de ropa se necesitan distintos niveles de evaporación para obtener los mejores resultados. Con la tecla CARGA se puede ajustar el nivel de evaporación necesario MIN, MED o MAX.
electrolux resumen de programas iron aid ¡Atención! En caso de duda, seleccione primero un nivel de evaporación más bajo hasta que tenga suficiente experiencia con la cantidad de carga, el tipo de tejidos y el nivel de evaporación óptimo correspondiente. Si el nivel de evaporación es excesivo, se pueden producir deformaciones y, si es insuficiente, pueden quedar arrugas en la ropa.
resumen de programas iron aid electrolux 61 Preselección de la hora de inicio Con la tecla INICIO DIFERIDO puede retrasar el inicio de un programa en 30 minutos (30') hasta máx. 20 horas (20H). 1. Seleccione el programa y las funciones adicionales. 2. Pulse la tecla INICIO DIFERIDO las veces que sean necesarias hasta que el retardo deseado se indique en el display múltiple, p.ej. 12H si el programa se debe iniciar al cabo de 12 horas.
electrolux iniciar el programa iron aid Iniciar el programa Iron Aid Pulse la tecla INICIO/PAUSA. El programa se inicia. En el display aparece primero el indicador de la fase de secado. Además, se indica la duración del programa Iron Aid ajustado sin fase de secado adicional. Si la ropa está húmeda, el aparato indica la duración correcta del programa Iron Aid, incluyendo el programa de secado conectado previamente, al cabo de unos minutos.
iniciar el programa iron aid electrolux 63 Programa Iron Aid finalizado/retirar la ropa Al final de la fase Iron Aid se iluminan 0.00 y el indicador PROTECCIÓN ANTIARRUGAS en el display. Si se ha activado ALARMA, suena una señal acústica en intervalos. Después de los programas Iron Aid se inicia automáticamente una fase antiarrugas con una duración de aprox. 90 minutos con breves fases de evaporación. El tambor gira durante la fase antiarrugas. De este modo, la ropa se mantiene suelta y sin arrugas.
electrolux secado Secado Resumen de programas de secado Carga máx. (peso en seco) ALARMA DELICADO GRADO DE SECADO 6kg • • • Secado completo de prendas grue- m n sas o de varias capas, p.ej. prendas de rizo o albornoces. SECO ARMARIO 6kg • • • Secado completo de prendas de un m n grueso uniforme, p.ej. prendas de rizo, prendas de punto, toallas. 6kg • • • Para prendas de algodón o lino de m n grosor normal, p.ej. ropa de cama o mantelería.
resumen de programas de secado electrolux 65 Seleccionar el programa Ajuste el programa de secado deseado con el programador. En el display múltiple aparece la duración prevista del programa (en minutos). Seleccionar funciones adicionales Se encuentran disponibles las funciones adicionales GRADO DE SECADO, DELICADO, ALARMA y TIEMPO (si se ha seleccionado un programa TIEMPO). En el display aparecen los símbolos de las funciones disponibles según el programa seleccionado.
electrolux resumen de programas de secado Precaución: ¡Tenga cuidado de no secar excesivamente la lana o la seda con la función GRADO DE SECADO ajustada! DELICADO Para el secado especialmente suave de tejidos delicados con el símbolo de cuidados requeridos l, así como para materiales textiles sensibles al calor (p.ej. acrilo, viscosa). El programa se ejecuta con una menor potencia calorífica. ¡DELICADO sólo tiene sentido con una carga de hasta 3kg! 1. Pulse la tecla DELICADO.
resumen de programas de secado electrolux 67 TIEMPO Para seleccionar la duración del programa después de ajustar el programa TIEMPO. Se pueden seleccionar duraciones del programa de 10 min. a 3 h en intervalos de 10 minutos. 1. Coloque el programador en el programa TIEMPO. 0.10 aparece en el display (que corresponde al programa ENFRIAMIENTO). 2. Pulse la tecla TIME hasta que se indique la duración deseada del programa en el display, p.ej. 00.20 para una duración del programa de 20 minutos.
electrolux iniciar el programa de secado Iniciar el programa de secado Pulse la tecla INICIO/PAUSA. El programa se inicia. El indicador de ciclo de programa muestra el progreso del secado. Los símbolos de SECADO y ENFRIAMIENTO se iluminan de manera consecutiva en el display; la cantidad de gotas en el indicador del grado de secado disminuye según avanza el secado.
limpieza y mantenimiento electrolux 69 Limpieza y mantenimiento Limpiar los filtros de pelusa Para garantizar un funcionamiento impecable del aparato, después de cada programa de secado o Iron Aid se deben limpiar los filtros de pelusa situados en la puerta y delante del tambor. ¡Atención! El aparato no se debe utilizar nunca sin filtros de pelusa o con filtros de pelusa atascados o dañados. 1. Abra la puerta de carga. 2.
electrolux limpieza y mantenimiento Limpiar la zona de los filtros La zona de los filtros no se necesita limpiar después de cada secado, pero se debería controlar regularmente y, dado el caso, limpiar. Siga los siguientes pasos para limpiar la zona de los filtros: 1. Retire el filtro de pelusa (véase el capítulo “Limpiar los filtros de pelusa”). 2. Retire la pelusa de toda la zona de los filtros, a ser posible con la ayuda del aspirador. 3. Vuelva a colocar el filtro de pelusa.
limpieza y mantenimiento electrolux 71 ¡Advertencia! El agua de condensación no es potable ni apta para la preparación de alimentos. 1. Retire el cajón con el depósito para el agua de condensación por completo (1) y levante la valvula de salida del depósito para el agua de condensación hasta el tope (2). 2. Vierta el agua de condensación en una cubeta o recipiente similar. 3. Introduzca la valvula de salida y vuelva a insertar el depósito para el agua de condensación.
electrolux limpieza y mantenimiento Rellenar el depósito de agua Antes de la primera puesta en servicio de un programa Iron Aid, se debe rellenar primero el depósito de agua. Para ello, utilice el agua destilada suministrada adjunta si no hay agua de condensación disponible de los programas anteriores de secado (véase el capítulo “Limpieza y mantenimiento, Vaciar el depósito para el agua de condensación”).
limpieza y mantenimiento electrolux 73 2. Llene el depósito de agua destilada hasta la marca MÁX con la jarra que se suministra adjunta. 3. Vuelva a introducir la valvula de llenado y el cajón con el depósito para el agua de condensación. El depósito de agua tiene una capacidad de aprox. 1,3 litros, que son suficientes para unos 4-10 programas Iron Aid con evaporación para la ropa, según la cantidad de vapor seleccionada, el programa y las fases de evaporación correspondientes durante la fase antiarrugas.
electrolux limpieza y mantenimiento Vaciado del depósito de agua en interrupciones prolongadas del funcionamiento Si no se ejecuta ningún programa Iron Aid durante un periodo superior a tres semanas, se debe vaciar el depósito y, si fuera necesario, rellenar con agua fresca destilada. 1. Abra la puerta del zócalo delante del condensador (véase el cap. “Limpiar el condensador”) y coloque la bandeja colectora delante del aparato. 2.
limpieza y mantenimiento electrolux 75 Limpiar el condensador Cuando se enciende el indicador CONDENSADOR, se tiene que limpiar el condensador. ¡Atención! El uso con el condensador lleno de pelusa puede dañar el aparato. Además, aumenta el consumo de energía. 1. Abra la puerta de carga. 2. Abra la puerta del zócalo: para este fin, pulse la tecla de desbloqueo en el lado inferior del orificio de carga y abra la puerta del zócalo hacia la izquierda. 3.
electrolux limpieza y mantenimiento Limpiar el tambor ¡Atención! No utilice objetos puntiagudos para la limpieza. El condensador podría perder su estanqueidad. 7. Limpie el condensador. A ser posible, utilice un cepillo de mano o aclare fuertemente con una ducha de mano. 8. Vuelva a insertar el condensador y bloquéelo (gire ambos pestañas de seguridad hacia el exterior hasta que encajen). 9. Cierre la puerta del zócalo. El aparato no funciona mientras el indicador CONDENSADOR esté encendido.
qué hacer cuando... electrolux 77 Qué hacer cuando... Eliminación de pequeñas averías por su cuenta Si, durante el funcionamiento, se muestra un código de error (E y un número o una letra) en el display múltiple: desconecte y conecte el aparato. Vuelva a ajustar el programa. Pulse la tecla INICIO/PAUSA. Problema Si vuelve a aparecer el error, llame al Servicio postventa, indicando el código de error. Posible causa Corrección El enchufe de red está desco- Conecte el enchufe de red.
electrolux qué hacer cuando... Problema Posible causa Corrección En el siguiente secado, seleccione Se ha seleccionado un prograotro programa (véase el capítulo ma inadecuado. “Resumen de programas”). Filtros de pelusa atascados. Limpie los filtros de pelusa. Condensador atascado con pelusa. Limpie el condensador. Carga incorrecta. El resultado de secado no Ranuras de ventilación en la es satisfactorio. zona del zócalo tapadas. Incrustaciones en el interior o en las aletas del tambor.
qué hacer cuando... electrolux 79 Problema El secado dura más de lo habitual. Nota: Al cabo de hasta 5 horas, el secado termina automáticamente (véase “Secado terminado”). Variaciones de color Posible causa Corrección Filtros de pelusa atascados. Limpie los filtros de pelusa. Condensador atascado con pelusa. Limpie el condensador. Tecla DELICATE pulsada y carga demasiado grande. ¡DELICADO sólo tiene sentido con una carga de hasta 3kg! Carga demasiado grande. Reduzca la carga.
electrolux datos técnicos Datos técnicos 5 Este aparato es conforme a las siguientes directivas CE: – 73/23/CEE del 19.02.1973 Directiva de Baja Tensión – 89/336/CEE del 03.05.89 “Directiva de Compatibilidad Electromagnética”, incluyendo Directiva de modificación 92/31/CEE – 93/68/CEE del 22.07.93 Directiva de Marcación CE Alto x Ancho x Fondo 85 x 60 x 60 cm Profundidad con la puerta de carga abierta 109 cm Ajuste de altura 1,5 cm Peso en vacío aprox.
indicaciones de seguridad para la instalación electrolux 81 Indicaciones de seguridad para la instalación • ¡Atención! El aparato sólo se debe transportar en posición vertical. • Antes de la puesta en servicio se tienen que quitar todos los elementos del seguro de transporte. De lo contrario, el aparato puede sufrir daños. • El aparato no se debe empotrar.
electrolux quitar el seguro de transporte Quitar el seguro de transporte ¡Atención! ¡Antes de la puesta en servicio es absolutamente necesario retirar todos los elementos del seguro de transporte! 1. Abra la puerta de carga: 2. Retire la cinta adhesiva en el interior en el lado superior del tambor. 3. Retire la bolsa de plastico con el expanso del aparato. . Conexión eléctrica Datos sobre la tensión de red, el tipo de corriente y el fusible necesario figuran en la placa de características.
accesorios especiales electrolux 83 Alinear el aparato Las cuatro patas del aparato vienen ya ajustadas previamente. Las grandes irregularidades se pueden compensar ajustando individualmente los pies roscados regulables en altura. Para ello, levante un poco el aparato y enrosque o desenrosque los pies roscados regulables. ¡Atención! No compense las irregularidades del suelo colocando madera, cartón o materiales similares, sino ajustando los pies roscados regulables en altura.
electrolux garantía/servicio postventa Garantía/Servicio postventa España Condiciones de Garantía: ELECTROLUX HOME PRODUCTS ESPAÑA, S.A.
garantía/servicio postventa electrolux 85 Garantía Europea Este aparato está garantizado por Electrolux en cada uno de los países indicados en la parte posterior de este manual durante el periodo especificado en la garantía del aparato o el periodo que prevea la ley.
electrolux servicio posventa Servicio posventa En caso de fallos técnicos, compruebe primero si puede corregir el problema por sí mismo con la ayuda de las instrucciones de uso (capítulo "Qué hacer cuando…"). Si esto no fuera posible, sírvase consultar al Servicio postventa o a una de nuestras delegaciones de servicio técnico.
www.electrolux.com www.electrolux.