EEC44549OK EEC44549OX EN Oven User Manual
www.electrolux.com CONTENTS 1. SAFETY INFORMATION....................................................................................3 2. SAFETY INSTRUCTIONS..................................................................................4 3. INSTALLATION.................................................................................................. 7 4. PRODUCT DESCRIPTION................................................................................ 9 5. CONTROL PANEL..............................
ENGLISH 1. 3 SAFETY INFORMATION Before the installation and use of the appliance, carefully read the supplied instructions. The manufacturer is not responsible for any injuries or damage that are the result of incorrect installation or usage. Always keep the instructions in a safe and accessible location for future reference. 1.
www.electrolux.com • • • • • • • • • WARNING: The appliance and its accessible parts become hot during use. Care should be taken to avoid touching heating elements. Always use oven gloves to remove or put in accessories or ovenware. Before carrying out any maintenance, disconnect the appliance from the power supply. WARNING: Ensure that the appliance is switched off before replacing the lamp to avoid the possibility of electric shock.
ENGLISH • Height of the front of the appliance 594 mm Height of the back of the appliance 576 mm Width of the front of the appliance 595 mm Width of the back of the appliance 559 mm Depth of the appli‐ ance 569 mm Built in depth of the appliance 548 mm Depth with open door 1022 mm • Ventilation opening minimum size. Opening placed on the bottom rear side 560x20 mm Mains supply cable length.
www.electrolux.com 2.3 Use WARNING! Risk of injury, burns and electric shock or explosion. • • • • • • • • • • • • This appliance is for household use only. Do not change the specification of this appliance. Make sure that the ventilation openings are not blocked. Do not let the appliance stay unattended during operation. Deactivate the appliance after each use. Be careful when you open the appliance door while the appliance is in operation. Hot air can release.
ENGLISH 2.5 Pyrolytic cleaning WARNING! Risk of Injury / Fires / Chemical Emissions (Fumes) in Pyrolytic Mode. • • • • • • Before carrying out a Pyrolitic selfcleaning function or the First Use please remove from the oven cavity: – any excess food residues, oil or grease spills / deposits. Read carefully all the instructions for Pyrolytic cleaning. Keep children away from the appliance while the Pyrolytic cleaning operates.
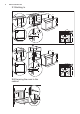
www.electrolux.com 3.1 Building In 548 21 min. 550 80 60 520 600 114 18 20 589 594 min. 560 595+-1 198 60 5 3 523 20 548 70 60 21 min. 550 20 520 18 590 114 min. 560 589 594 198 60 595+-1 5 3 20 3.
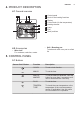
ENGLISH 9 4. PRODUCT DESCRIPTION 4.1 General overview 1 2 3 4 5 5 6 4 8 3 7 2 1 2 3 4 5 6 7 8 Control panel Knob for the heating functions Display Control knob (for the temperature) Heating element Lamp Fan Shelf positions 1 4.2 Accessories • • Wire shelf For cookware, cake tins, roasts. Grill- / Roasting pan To bake and roast or as pan to collect fat. 5. CONTROL PANEL 5.1 Buttons Sensor field / Button Function Description CLOCK To set a clock function. MINUS To set the time.
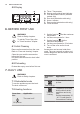
www.electrolux.com 5.2 Display A G F E B D C A. Timer / Temperature B. Heat-up and residual heat indicator C. Core temperature sensor (selected models only) D. Door lock (selected models only) E. Hours / minutes F. Demo mode (selected models only) G. Clock functions 6. BEFORE FIRST USE WARNING! Refer to Safety chapters. 1. Set the function .Set the maximum temperature. 2. Let the oven operate for 1 hour. To set the Time of day refer to "Clock functions" chapter. 3. Set the function .
ENGLISH Oven func‐ tion Pizza Func‐ tion Application To bake pizza. To make intensive browning and a crispy bottom. Oven func‐ tion Moist Fan Baking To bake and roast food on one shelf position. Conventional Cooking Bottom Heat Defrost To bake cakes with crispy bottom and to preserve food. To defrost food (vegeta‐ bles and fruit). The de‐ frosting time depends on the amount and size of the frozen food. Fast Grilling 11 Application This function is de‐ signed to save energy during cooking.
www.electrolux.com 7.3 Setting a heating function 1. Turn the knob for the heating functions to select a heating function. 2. Turn the control knob to select the temperature. The lamp turns on when the oven operates. 3. To turn off the oven, turn the knob for the heating functions to the off position. 7.4 Fast Heat Up The fast heat up decreases the heat up time. Do not put food in the oven when the Fast heat up operates. 1. Turn the knob for the oven functions to set the fast heat up. 2.
ENGLISH 4. Press to confirm or the set time of day will be saved automatically after 5 seconds. The display shows the new time. To change the time of day press again and again until the indicator for the time of day flashes in the display. 8.3 Setting the DURATION function 1. Set a heating function. again and again until 2. Press starts to flash. 3. Press or to set the minutes and then the hours. Press to confirm. When the set Duration time ends the and signal sounds for 2 minutes.
www.electrolux.com 9. USING THE ACCESSORIES WARNING! Refer to Safety chapters. 9.1 Inserting the accessories Deep pan: Push the deep pan between the guide bars of the shelf support. Wire shelf: Push the shelf between the guide bars of the shelf support and make sure that the feet point down. 10. ADDITIONAL FUNCTIONS 10.1 Using the Child Lock When the Child Lock is on the oven cannot be turned on accidentally. 1. Ensure the knob for the oven functions is in the off position. and at the 2.
ENGLISH 15 10.3 Residual heat indicator When you turn off the oven, the display if shows the residual heat indicator the temperature in the oven is more than 40 °C.Turn the knob for the temperature left or right to check the oven temperature. 10.4 Automatic Switch-Off For safety reasons the oven turns off automatically after some time, if a heating function works and you do not change any settings. (°C) (h) 30 - 115 12.5 120 - 195 8.5 200 - 245 5.5 250 - maximum 3 (°C) Pyrolysis (h) 4.
www.electrolux.com To prevent too much smoke in the oven during roasting, add some water into the deep pan. To prevent the smoke condensation, add water each time after it dries up. Cooking times Cooking times depend on the type of food, its consistency, and volume. cookware, recipes and quantities when you use this appliance. 11.2 Inner side of the door On the inner side of the door you can find: • • Initially, monitor the performance when you cook.
ENGLISH 17 CAKES Conventional Cook‐ True Fan Cooking ing (min) (°C) (°C) Muffins, two levels, pre‐ heat the empty oven - - 140 150 2 and 4 25 - 35 Baking tray Muffins, three levels, preheat the empty oven - - 140 150 1, 3 and 5 30 - 45 Baking tray Biscuits 140 3 140 150 3 25 - 45 Baking tray Biscuits, two levels - - 140 150 2 and 4 35 - 40 Baking tray Biscuits, three levels - - 140 150 1, 3 and 5 35 - 45 Baking tray Meringues 120 3 120 3 80 - 100 Baking tray Mering
www.electrolux.com BREAD AND PIZZA Conventional Cooking True Fan Cooking (min) (°C) (°C) White bread, 1 - 2 pieces, 0.5 kg each 190 1 190 1 60 - 70 - Rye bread, preheating is not needed 190 1 180 1 30 - 45 Bread tin Bread rolls, 6 - 8 rolls 190 2 180 2 (2 and 4) 25 - 40 Pizza 230 250 1 230 - 250 1 10 - 20 Baking tray / Deep pan Scones 200 3 190 10 - 20 Baking tray 3 Baking tray Preheat the empty oven. Use the cake mould.
ENGLISH 19 MEAT Conventional Cooking True Fan Cooking (min) (°C) (°C) Beef 200 190 50 - 70 Pork 180 180 90 - 120 Veal 190 175 90 - 120 English roast beef, rare 210 200 50 - 60 English roast beef, medium 210 200 60 - 70 English roast beef, well done 210 200 70 - 75 MEAT Conventional Cook‐ ing True Fan Cooking (min) (°C) (°C) Pork shoulder, with rind 180 2 170 2 120 - 150 Pork shin, 2 pieces 180 2 160 2 100 - 120 Leg of lamb 190 2 175 2 110 - 130 Whole chick
www.electrolux.com FISH Conventional Cooking True Fan Cook‐ ing (min) (°C) (°C) Trout / Sea bream, 3 - 4 fish 190 175 40 - 55 Tuna / Salmon, 4 - 6 fillets 190 175 35 - 60 11.4 Grill Preheat the empty oven. Use the fourth shelf position. Grill with the maximum temperature setting. GRILL (kg) (min) 1st side (min) 2nd side Fillet steaks, 4 pieces 0.8 12 - 15 12 - 14 Beef steak, 4 pieces 0.6 10 - 12 6-8 Sausages, 8 - 12 - 15 10 - 12 Pork chops, 4 pieces 0.
ENGLISH 21 LAMB BEEF (°C) (°C) (min) (min) Roast beef or fil‐ let, rare 190 - 200 5 - 6 Lamb leg / Roast 150 - 170 100 - 120 lamb, 1 - 1.5 kg Roast beef or fil‐ let, medium 180 - 190 6 - 8 Lamb saddle, 1 - 160 - 180 40 - 60 1.5 kg Roast beef or fil‐ let, well done 170 - 180 8 - 10 POULTRY PORK (°C) (°C) (min) Shoulder / Neck / 160 - 180 90 - 120 Ham joint, 1 - 1.5 kg Chops / Spare rib, 1 - 1.5 kg 170 - 180 60 - 90 Meatloaf, 0.
www.electrolux.com 11.6 Defrost (kg) Defrosting time (min) Further defrost‐ ing time (min) Chicken 1 100 - 140 20 - 30 Place chicken on an upturned saucer placed on a large plate. Turn halfway through. Meat 1 100 - 140 20 - 30 0.5 90 - 120 Turn halfway through. Cream 2 x 0.2 80 - 100 10 - 15 Cream can also be whipped when still slightly frozen in places. Trout 0.15 25 - 35 10 - 15 - Strawberries 0.3 30 - 40 10 - 20 - Butter 0.25 30 - 40 10 - 15 - Gateau 1.
ENGLISH 23 11.8 Moist Fan Baking recommended accessories FRUIT Use the dark and non-reflective tins and containers. They have better heat absorption than the light colour and reflective dishes. (h) Apple slices 6-8 Pears 6-9 Ramekins Pizza pan Baking dish Dark, non-reflective 28 cm diameter Dark, non-reflective 26 cm diameter Ceramic 8 cm diame‐ ter, 5 cm height Flan base tin Dark, non-reflective 28 cm diameter 11.
www.electrolux.com (°C) (min) Victoria sand‐ wich baking dish on wire shelf 170 2 40 - 50 Poached fish, 0.3 kg baking tray or dripping 180 pan 3 20 - 25 Whole fish, 0.2 kg baking tray or dripping 180 pan 3 25 - 35 Fish fillet, 0.3 kg pizza pan on wire shelf 180 3 25 - 30 Poached meat, 0.25 kg baking tray or dripping 200 pan 3 35 - 45 Shashlik, 0.
ENGLISH (°C) (min) 25 Small cakes, 20 per tray Conven‐ Baking tional Cook‐ tray ing 3 170 20 - 30 - Small cakes, 20 per tray True Fan Cooking Baking tray 3 150 160 20 - 35 - Small cakes, 20 per tray True Fan Cooking Baking tray 2 and 4 150 160 20 - 35 - Apple pie, 2 tins Ø20 cm Conven‐ Wire tional Cook‐ shelf ing 2 180 70 - 90 - Apple pie, 2 tins Ø20 cm True Fan Cooking Wire shelf 2 160 70 - 90 - Sponge cake, cake mould Ø26 cm Conven‐ Wire tional Cook‐ shelf ing 2 170
www.electrolux.com Toast, 4 -6 pieces Grill Beef bur‐ Grill ger, 6 pieces, 0.6 kg (°C) (min) 4 max. 2 - 3 minutes Preheat the oven first side; 2 - 3 for 3 minutes. minutes sec‐ ond side Wire 4 shelf and dripping pan max. 20 - 30 Wire shelf Put the wire shelf on the fourth lev‐ el and the drip‐ ping pan on the third level of the oven. Turn the food halfway through the cooking time. Preheat the oven for 3 minutes. 12. CARE AND CLEANING WARNING! Refer to Safety chapters. 12.
ENGLISH 12.2 Stainless steel or aluminium ovens P2 Clean the oven door with a damp cloth or sponge only. Dry it with a soft cloth. Do not use steel wool, acids or abrasive materials as they can damage the oven surface. Clean the oven control panel with the same precautions. 12.3 Pyrolysis CAUTION! Remove all accessories. WARNING! The oven becomes very hot. There is a risk of burns. Press or turn the knob for the temperature to start the pyrolysis.
www.electrolux.com CAUTION! Do not use the oven without the glass panels. 1. Fully open the door and find the hinge to the right side of the door. 2. Use a screwdriver to lift and turn fully the right side hinge lever. 5. Close the oven door halfway to the first opening position. Then lift and pull forward and remove the door from its seat. 3. Find the hinge to the left side of the door. 6. Put the door on a soft cloth on a stable surface. 7.
ENGLISH Make sure the glass slides out of the supports completely. 29 Make sure that you install the middle panel of glass in the seats correctly. A B 12.6 Replacing the lamp 10. Clean the glass panels with water and soap. Dry the glass panels carefully. Do not clean the glass panels in the dishwasher. When the cleaning is completed, install the glass panels and the oven door. Make sure that you put the glass panels (A and B) back in the correct sequence.
www.electrolux.com 13.1 What to do if... Problem Possible cause Remedy You cannot activate or op‐ erate the oven. The oven is not connected to an electrical supply or it is connected incorrectly. Check if the oven is cor‐ rectly connected to the electrical supply (refer to the connection diagram if available). The oven does not heat up. The oven is deactivated. Activate the oven. The oven does not heat up. The clock is not set. Set the clock. The oven does not heat up.
ENGLISH Problem Possible cause The display shows an error There is an electrical fault. code that is not in this ta‐ ble. Remedy • • The appliance is activated and does not heat up. The fan does not operate. The display shows "Demo". The demo mode is activa‐ ted. 31 Deactivate the oven with the house fuse or the safety switch in the fuse box and activate it again. If the display shows the error code again, con‐ tact the Customer Care Department. 1. Deactivate the oven. 2.
www.electrolux.com 14. ENERGY EFFICIENCY 14.1 Product Information Sheet Product information according to EU 65-66/2014 Supplier's name Electrolux Model identification EEC44549OK 949498612 EEC44549OX 949498609 Energy Efficiency Index 81.0 Energy efficiency class A+ Energy consumption with a standard load, con‐ ventional mode 0.93 kWh/cycle Energy consumption with a standard load, fanforced mode 0.
ENGLISH Keep food warm Choose the lowest possible temperature setting to use residual heat and keep a meal warm. The residual heat indicator or temperature appears on the display. 33 Moist Fan Baking Function designed to save energy during cooking. When you use this function the lamp automatically turns off after 30 seconds. 15. ENVIRONMENTAL CONCERNS Recycle materials with the symbol . Put the packaging in relevant containers to recycle it.
www.electrolux.
ENGLISH 35
867347851-B-152019 www.electrolux.