User Manual EFC 008 X GB
Contents Safety instructions ............................................................. 31 Description of the cooker hood ......................................... 32 Using the cooker hood ...................................................... 32 Maintenance and cleaning ................................................. 33 If the hood does not function ............................................ 34 Technical data .................................................................... 34 Installation ......
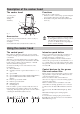
Description of the cooker hood The cooker hood Functions 1 Control panel 2 Grease filter 3 Lamps 4 Chimney There are two possible systems: • Extraction of air to outside using optional venting kit and evacuation duct (remove the carbon filter). • Recirculation using carbon filter (already fitted with the hood). 4 3 1 3 Fig. 1 3 Accessories 3 2 The following are included with the cooker hood (Fig.
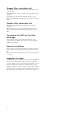
Grease filter saturation led The LED marked F warns you when the grease filter needs to be cleaned. This LED flashes to warn you that the grease filters must be cleaned. Generally, these must be cleaned after 40 hours of use. Read the maintenance instructions provided for the grease filters. Carbon filter saturation led The LED marked C indicates carbon filter needs to be replaced. This must be done after approximately 160 hours of use. Read the instructions provided for replacing the carbon filter.
Maintenance and cleaning Before doing any maintenance work on the hood, disconnect it from the main supply by disconnecting the plug from the wall socket or unscrewing the fuse. Clean the filter regularly. The grease that collects in the filter and the duct could ignite if a hot plate is left on (or if overheating occurs). Cleaning the hood Clean the outside of the hood using a damp cloth and a mild detergent. Never use corrosive, abrasive or flammable cleaning products.
If the hood does not function Before calling for service Check the plug is correctly connected to the wall socket. Check the fuse. Do not attempt any repairs yourself that are likely to lead to further damage. If the problem remains, contact your dealer or an approved service company. Remember to save your purchase receipt and warranty card (only used in some countries). Service and spare parts Your dealer or service company will supply you with service and spare parts.
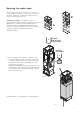
Mounting the cooker hood Expansion plugs are provided to secure the hood to most types of ceilings. A qualified technician is needed, however, to make sure that the plugs are suitable for your ceiling. The ceiling must be strong enough to hold the weight of the hood. B Preliminary operations: Assembly the cooker hood support structure using the brackets supplied (Fig.
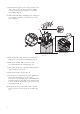
3. Fit the template supplied on the ceiling vertically to the centre of the cooktop (the short sides of the template correspond to the long side of the hood-to consider when drilling). Fig. 10. 4. Drill asindicatedandinsert 4wallplugs,screw onit4screws, do not thighten completely, screws will serve to hang the hood. Fig. 10. 4 3 8 4 6 5 10 10 6 5 6 7 5 9 7 5 10 10 9 (Recirculation!) (Umluftbetrieb!) Fig. 10 5.
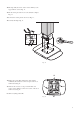
11.Fix temporarily the lower section of the chimney to the upper with two screws. Fig. 11. 12. Fix the lower part of the hood to the structure complex. Fig. 11. 13.Connect the control panel to the motor. Fig. 11. 14. Connect the lamps. Fig. 11. 11 11 13 12 13 12 14 12 12 12 Fig. 11 15 15.Remove the grease filter if already in place and fix definitively the structure to the lower part of the hood with f4 screws.Fig.12. 16.
LI1PIA Ed.