
User manual


8
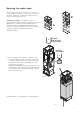
3. Fit the template supplied on the ceiling vertically to the
centre of the cooktop (the short sides of the template
correspond to the long side of the hood-to consider
when drilling). Fig. 10.
4. Drill asindicatedandinsert 4wallplugs,screw onit4screws,
do not thighten completely, screws will serve to hang
the hood. Fig. 10.
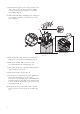
5. Hang the structure complex and with a pencil mark 2
fixing points corresponding to wall plugs 6. Fig. 10.
6. Remove the structure, drill two holes on points
previously marked, fit two wall plugs. Fig. 10.
7. Hang againg the structure complex and fix definitively
the hood with 2 screws. Fig. 10.
8. Make the electrical connection. Fig. 10.
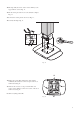
9. In case the hood is intended to be used in Abluftbetrieb,
then connect the exhaust pipe to the outside.
In case the hood is intended to be used in Umluftbetrieb,
then fit the deflector to the flange of the structure using
4 screws and fix the exhaust tube to the connection ring
of the deflector. Fig. 10.
10. Fix the upper section of the chimney to the structure
with two screws (1 to the front and 1 to the back ). Fig.
10.
10
6
3
4
4
6
5
5
5
5
6
7
7
8
9
10
10
10
9
(Umluftbetrieb!)
10
6
3
4
4
6
5
5
5
5
6
7
7
8
9
10
10
10
9
(Recirculation!)
Fig. 10