User Manual EFC 938 UK
Contents Safety instructions .............................................................................................................. 41 Description of the appliance .............................................................................................. 42 Mounting of grease filters .....................................................................................................................................42 Function ......................................................................
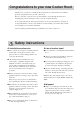
Congratulations to your new Cooker Hood Thank you for your choice of an Electrolux product. We are convinced that you will have great use and pleasure from your new cooker hood. Before you use the cooker hood we recommend that you read through the whole user manual giving a direct description of the cooker hood and its functions.
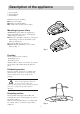
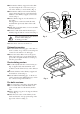
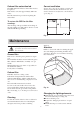
Description of the appliance 1. Control panel 2. Operating light 3. Grease filters Standard accessories included: ● Screws for mounting ● Template for wall mounting ● No return valve (mounted on air outlet) 1 Mounting of grease filters Attention! The grease filters are supplied not mounted and packed in order to avoid damages during transport of the hood. ● Fit the pins of the filter on the slots of the grease filter housing (a), then use the handles of the filter to lock them (b).
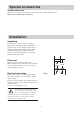
Special accessories Active carbon filter When the hood is used in recirculation mode an active carbon filter should be used. Order by the retailer: PNC 942 120 182 Installation Unpacking Check that the cooker hood has no damages. Transportation damages should immediately be reported to the one responsible for the transport Damages, faults and eventually missing details should immediately be reported to the seller. Take care of the packing material so that small children cannot play with it.
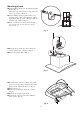
Mounting of hood ● Fit the drilling scheme onto the wall at the right height. (Fig. 4) The lower edge of the scheme correspond to the lower edge of the cooker hood. ● On the drilling scheme is printed a line corresponding to the centre of the appliance; with a pencil draw a line up to the ceiling, this will aid installation procedures. (Fig. 4) ● Drill as indicated on the scheme and fit two dowels, two hooks and two screws 5x45. (Fig. 4) Fig.
● Dismount the chimney support from the chimney unscrewing the two side screws (one per side of the chimney- conserve them). (Fig. 7) ● Dismount the deflector "b" from the chimney support unscrewing the two screws that fix the deflector to the chimney support (conserve the screws). (Fig. 7) ● Fit the chimney support onto the wall close to the ceiling. The support has a reference mark, this must match the line previously drawn on the wall. (Fig.
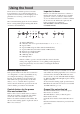
Using the hood Important to know The hood has one variable speed motor. For the best performance, we recommend using the low speeds in normal conditions and the high speeds in particular cases of strong odour and vapour concentration. If the hood is run at the same time as a burner or fireplace that depend on ambient air (for example gas, Diesel, coal or wood heaters, water heaters, etc.
Carbon filter saturation led Correct ventilation The LED marked C indicates carbon filter needs to be replaced. This must be done after approximately 160 hours of use. Read the instructions provided for replacing the carbon filter. To have the cooker hood working correctly the windows in the kitchen should be closed. In stead a window in an adjacent room should be open. (Fig. 9) To restore the LED for the filter warnings.
If the hood does not function Before you make contact to service When you order service or spare parts you should be ready to give the product number and model denomination. This information you will find on the rating label. Take away the grease filter and you will find the rating label behind. Check that the power plug is connected to the wall power outlet and that no fuse is blown. Do not do any operations that can cause hazard or damage to the product.
LI1PHA Ed.