
User manual

6
Mounting of hood
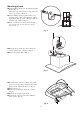
● Fit the drilling scheme onto the wall at the right
height. (Fig. 4)
The lower edge of the scheme correspond to the
lower edge of the cooker hood.
● On the drilling scheme is printed a line corre-
sponding to the centre of the appliance; with a
pencil draw a line up to the ceiling, this will aid
installation procedures. (Fig. 4)
● Drill as indicated on the scheme and fit
two dowels, two hooks and two screws
5x45. (Fig. 4)
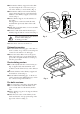
● Hang the hood, adjust the position using the
screws on the hooks of the hood. (Fig. 5)
● Release the grease filters. (Fig. 1)
● From the inside of the hood mark on the wall
the point corresponding to the hole which will
be used to fix definitively the hood. (Fig. 6)
● Remove the hood.
● Drill two hole (Ø 8mm) and fit two dowels.
(Fig. 6)
● Hang the hood again on the hooks.
● From inside of the hood insert the definitive
fixing screws. (Fig. 6)
Fig. 5
Fig. 4
Fig. 6