Liesituuletin KÄYTTÖOHJEET EFC 959 821 27 70-01/1
Indholdsfortegnelse Sikkerhedsinformation.............................................. 17 Beskrivelse af emhætten ........................................... 18 Sådan benyttes emhætten .......................................... 19 Vedligeholdelse og rengøring ................................... 19 Hvis emhætten ikke fungerer .................................... 20 Tekniske data ............................................................ 21 Installation .....................................................
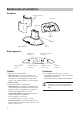
Beskrivelse af emhætten Emhætten Justérbar skorsten Belysning Udblæsning Fedtfilter Motorhus Kåben Betjeningspanel Betjeningspanel Indikering af hastighed Knap for start og stop Knap for valg af hastighed Indikering af intensiv hastighed Knap for valg af intensiv sug Knap for belysning Tilbehør Funktioner Følgende leveres med emhætten: • Monteringssæt: 8 stk 5x30 mm skruer, 2 stk M4x10 mm skruer, 2 stk M4x14 mm skruer, 2 stk spændskiver, 2 stk afstandstykker, 8 stk 10 mm propper, 2 stk beslag t
Sådan benyttes emhætten Betjeningspanel Anvend ikke for høj hastighed. De låga hastigheterna är effektiva vid vanlig matlagning. De höga hastigheterna bör endast användas vid vidbränning eller kraftig osutveckling. Foran på emhætten sidder hastighedsreguleringen. For at opnå det bedste resultat anbefaler vi anvendelse af lav hastighed under normale forhold og høj hastighed ved kraftig udvikling af os og damp. Knap for start og stop. Betjeningsknap til hastighedsregulering. Betjeningsknap til intensivsug.
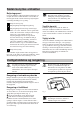
Rengøring af motorhus Efter behov kan motorhuset også rengøres (Fig. 2): Afmontering af skorsten (se montering). Løsne de tre skruer på forsiden og tag frontpladen af (A). Fjern lydisoleringen (B). Tryk snaplåsene (D) på mellemvæggene (C) op. Fjern mellemvæggene fra motorhusets (E) bagkant. Ventilatorhjulet sidder fast på motoren med bajonetfatning. Ved afmontering af ventilatorhjulet anbefales det at bruge handsker. Tag fat om motoren med den ene hånd og om blæserhjulet med den anden hånd.
PRODUKTANSVAR: Vort produktansvar er gældende i følge Lov om produktansvar. Denne lov gælder for skader på personer eller ting, som skyldes fejl på selve det installerede produkt. Dette ansvar er gældende 10 år efter, at apparatet er købt som fabriksnyt. Forbehold: Vort produktansvar gælder ikke, hvis den pågældende skade skyldes et eller flere af følgende forhold: • At produktets installation ikke er udført i overensstemmelse med installationsvejledningen.
Fig. 4 Installation Udpakning Obs! Kontrollér at emhætten er ubeskadiget. Eventuelle transportskader fra en transport, som De ikke selv har foretaget, skal inden 1 uge anmeldes til forhandleren. Kassér emballagen på forsvarlig vis, da den kan være til fare for børn. Placering Kåben kan monteres frithængende på væggen. Afstanden fra emhættens underside og ned til en elektrisk kogezone skal mindst være 50 cm og til gasblus 60 cm (Fig. 5). Fig.
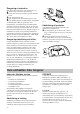
Montering af emhætte (Fig. 7): Hæng emhætten op på skruerne (G) i hullerne (H) på motorhuset. Skru skruerne (I) 2 stk M 4x10 mm fast med spændeskiver (J) i emhættens motorhus. Skru skruerne (G), som er placeret i nøglehullet (H), fast. Sæt stikket i stikkontakten. Emhætten skal tilsluttes med jord. Hvis emhætten skal monteres med aftræk til det fri, skal dette foretages nu, ifølge Fig. 11 (Gælder ikke ved recirkulation). Fig. 7 Montering af skorsten (Fig.
Montering af tilslutningssæt (Fig. 11): Træk aftræksslangen. En lang aftræksslange med mange bøjninger kan halvere emhættens effektivitet. Skær af slangen, hvis den er for lang, og undgå unødvendige bøjninger. Komplet tilslutningssæt kan købes som ekstratilbehør. Placér aftræksslangen (A) over aftræksstudsen (B), og spænd den fast med et spændebånd. Vær opmærksom på at slangen skal være så lige som muligt, og ikke forhindrer klappernes bevægelse. Slangen skal tilsluttes emhætten v.h.a.
©1998 MO-STF