EFCI 90542 Instructions Manual Manual de instrucciones Manual de Instruções
Instructions Manual INDEX RECOMMENDATIONS AND SUGGESTIONS ......................................................................................................................5 CHARACTERISTICS..............................................................................................................................................................6 INSTALLATION ..................................................................................................................................................
Manual de instrucciones ÍNDICE CONSEJOS Y SUGERENCIAS ...........................................................................................................................................16 CARACTERÍSTICAS ............................................................................................................................................................17 INSTALACIÓN..................................................................................................................................
Manual de Instruções ÍNDICE CONSELHOS E SUGESTÕES ............................................................................................................................................27 CARACTERÍSTICAS ............................................................................................................................................................28 INSTALAÇÃO .....................................................................................................................................
RECOMMENDATIONS AND SUGGESTIONS INSTALLATION • The manufacturer will not be held liable for any damages resulting from incorrect or improper installation. • The minimum safety distance between the cooker top and the extractor hood is 650 mm. • Check that the mains voltage corresponds to that indicated on the rating plate fixed to the inside of the hood. • For Class I appliances, check that the domestic power supply guarantees adequate earthing.
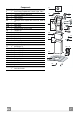
CHARACTERISTICS Max 1050 650 min.
Components Ref. 1 2 2.1 2.2 7.1 Q.ty 1 1 1 1 1 7.1a 7.1b 9 10 15 24 25 26 27 1 1 1 1 1 1 2 2 1 Ref. 11 12c 12e 12f 12g 12h 21 22 23 Q.
INSTALLATION Drilling the Ceiling/shelf and fixing the frame DRILLING THE CEILING/SHELF • Use a plumb line to mark the centre of the hob on the ceiling/support shelf. • Place the drilling template 21 provided on the ceiling/support shelf, making sure that the template is in the correct position by lining up the axes of the template with those of the hob. • Mark the centres of the holes in the template.
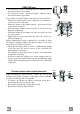
FIXING THE frame • Loosen the two screws fastening the lower chimney and remove this from the lower frame. • Loosen the two screws fastening the upper chimney and remove this from the upper frame. If you wish to adjust the height of the frame, proceed as follows: • Unfasten the eight metric screws joining the two columns, located at the sides of the frame. • Adjust the frame to the height required, then replace all the screws removed as above.
Recirculation version air outlet 15 • Fix the connection 15 to the frame using the 4 screws provided. • Fix the flange 10 to the lower opening of the connection 15. • Connect the hood air outlet to the flange in the lower part of the junction using a rigid or flexible ø 150 tube (by installer’s choice). Flue assembly - Mounting the hood body • Position the upper chimney section and fix the upper part to the frame using the 2 screws 12c (2,9 x 6,5) provided.
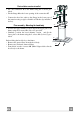
ELECTRICAL CONNECTION • Connect the Hood to the Mains power supply, inserting a two-pole Switch with a contact aperture of at least 3 mm. • Remove the Metal grease filters (see par. on “Maintenance”) and make sure that the power supply Cable is properly inserted in the Suction fan socket. • Take the wires indicated in fig.1 and pass them through the slot formed on the galvanized diffuser support, as shown in fig.2.
USE L T1 T2 T3 T4 T5 F The hood can be switched on pushing directly onto the requested speed without firstly having to select 0/1 button . Touch control L T1 Basic functions Dual Function Indicator lights When briefly pressed it switches the lighting system on and off. When pressed for 2 seconds it starts the lighting system in “courtesy light” mode. The lamps are fed at a reduced power of approximately 5W.
Touch control T5 F Basic functions Indicator lights When pressed the motor is set to the intensive speed timed to 5 minutes. At the end of 5 minutes of intensive speed the hood starts again at the speed it was set Touch control lit to previously. In case the hood is set to the intensive speed directly from OFF-state it will then start from the first speed after 5 minutes of intensive speed. Touch control lit Metal grease filters satuWhen pressed for 4 seconds it resets the filter alarm ration alarm.
MAINTENANCE REMOTE CONTROL (OPTIONAL) The appliance can be controlled using a remote control powered by a 1.5 V carbon-zinc alkaline batteries of the standard LR03-AAA type. • Do not place the remote control near to heat sources. • Used batteries must be disposed of in the proper manner. Grease filters CLEANING OF THE METAL CASSETTE FILTERS Alarm reset • Stop the motor. • Press the F -touch control for at least 4 seconds until the T1 -touch control flashes.
Odour filter (Recirculation Version) This filter cannot be washed or regenerated, and must be replaced when the F touch control starts to flash, or at least once every 4 months. The alarm is only triggered when the motor is on. Enabling/Disabling the alarm signal • In Recirculation Version Hoods, the Filter saturation Alarm must be enabled at the time of installation or later. • Switch off the lights and the motor.
The symbol on the product or on its packaging indicates that this product may not be treated as household waste. Instead it shall be handed over to the applicable collection point for the recycling of electrical and electronic equipment. By ensuring this product is disposed of correctly, you will help prevent potential negative consequences for the environment and human health, which could otherwise be caused by inappropriate waste handling of this product.