
Installation Guide


3
Important Safety Instructions
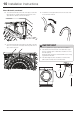
Unpacking
q Plastic film (lining drum interior) is removed and
discarded. See also image below.
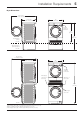
Leveling
q Dryer is level, side-to-side and front-to-back
q Cabinet is setting solid on all corners
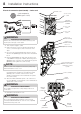
240v Electric Supply
q Approved NEMA 10-30R or 14-30R service cord with
all screws tight on terminal block
q Terminal access cover/strain relief installed before
initial operation
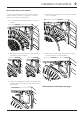
Door Reversal
q Follow detailed instructions in this guide
q Test hinge and latch for function
Electrical Power
q House power turned on
q Dryer plugged in
Final Checks
q Installation Instructions and Use and Care Guide read
thoroughly
q Door latches and drum tumbles when cycle starts
q Registration card sent in
Installation Checklist
Definitions
This is the safety alert symbol. It is used to alert you to
potential personal injury hazards. Obey all safety messages that
follow this symbol to avoid possible injury or death.
Recognize safety symbols, words and labels
Safety items throughout this manual are labeled with a
WARNING or CAUTION based on the risk type as described
below:
IMPORTANT
IMPORTANT indicates installation, operation or maintenance
information which is important but not hazard-related.
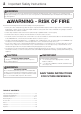
WARNING
WARNING indicates a potentially hazardous situation which,
if not avoided, could result in death or serious injury.
WARNING
Please read all instructions before using this dryer.
CAUTION
CAUTION indicates a potentially hazardous situation which, if
not avoided, may result in minor or moderate injury.
DANGER
DANGER indicates an imminently hazardous situation which,
if not avoided, will result in death or serious injury.
Tools and materials needed for installation:
Adjustable
pliers
AND AND ANDOR
Optional uni-
versal wrench
available from
dealer
3 or 4-wire
240 volt
cord kit
Phillips screwdriver Carpenter’s level