User manual EFI 60021
electrolux Welcome to the world of Electr olux Electrolux Thank you for choosing a first class product from Electrolux, which hopefully will provide you with lots of pleasure in the future. The Electrolux ambition is to offer a wide variety of quality products that make your life more comfortable. You find some examples on the cover in this manual. Please take a few minutes to study this manual so that you can take advantage of the benefits of your new machine.
electr olux contents electrolux Contents GB Safety warnings ................................ 5 Description of the Appliance ............. 7 Control Panel .................................... 8 Maintenance and Care ..................... 9 Special accessories ........................ 14 Something Not Working .................. 14 Installation ......................................
electrolux safety warnings 5 GB Safety warnings • When used as an extractor unit, the hood must be fitted with a hose having preferably the same diameter as the outlet hole. Attention: The hose is not supplied and must be purchased separately. • The minimum distance between the supporting surface for the cooking vessels on the hob and the lowest part of the range hood must be not less than 60cm from electric cookers and 70cm from gas or mixed cookers.
GB electr olux safety warnings electrolux • We decline any responsibility for any problems, damage or fires caused to the appliance as the result of the non-observance of the instructions included in this manual. This appliance is marked according to the European directive 2002/96/EC on Waste Electrical and Electronic Equipment (WEEE).
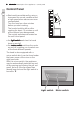
electrolux description of the appliance 7 Description of the Appliance GB • The cooker hood is designed to extract unpleasant odours fr om the from kitchen, it will not extract steam. • The cooker hood is supplied ready for use as a recirculation hood and may be used for extraction by removing the charcoal filter which has been fitted inside the cooker hood.
electr olux description of the appliance - control panel electrolux Control Panel GB • Best results are obtained by using a low speed for normal conditions and a high speed when odours are more concentrated. Turn the hood on a few minutes before you start cooking. The hood should be left on after cooking for about 15 minutes or until all the odours have disappeared.
electrolux maintenance and care 9 Maintenance and Care GB Attention! Before performing any maintenance operation, isolate the hood from the electrical supply by switching off at the connector and removing the connector fuse. Or if the appliance has been connected through a plug and socket, then the plug must be removed from the socket.
GB electr olux maintenance and care electrolux Char coal filter Charcoal • The charcoal filter should only be used if you want to use the hood in recirculation mode. • The charcoal filter cannot be washed nor regenerated. The charcoal filter should be replaced every 4 months under normal use. Replacement filters are available from your local Service Force Centre. Fitting Remove the grill or the metal grease filter.
electrolux maintenance and care 11 War ning arning GB • Failure to observe the instructions on cleaning the unit and changing the filters will cause a fire hazard. You are therefore strongly recommended to follow these instructions. • The manufacturer declines all responsibility for any damage to the motor or any fire damage linked to inappropriate maintenance or failure to observe the above safety recommendations.
electr olux maintenance and care electrolux Cleaning the hood GB • Clean the outside of the hood using a damp cloth and a solution of water and mild washing up liquid. • Never use corrosive, abrasive or flammable cleaning products or products containing bleach. • Never insert pointed objects in the motor’s protective grid. • Only ever clean the switch panel and filter grill using a damp cloth and mild washing up liquid.
electrolux special accessories 13 Special accessories GB Char coal filter type 29 Charcoal Something Not Working If your appliance fails to work properly please carry out the following checks. Symptom Solution The cooker hood will not start... Check that: The hood is connected to the electricity supply. Check that a fan speed has been selected. The cooker hood is not working Check that: The fan speed is set high enough for the task. The grease filters are clean.
electr olux installation electrolux Installation GB Technical Details Dimensions (in cm): Height : 400 Width: 599 Depth: 270 Maximum absorbed power: 180 W Motor: 100 W Lighting: 2x40 W (E14) Length of the cable: 150 cm Electrical connection: 220-240W Fuse rating: 5A T Mounting accessories included 1 spacer 2 brackets 2 hooks 1 deflector 2 plastic washers for the spacer 2 wall plugs 1 screw 2,9x9,5 to affix the deflector/coupling ring on the outlet hole 4 screws 4.
electrolux installation 15 Electrical connection GB Safety war nings for the electrician warnings The mains power supply must correspond to the rating indicated on the plate situated inside the hood. If provided with a plug connect the hood to a socket in compliance with current regulations and positioned in an accessible area.
electr olux installation electrolux Installation GB Make sur e that the cooker hood is disconnected fr om the power supply befor e sure from before carrying out the installation. Befor e beginning installation Before • Remove and keep the extraction grill or the metal grease filter. Note: This is to be inserted once installation is completed. • Remove and keep the charcoal filter/s (see also relative paragraph).
electrolux installation • Check that the side wall units between which to install the hood are sufficiently heavy for installing the hood. Otherwise mount the brackets to use as additional supports: a. Insert each bracket from the rear inside the hood through the opposite slots.. b. Fix the brackets with the screws and threaded bushes. Screw the headless screws halfway. They will serve to adjust the position of the hood at the moment of installation.
GB electr olux installation electrolux Fixing a fur nitur e door to the visor furnitur niture • Remove the extraction grill or the metal grease filter. • Remove the visor (freeing the locking releases II). I • Apply the drill holes diagram N3 on J-the the rear of the furniture door (J arrow on the diagram should face the upper border of the furniture door), K). perform blind holes as indicated (K • Place the visor over the furniture door L).
electrolux installation Fixing the hood • Use template N2 N2. Position the template on the front edges of the wall unit (right wall unit, B side) – (left wall unit, C side) WITHOUT CONSIDERING THE THICKNESS OF THE FRONT W ALL UNIT WALL DOORS, and make the holes as indicated. • If the side wall units ar e not heavy are enough ONL Y : ONLY a. If necessary, fix the hood to the wall, putting template N1 on the wall so its upper edge coincides with the upper edge of template N2. b. Make the holes as indicated.
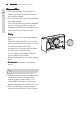
electr olux installation electrolux • Mount the lower corner Q (*) to the hood with two screws and plastic GB washers T. They will serve to cover possible spaces between the rear of the hood and the wall. • Fit the charcoal filter/s (Recirculation mode ONLY). • Fit the grill or the metal grease filters.
electrolux 21 Guarantee/Customer Service Standar d guarantee conditions Standard We, Electrolux, undertake that if within 12 months of the date of the purchase this Electrolux appliance or any part thereof is proved to be defective by reason only of faulty workmanship or materials, we will, at our option repair or replace the same FREE OF CHARGE for labour, materials or carriage on condition that: • The appliance has been correctly installed and used only on the electricity supply stated on the rating pla
electr olux electrolux Customer Car e Care For general enquiries concerning your Electrolux appliance, or for further information on Electrolux products please contact our Customer Care Department by letter or telephone at the address below or visit our website at www.electrolux.co.
electrolux Eur opean Guarantee European This appliance is guaranteed by Electrolux in each of the countries listed at the back of this user manual, for the period specified in the appliance guarantee or otherwise by law.
electr olux electrolux Þ Albania +35 5 4 261 450 Rr. Pjeter Bogdani Nr. 7 Tirane Belgique/België/ Belgien +32 2 363 04 44 Bergensesteenweg 719, 1502 Lembeek Èeská republika +420 2 61 12 61 12 Budìjovická 3, Praha 4, 140 21 Danmark +45 70 11 74 00 Sjællandsgade 2, 7000 Fredericia Deutschland +49 1803 22 66 22 Muggenhofer Str. 135, 90429 Nürnberg Eesti +37 2 66 50 030 Mustamäe tee 24, 10621 Tallinn España +34 902 11 63 88 Carretera M-300, Km.
electrolux Þ Slovenija +38 61 24 25 731 Tr•aška 132, 1000 Ljubljana Slovensko +421 2 43 33 43 22 Electrolux Slovakia s.r.o., Electrolux Domáce spotrebièe SK, Seberíniho 1, 821 03 Bratislava Suomi www.electrolux.
LI3L7A Ed.