user manual Induction hob EHD60100P
We were thinking of you when we made this product
electrolux 3 Welcome to the world of Electrolux Thank you for choosing a first class product from Electrolux, which hopefully will provide you with lots of pleasure in the future. The Electrolux ambition is to offer a wide variety of quality products that make your life more comfortable. You will find some examples on the cover in this manual. Please take a few minutes to study this manual so that you can take advantage of the benefits of your new machine.
electrolux contents Contents Safety instructions Description of the Appliance Operating the appliance Tips on Cooking and Frying Cleaning and Care What to do if … Disposal Installation Instructions Assembly Guarantee/Customer Service Service 5 7 11 23 28 30 32 33 35 40 42 The following symbols are used in this user manual: 1 3 2 Important information concerning your personal safety and information on how to avoid damaging the appliance.
safety instructions electrolux 5 Safety instructions Please comply with these instructions. If you do not, any damage resulting is not covered by the warranty. 5 This appliance conforms with the following EU Directives: – 73/23/EEC dated 19.02.1973 Low Voltage Directive – 89/336/EEC dated 03.05.1989 EMC Directive inclusive of Amending Directive 92/31/EEC – 93/68/EEC dated 22.07.
electrolux safety instructions Safety during use • Remove stickers and film from the glass ceramic. • There is the risk of burns from the appliance if used carelessly. • Cables from electrical appliances must not touch the hot surface of the appliance or hot cookware. • Overheated fats and oils can ignite very quickly. Warning! Fire hazard! • Switch the cooking zones off after each use.
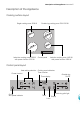
description of the appliance electrolux 7 Description of the Appliance Cooking surface layout Single cooking zone 1200 W Induction cooking zone 2300 W with power function 3700 W Double ring cooking zone 700/1700 W Control panel Induction cooking zone 1400 W with power function 1800 W Control panel layout Heat setting selection Cooking zone indicators Timer function Power function Timer display On/Off with power indicator Outside ring On/Off Double ring pilot light Display Timer Lock
electrolux description of the appliance Touch Control sensor fields The appliance is operated using Touch Control sensor fields. Functions are controlled by touching sensor fields and confirmed by displays and acoustic signals. Touch the sensor fields from above, without covering other sensor fields.
description of the appliance electrolux 9 Displays Display Description Cooking zone is switched off - Keep warm setting Keep warm setting is set Heat settings Heat setting is set Automatic warm up function Automatic warm-up function is activated Fault Malfunction has occurred Pan detection Cookware is unsuitable or too small or no cookware has been placed on the cooking zone Residual heat Cooking zone is still hot Child safety device Lock/child safety device is engaged Power Power function
electrolux description of the appliance Residual heat indicator Warning! Risk of burns from residual heat. After being switched off, the cooking zones need some time to cool down. Look at the residual heat . indicator Residual heat can be used for melting and keeping food warm. The induction cooking zones create the heat required for cooking directly in the base of the cookware. The glass ceramic is merely heated by the residual heat of the cookware.
operating the appliance electrolux 11 Operating the appliance Use the induction cooking zones with suitable cookware. Switching the appliance on and off Control panel Display Pilot light Switch on Touch for 2 seconds / lights up Switch off Touch for 1 second / none goes out After switching on, within approx. 10 seconds a heat setting or a function must be set, otherwise the appliance automatically switches itself off.
electrolux operating the appliance Switching the double ring cooking zone on and off With the double ring cooking zone the heating surface can be matched to the size of the cookware.
operating the appliance electrolux 13 Using the automatic warm-up function All cooking zones are equipped with an automatic warm-up function. The automatic warm-up function sets the cooking zone to the highest setting for a certain period of time and then automatically switches back to the cooking setting that was originally set. Step Control panel Display 1. Setting the maximum setting / 2. Place to one side for a moment / touch 3. touch in order to set the desired cooking setting 4.
electrolux operating the appliance Locking/unlocking the control panel The control panel, with the exception of the “On/Off” sensor field, can be locked at any time in order to prevent the settings being changed e.g. by wiping over the panel with a cloth. Control panel Switch on Touch Switch off Touch When you switch the appliance off, the locking function is automatically switched off.
operating the appliance electrolux 15 Using the child safety device The child safety device prevents unintentional use of the appliance. Setting the child safety device Step Control panel 1. Switch on the appliance (Do not set a heat setting) 2. Touch 3. Touch until the signal sounds Display/Signal Acoustic signal Appliance switches off. The child safety device is engaged. Releasing the child safety device Step Control panel Display/Signal Switch on the appliance 1. 2. Touch 3.
electrolux operating the appliance Switching the power function on and off The power function makes more power available to the induction cooking zones, e.g. to bring a large quantity of water to the boil quickly. The power function is activated for 10 minutes. After that the induction cooking zone automatically switches back to heat setting 9.
operating the appliance electrolux 17 Power Management The cooking zones of the cooking surface have a maximum power available to them. Two cooking zones make up a pair (see figure). So that the Power function can always be carried out, Power Management may reduce the power of the other cooking zone in the pair Example: heat setting 9 is selected on a cooking zone. The Power function is switched on for the cooking zone paired up with it.
electrolux operating the appliance Using the timer All cooking zones can use each use one of the two timer functions at the same time. Function Condition Outcome after the time has elapsed Automatic cut-out a heat setting is set acoustic signal 00 flashes Cooking zone switches off Countdown timer cooking zones not in use acoustic signal 00 flashes If a cooking zone is switched off, the timer function set is also switched off.
operating the appliance electrolux 19 Selecting a cooking zone Step Control panel Display 1. Touch once Pilot light of the first cooking zone flashes 2. Touch once Pilot light of the second cooking zone flashes 3. Touch once Pilot light of the third cooking zone flashes 4. Touch once Pilot light of the fourth cooking zone flashes The heat setting indicator of the selected cooking zone goes out, as long as the timer time can be set.
electrolux operating the appliance Setting the time Step 1. 2. Control panel field Display Select cooking zone Pilot light of the cooking zone selected flashes Touch or for the cooking zone selected 00 to 99 minutes After a few seconds the pilot light flashes more slowly. The time is set. The time counts down. Switching off the Timer function Step Control panel Display 1. Select a cooking zone Pilot light of the selected cooking zone flashes more quickly. Remaining time is displayed 2.
operating the appliance electrolux 21 Displaying the time remaining for a cooking zone Step 1. Control panel field Display Select cooking zone Pilot light of the cooking zone selected flashes faster The time remaining is displayed After a few seconds the pilot light flashes more slowly. Switching off the acoustic signal Step Control panel field Acoustic signal 1. Touch Acoustic signal to acknowledge. Acoustic signal stops.
electrolux operating the appliance Safety cut-out Cooking surface • If after switching on the cooking surface, a heat setting is not set for a cooking zone within approx. 10 seconds, the cooking surface automatically switches itself off. • If one or more sensor fields are covered for longer than approx. 10 seconds, e.g. by a pan placed upon it, a signal sounds and the cooking surface switches off automatically.
tips on cooking and frying electrolux 23 Tips on Cooking and Frying Information on acrylamides According to the latest scientific knowledge, intensive browning of food, especially in products containing starch, can constitute a health risk due to acrylamides. Therefore we recommend cooking at the lowest possible temperatures and not browning foods too much. Cookware • You can recognise good cookware from the bottoms of the pans. The bottom should be as thick and flat as possible.
electrolux tips on cooking and frying Cookware for induction cooking zones Cookware material Cookware material Suitable Steel, enamelled steel yes Cast iron Stainless steel yes if appropriately labelled by the manufacturer Aluminium, copper, brass --- Glass, ceramic, porcelain --- Cookware for induction cooking zones is labelled as suitable by the manufacturer. Suitability test Cookware is suitable for induction cooking, if … • ...
tips on cooking and frying electrolux 25 Pan size Induction cooking zones adapt automatically to the size of the bottom of the cookware up to a certain limit. However the magnetic part of the bottom of the cookware must have a minimum diameter depending upon the size of the cooking zone. Diameter of cooking zone [mm] Minimum diameter of dish base [mm] 210 180 145 120 The cookware must be placed centrally on the cooking zone.
electrolux tips on cooking and frying Tips on energy saving Place cookware on the cooking zone before it is switched on. If possible, always place a lid on the cookware.
tips on cooking and frying electrolux 27 Examples of cooking applications The information given in the following table is for guidance only. Heat setting Cookingprocess 0 suitable for Cooking time Tips/Hints Off position Keeping food warm Keeping cooked foods warm as required Cover Melting Hollandaise sauce, melting butter, chocolate, gelatine 5-25 mins. Stir occasionally Solidifying Fluffy omelettes, baked eggs 10-40 mins.
electrolux cleaning and care Cleaning and Care Take care! Risk of burns from residual heat. Warning! Sharp objects and abrasive cleaning materials will damage the appliance. Clean with water and washing up liquid. Warning! Residues from cleaning agents will damage the appliance. Remove residues with water and washing up liquid. Cleaning the appliance after each use 1. Wipe the appliance with a damp cloth and a little washing up liquid. 2. Rub the appliance dry using a clean cloth.
cleaning and care electrolux 29 Removing deposits 1. Place a scraper on the glass ceramic surface at an angle. 2. Remove residues by sliding the blade over the surface. 3. Wipe the appliance with a damp cloth and a little washing up liquid. 4. Rub the appliance dry using a clean cloth.
electrolux what to do if … What to do if … Problem Possible cause The appliance cannot be More than 10 seconds have switched on or is not operating passed since the appliance was switched on The residual heat indicator is not displaying anything Remedy Switch the appliance on again.
what to do if … electrolux 31 Problem flashes Possible cause Remedy Unsuitable cookware Use suitable cookware No cookware on the cooking zone Place cookware on the cooking zone The diameter of the bottom of Move onto a smaller cooking the cookware is too small for zone the cooking zone Use suitable cookware is lit Overheating protection for the Switch off the cooking zone.
electrolux disposal Disposal Packaging material The packaging materials are environmentally friendly and can be recycled. The plastic components are identified by markings, e.g. >PE<, >PS<, etc. Please dispose of the packaging materials in the appropriate container at the community waste disposal facilities. Old appliance W on the product or on The symbol its packaging indicates that this product may not be treated as household waste.
installation instructions electrolux 33 Installation Instructions Safety instructions The laws, ordinances, directives and standards in force in the country of use are to be followed (safety regulations, proper recycling in accordance with the regulations, etc.) Installation may only be carried out by a qualified electrician. The minimum distances to other appliances and units are to be observed.
electrolux installation instructions Electrical Connection Before connecting, check that the nominal voltage of the appliance, that is the voltage stated on the rating plate, corresponds to the available supply voltage. The rating plate is located on the lower casing of the hob. The heating element voltage is AC230V~. The appliance also works perfectly on networks with AC220V~ or AC240V~.
assembly electrolux 35 Assembly
electrolux assembly
assembly electrolux 37
electrolux assembly
electrolux 39 Rating Plate EHD60100P 55GAD83AG 949 592 659 230 V 50 Hz Induction 3,7 kW 6,6 kW ELECTROLUX
electrolux guarantee/customer service Guarantee/Customer Service Warranty FOR SALES IN AUSTRALIA AND NEW ZEALAND APPLIANCE: Electrolux cooktop This document sets out the terms and conditions of product warranties for Electrolux branded appliances. It is an important document. Please keep it with your proof of purchase documents in a safe place for future reference should you require service for your Electrolux appliance. General Terms and Conditions 1.
guarantee/customer service electrolux 41 11. Provisions of the Trade Practices Act and Appliances repaired or of acquiring equivalent ApState consumer legislation in Australia, and pliances.
electrolux service Service In the event of technical faults, please first check whether you can remedy the problem yourself with the help of the operating instructions (section “What to do if…”). If you were not able to remedy the problem yourself, please contact the Customer Care Department or one of our service partners. In order to be able to assist you quickly, we require the following information: – Model description – Product number (PNC) – Serial number (S No.
www.electrolux.