EGH6343 EN Hob User Manual
www.electrolux.com CONTENTS 1. SAFETY INFORMATION....................................................................................2 2. SAFETY INSTRUCTIONS..................................................................................4 3. PRODUCT DESCRIPTION................................................................................ 7 4. DAILY USE......................................................................................................... 7 5. HINTS AND TIPS.........................
ENGLISH 3 injuries and damages. Always keep the instructions with the appliance for future reference. 1.1 Children and vulnerable people safety • • • • • • • This appliance can be used by children aged from 8 years and above and persons with reduced physical, sensory or mental capabilities or lack of experience and knowledge if they have been given supervision or instruction concerning use of the appliance in a safe way and understand the hazards involved. Do not let children play with the appliance.
www.electrolux.com • • • If the supply cord is damaged, it must be replaced by the manufacturer, an authorized Service or similarly qualified persons in order to avoid a hazard. Where the appliance is directly connected to the power supply, an all-pole isolating switch with a contact gap is required. Complete disconnection in compliance with the conditions specified in overvoltage category III must be guaranteed. The earth cable is excluded from this.
ENGLISH • • • • • • • • • • • • Do not let the electricity mains cable tangle. Make sure that a shock protection is installed. Use the strain relief clamp on the cable. Make sure the mains cable or plug (if applicable) does not touch the hot appliance or hot cookware, when you connect the appliance to the near sockets Do not use multi-plug adapters and extension cables. Make sure not to cause damage to the mains plug (if applicable) or to the mains cable.
www.electrolux.com WARNING! Risk of damage to the appliance. • • • • • • • • • • • • • Do not keep hot cookware on the control panel. Do not let cookware to boil dry. Be careful not to let objects or cookware fall on the appliance. The surface can be damaged. Do not activate the cooking zones with empty cookware or without cookware. Do not put aluminium foil on the appliance. Use only stable cookware with the correct shape and diameter larger than the dimensions of the burners.
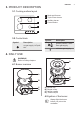
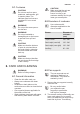
ENGLISH 3. PRODUCT DESCRIPTION 3.1 Cooking surface layout 1 2 3 4 1 2 Semi-rapid burner Triple Crown burner Auxiliary burner Control knobs 3 4 3.2 Control knob Symbol Symbol Description Description ignition position / maxi‐ mum gas supply no gas supply / off posi‐ tion minimum gas supply 4. DAILY USE WARNING! Refer to Safety chapters. A 4.1 Burner overview B A C D B C D A) B) C) D) Burner cap Burner crown Ignition candle Thermocouple 4.
www.electrolux.com WARNING! Be very careful when you use open fire in the kitchen environment. The manufacturer declines any responsibility in case of the flame misuse. 1. Push the control knob down and turn it counterclockwise to the maximum gas supply position ( ). 2. Keep the control knob pushed for equal or less than 10 seconds. This lets the thermocouple warm up. If not, the gas supply is interrupted. 3. Adjust the flame after it is regular.
ENGLISH 5.1 Cookware CAUTION! Make sure that the pots are placed centrally on the burner in order to get maximum stability and to get lower gas consumption. CAUTION! Do not use cast iron pans, potstones, earthenware, grill or toaster plates. The stainless steel can become tarnished if it is too much heated. 5.2 Diameters of cookware WARNING! Do not put the same pan on two burners. Use cookware with diameters applicable to the size of burners.
www.electrolux.com remove stubborn stains with a paste cleaner. 3. After you clean the pan supports, make sure that they are in correct positions. 4. For the burner to operate correctly, make sure that the arms of the pan supports are aligned with the centre of the burner. 6.3 Cleaning the hob • • • Remove immediately: melted plastic, plastic foil, and food with sugar. If not, the dirt can cause damage to the hob.
ENGLISH Problem 11 Possible cause Remedy Burner cap and crown are placed incorrectly. Place the burner cap and crown correctly. The flame extinguishes im‐ Thermocouple is not heat‐ mediately after ignition. ed up sufficiently. After lightning the flame, keep the knob pushed for equal or less than 10 sec‐ onds. The flame ring is uneven. Make sure that the injector is not blocked and the burner crown is clean. Burner crown is blocked with food residues. 7.2 If you cannot find a solution...
www.electrolux.com 8.1 Before the installation Before you install the hob, write down the information bellow from the rating plate. The rating plate is on the bottom of the hob. Model ....................................... PNC ......................................... Serial number ........................... 8.
ENGLISH The connection should be suitable for connecting to R 1/2 (1/2 BSP male thread). When the final connection has been made, it is essential that a thorough leak test is carried out on the hob and installation. Make sure that the main connection pipe does not exert any strain on the hob. If you use flexible metal pipes make sure that they agree to ISO 10380 and ISO 10807 standards. Be careful they do not come in touch with mobile parts or they are not squeezed.
www.electrolux.com of clamps fixed to the side of the cabinet, in order to avoid any contact with the equipment beneath the cooktop. • Make sure that there is access to the mains plug after the installation. Electrical Requirements Permanent electrical installation must agree with the latest I.E.E. Regulations and local Electricity Board regulations. For your own safety the installation must be done by a qualified electrician (e.g.
ENGLISH To replace the connection cable use only H03V2V2-F T90 or equivalent type. Make sure that the cable section is applicable to the voltage load and the working temperature. The yellow/ green earth wire (B) must be approximately 2 cm longer than the live and neutral wire (A). A 15 A 10 mm 11 mm 3 mm 11 mm B A B 1. Connect the green and yellow (earth) wire to the terminal which is marked with the letter 'E', or the earth symbol , or coloured green and yellow. 2.
www.electrolux.com Kitchen unit with oven The electrical connection of the hob and the oven must be installed separately for safety reasons and to let easy remove oven from the unit. 9. TECHNICAL INFORMATION 9.1 Hob dimensions Width 594 mm Depth 510 mm 9.2 Bypass diameters BURNER Ø BYPASS 1/100 mm Triple Crown 56 Semi-rapid 32 Auxiliary 28 9.
ENGLISH 17 9.5 Gas burners for LPG G30/G31 28-30/37 mbar BURNER NORMAL POWER kW MINIMUM POWER kW INJECTOR NOMINAL GAS FLOW g/h MARK 1/100 G30 28-30 G31 37 mbar mm mbar Triple Crown 4,0 1,4 98 291 286 Semi-rapid 2,0 0,45 71 145 143 Auxiliary 1,0 0,33 50 73 71 10. ENERGY EFFICIENCY 10.
www.electrolux.
ENGLISH 19
867321431-B-122015 www.electrolux.