EGS7534X EGS7536X EN IT Hob Piano cottura User Manual Istruzioni per l’uso 2 20
www.electrolux.com CONTENTS 1. SAFETY INFORMATION....................................................................................2 2. SAFETY INSTRUCTIONS..................................................................................5 3. INSTALLATION.................................................................................................. 8 4. PRODUCT DESCRIPTION.............................................................................. 12 5. DAILY USE...................................
ENGLISH 3 of incorrect installation or usage. Always keep the instructions in a safe and accessible location for future reference. 1.1 Children and vulnerable people safety • • • • • • This appliance can be used by children aged from 8 years and above and persons with reduced physical, sensory or mental capabilities or lack of experience and knowledge if they have been given supervision or instruction concerning the use of the appliance in a safe way and understand the hazards involved.
www.electrolux.com • • • • • • • • • • • • • WARNING: The appliance and its accessible parts become hot during use. Care should be taken to avoid touching heating elements. WARNING: Unattended cooking on a hob with fat or oil can be dangerous and may result in fire. Never use water to extinguish the cooking fire. Switch off the appliance and cover flames with e.g. a fire blanket or lid.
ENGLISH • • 5 When you route the mains cable, make sure that the cable doesn't come into direct contact (for example using insulating sleeving) with parts that can reach temperatures of more than 50°C above room temperature. WARNING: Use only hob guards designed by the manufacturer of the cooking appliance or indicated by the manufacturer of the appliance in the instructions for use as suitable or hob guards incorporated in the appliance. The use of inappropriate guards can cause accidents. 2.
www.electrolux.com • • • • • • • • • Make sure the mains cable or plug (if applicable) does not touch the hot appliance or hot cookware, when you connect the appliance to a socket. Do not use multi-plug adapters and extension cables. Make sure not to cause damage to the mains plug (if applicable) or to the mains cable. Contact our Authorised Service Centre or an electrician to change a damaged mains cable.
ENGLISH • • Do not use the appliance as a work surface or as a storage surface. When you place food into hot oil, it may splash. WARNING! Risk of fire and explosion • • • • Fats and oil when heated can release flammable vapours. Keep flames or heated objects away from fats and oils when you cook with them. The vapours that very hot oil releases can cause spontaneous combustion. Used oil, that can contain food remnants, can cause fire at a lower temperature than oil used for the first time.
www.electrolux.com 3. INSTALLATION WARNING! Refer to Safety chapters. 3.1 Before the installation threaded nut G 1/2". Screw the parts without force, adjust the connection in the necessary direction and tighten everything. Before you install the hob, write down the information below from the rating plate. The rating plate is on the bottom of the hob. Model ....................................... PNC ......................................... Serial number ........................... 3.
ENGLISH 9 you must fit an applicable pressure adjuster on the gas supply pipe. 3.4 Adjustment of minimum level To adjust the minimum level of the burners: 1. Light the burner. 2. Turn the knob on the minimum position. 3. Remove the knob and the gasket. WARNING! Make sure to place the gasket exactly in the original position. WARNING! Make sure the flame does not go out when you quickly turn the knob from the maximum position to the minimum position. WARNING! Pay attention not to damage the gasket.
www.electrolux.com To prevent contact between the cable and the appliance below the hob use the clamps which are on the side of the cabinet. 3.7 Assembly 1. A A. Rigid copper pipe or flexible pipe of stainless steel 3.6 Connection cable To replace the connection cable use only the special cable or its equivalent. The cable type is: H03V2V2-F T90. 2. Make sure that the cable section is applicable to the voltage and the working temperature.
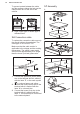
ENGLISH 11 3.8 Installing hob under the hood 5. If you install the hob under a hood, please see the installation instructions of the hood for the minimum distance between the appliances. 3.9 Possibilities for insertion 6. The panel installed below the hob must be easy to remove and let an easy access in case a technical assistance intervention is necessary. Kitchen unit with door 7. A min 6 mm B 8. A A. Supplied seal B. Supplied bracket B min 30 mm min 5 mm (max 150 mm) 60 mm A.
www.electrolux.com 4. PRODUCT DESCRIPTION 4.1 Cooking surface layout 2 1 3 1 2 3 4 5 Semi-rapid burner Multi Crown burner Rapid burner Auxiliary burner Control knobs 4 5 4.2 Control knob Symbol Symbol Description Description ignition position / maxi‐ mum gas supply no gas supply / off posi‐ tion minimum gas supply 5. DAILY USE WARNING! Refer to Safety chapters. A 5.1 Burner overview B A C D B C D A. B. C. D. Burner cap Burner crown Ignition candle Thermocouple 5.
ENGLISH WARNING! Be very careful when you use open fire in the kitchen environment. The manufacturer declines any responsibility in case of the flame misuse. 1. Push the control knob down and turn it counterclockwise to the maximum gas supply position ( ). 2. Keep the control knob pushed for equal or less than 10 seconds. This lets the thermocouple warm up. If not, the gas supply is interrupted. 3. Adjust the flame after it is regular.
www.electrolux.com 6.1 Cookware CAUTION! Do not use cast iron pans, clay or earthenware pots, grilling accessories or toaster plates. The stainless steel can become tarnished if it is too much heated. WARNING! Do not put the same pan on two burners. WARNING! Do not put unstable or damaged pots on the burner to prevent spills and injuries.
ENGLISH • • • 15 To remove burnt food, fat and stubborn stains let them soak in a small amount of mild detergent for a few minutes before cleaning. Use cleaning products designed specifically for cleaning stainless steel in order to protect the steel surfaces. Do not use cleaning products containing corrosive chemicals such as chlorides, do not clean the surface with disinfectants, stain or rust removers and immersion cleaners. 7.
www.electrolux.com 7.4 Cleaning the spark plug 7.5 Periodic maintenance This feature is obtained through a ceramic ignition candle with a metal electrode. Keep these components well clean to prevent difficult lighting and check that the burner crown holes are not obstructed. Speak to your local Authorised Service Centre periodically to check the conditions of the gas supply pipe and the pressure adjuster, if fitted. 8. TROUBLESHOOTING WARNING! Refer to Safety chapters. 8.1 What to do if...
ENGLISH 8.3 Labels supplied with the accessories bag Stick the adhesive labels as indicated below: A B MOD. MOD. PROD.NO. PROD.NO. SER.NO SER.NO DATA DATA C MOD. PROD.NO. SER.NO. 0049 TYPE IP20 03 IT MADE IN ITALY A. Stick it on Guarantee Card and send this part (if applicable). B. Stick it on Guarantee Card and keep this part (if applicable). C. Stick it on instruction booklet. 9. TECHNICAL DATA 9.1 Hob dimensions Width 744 mm Depth 510 mm 9.
www.electrolux.com 9.3 Other technical data TOTAL POW‐ ER: Electric supply: Gas original: G20 (2H) 20 mbar 12,0 kW Gas replace‐ ment: G30 (3+) 28-30 mbar 825 g/h G31 (3+) 37 mbar 811 g/h 220-240 V ~ 50-60 Hz Appliance cate‐ II2H3+ gory: Gas connec‐ tion: G 1/2" Appliance class: 3 9.4 Gas burners for NATURAL GAS G20 20 mbar BURNER NORMAL POWER MINIMUM POWER kW kW INJECTOR MARK Multi Crown 4,0 1,4 146 Rapid 3,0 0,75 119 Semi-rapid 2,0 0,45 96 Auxiliary 1,0 0,33 70 9.
ENGLISH Energy efficiency per gas burner (EE gas burner) Left rear - Semi-rapid 61.2% Right rear - Rapid 54.4% Centre middle - Multi crown 54.7% Left front - Semi-rapid 57.6% Right front - Auxiliary not applicable Energy efficiency for the gas hob (EE gas hob) 57.0% Model identification EGS7536X Type of hob Built-in hob Number of gas burners 5 Energy efficiency per gas burner (EE gas burner) Left rear - Semi-rapid 55.9% Right rear - Rapid 56.4% Centre middle - Multi crown 55.
www.electrolux.com INDICE 1. INFORMAZIONI DI SICUREZZA......................................................................20 2. ISTRUZIONI DI SICUREZZA........................................................................... 23 3. INSTALLAZIONE..............................................................................................26 4. DESCRIZIONE DEL PRODOTTO....................................................................31 5. UTILIZZO QUOTIDIANO..........................................
ITALIANO 21 sono responsabili di eventuali lesioni o danni derivanti da un'installazione o un uso scorretti. Conservare sempre le istruzioni in un luogo sicuro e accessibile per poterle consultare in futuro. 1.
www.electrolux.com • • • • • • • • • • • • in agriturismi e altre sistemazioni simili in cui tale utilizzo non superi i livelli di utilizzo domestico (medi). AVVERTENZA: L’elettrodomestico e le parti accessibili si riscaldano molto durante l'uso. Fare attenzione a non toccare gli elementi riscaldanti. AVVERTENZA: Non lasciare mai il piano cottura incustodito durante la preparazione di pietanze in quanto olio e grassi potrebbero incendiarsi. Non usare mai acqua per spegnere il fuoco di cottura.
ITALIANO • • • 23 Se l'apparecchiatura è collegata direttamente alla corrente, è necessario un interruttore onnipolare con contatti separati. Lo scollegamento completo deve avvenire in linea con le condizioni indicate nella categoria III di sovratensione. Il cavo di terra è escluso.
www.electrolux.com dell'apparecchiatura per rendere inaccessibile la base. 2.2 Collegamento elettrico AVVERTENZA! Rischio di incendio e scossa elettrica. • • • • • • • • • • • • • • Tutti i collegamenti elettrici devono essere effettuati da un elettricista qualificato . L'apparecchiatura deve disporre di una messa a terra. Prima di qualsiasi intervento è necessario verificare che l'apparecchiatura sia scollegata dalla rete elettrica.
ITALIANO 2.4 Utilizzo: • AVVERTENZA! Rischio di lesioni, ustioni o scosse elettriche. ATTENZIONE! L'uso di un’apparecchiatura di cottura a gas determina la produzione di calore, umidità e prodotti di combustione nella stanza in cui è installata. Assicurarsi che la cucina sia ben ventilata, specialmente quando l'apparecchiatura è in uso.
www.electrolux.com • • • • Utilizzare solo gli accessori forniti con l’apparecchiatura. Non installare uno spargifiamma sul bruciatore. Non lasciare che sostanze acide, come per esempio aceto, succo di limone o anticalcare vengano a contatto con il piano cottura. Ciò può causare macchie opache. Lo scolorimento dello smalto o dell'acciaio inox non influisce sulle prestazioni dell'elettrodomestico. 2.5 Pulizia e cura AVVERTENZA! Non togliere pulsanti, manopole o guarnizioni dal pannello dei comandi.
ITALIANO utilizzano tubi in metallo flessibili, fare attenzione che non entrino in contatto con parti mobili o non siano schiacciati. Ulteriore attenzione è richiesta qualora al piano di cottura fosse abbinato il forno. Accertarsi che la pressione del gas di alimentazione dell'apparecchiatura sia conforme ai valori consigliati. Se la pressione fornita non ha il valore specificato, è necessario montare un adeguato regolatore di pressione in conformità allo standard UNI EN 88.
www.electrolux.com AVVERTENZA! Prestare attenzione a non danneggiare la guarnizione. Non usare attrezzi affilati per toglierla. 4. Con un cacciavite sottile, regolare la posizione della vite di by-pass (A). A 5. Se si passa da: • gas naturale G20 a 20 mbar a gas liquido, serrare a fondo la vite di by-pass. • da gas liquido a gas naturale G20 a 20 mbar, svitare la vite di bypass di circa 1/4 di giro (1/2 giro per bruciatore mullti-corona). 6. Rimontare la guarnizione e la manopola. 3.
ITALIANO Accertarsi che il cavo sia di sezione idonea alla tensione e alla temperatura di esercizio. Il cavo di terra giallo/verde deve essere circa 2 cm più lungo del cavo di fase marrone (o nero). 2. L 3. min. 150 mm N 1. Collegare il filo di colore verde e giallo (terra) al morsetto contrassegnato dalla lettera "E" o dal o colorato di simbolo di terra verde e giallo. 2. Collegare il filo di colore blu (neutro) al morsetto contrassegnato dalla lettera 'N' o colorato di blu. 3.
www.electrolux.com 3.9 Possibilità di inserimento A Il pannello installato sotto il piano di cottura deve essere facilmente rimovibile e altrettanto facilmente deve consentire l'accesso in caso di interventi dell'assistenza tecnica. Unità da cucina con porta B 8. A. Guarnizione in dotazione B. Staffa in dotazione min 6 mm A ATTENZIONE! Installare l'apparecchiatura esclusivamente su un piano di lavoro dalla superficie piatta. 3.
ITALIANO 4. DESCRIZIONE DEL PRODOTTO 4.1 Disposizione della superficie di cottura 2 1 3 1 2 3 4 5 Bruciatore semirapido Bruciatore multi corona Bruciatore rapido Bruciatore ausiliario Manopole di regolazione 4 5 4.2 Manopola di regolazione Simbolo Simbolo Descrizione Descrizione alimentazione minima del gas alimentazione gas as‐ sente/posizione di spen‐ to posizione di accensione/ alimentazione massima del gas 5. UTILIZZO QUOTIDIANO AVVERTENZA! Fare riferimento ai capitoli sulla sicurezza.
www.electrolux.com 5.2 Accensione del bruciatore Accendere sempre il bruciatore prima di posizionare una pentola. AVVERTENZA! Fare attenzione in fase di utilizzo di fiamme libere all'interno della cucina. Il produttore declina qualsiasi responsabilità in caso di cattivo utilizzo delle fiamme. 1. Premere la manopola di regolazione e ruotarla in senso antiorario fino alla posizione massima ( ). 2. Tenere premuta la manopola di regolazione per circa 10 secondi.
ITALIANO 33 6. CONSIGLI E SUGGERIMENTI UTILI AVVERTENZA! Fare riferimento ai capitoli sulla sicurezza. 6.1 Pentole ATTENZIONE! Non usare pentole in ghisa, teglie in terracotta o coccio, accessori per il grill o piastre tostapane. L’acciaio inox può brunire se sottoposto ad eccessivo riscaldamento. AVVERTENZA! Non mettere la stessa pentola su due bruciatori. AVVERTENZA! Evitare di posare sul bruciatore pentole instabili o deformate per prevenire versamenti e lesioni.
www.electrolux.com 7. PULIZIA E CURA AVVERTENZA! Fare riferimento ai capitoli sulla sicurezza. 7.1 Informazioni generali • Pulire il piano cottura dopo ogni utilizzo. • Usare sempre pentole con il fondo pulito. • Graffi o macchie scure sulla superficie non hanno alcun effetto sul funzionamento del piano cottura. • Usare un prodotto di pulizia adatto alla superficie del piano di cottura. Acciaio inox • • • • asciugare i supporti pentole a mano.
ITALIANO • • contrario la sporcizia potrebbe causare danni al piano cottura. Attenzione a evitare le ustioni. Quando il piano di cottura è sufficientemente raffreddato, è possibile rimuovere: i segni di calcare e d'acqua, le macchie di grasso e le macchie opalescenti. Pulire il piano di cottura con un panno umido e un detergente non abrasivo. Al termine della pulizia, asciugare il piano di cottura con un panno morbido.
www.electrolux.com 8.2 Se non è possibile trovare una soluzione... rivenditore potrà essere effettuato a pagamento anche durante il periodo di garanzia. Le istruzioni relative al Centro di Assistenza e alle condizioni di garanzia sono contenute nel libretto della garanzia. Qualora non sia possibile trovare una soluzione al problema, contattare il rivenditore o il Centro di Assistenza Autorizzato. Fornire i dati riportati sulla targhetta dei dati.
ITALIANO BRUCIATORE Ø BYPASS 1/100 mm Rapido 42 Semi rapido 32 Ausiliario 28 37 9.3 Altri dati tecnici POTENZA TO‐ TALE: Alimentazione elettrica: Gas - Origi‐ nale: G20 (2H) 20 mbar 12,0 kW Gas - sostitu‐ G30 (3+) 28-30 mbar zione: G31 (3+) 37 mbar 825 g/h 811 g/h 220-240 V ~ 50-60 Hz Categoria del‐ II2H3+ l'apparecchiatu‐ ra: Collegamento gas: G 1/2" Classe dell'ap‐ parecchiatura: 3 9.
www.electrolux.com 10. EFFICIENZA ENERGETICA 10.
ITALIANO • • • 39 Se possibile, coprire sempre le pentole con il coperchio. Quando il liquido inizia a bollire, abbassare la fiamma per provocare una lenta ebollizione del liquido. Se possibile, utilizzare una pentola a pressione. Fare riferimento al relativo manuale per l'utente. 11. CONSIDERAZIONI SULL'AMBIENTE Riciclare i materiali con il simbolo . Buttare l'imballaggio negli appositi contenitori per il riciclaggio.
867367286-B-132022 www.electrolux.