C e r a m i c g l a s s h o b Installation and Operating Instructions EHC 3833-U 315 821 903-A-050406-01 g
Dear customer, Please read these operating instructions carefully. Pay particular attention to the section “Safety information” on the first few pages. Please retain these operating instructions for later reference. Pass them on to possible new owners of the appliance. 1 3 2 The following symbols are used in the text: Safety instructions Warning: Information concerning your personal safety. Important: Information on how to avoid damaging the appliance.
Contents Operating Instructions . . . . . . . . . . . . . . . . . . . . . . . . . . . . . . . . . . . . . 4 Safety instructions . . . . . . . . . . . . . . . . . . . . . . . . . . . . . . . . . . . . . . . . . . . . 4 Description of the Appliance . . . . . . . . . . . . . . . . . . . . . . . . . . . . . . . . . . . . Cooking surface layout . . . . . . . . . . . . . . . . . . . . . . . . . . . . . . . . . . . . . . . . . . Control panel layout . . . . . . . . . . . . . . . . . . . . . . . . . . . . . . .
Operating Instructions 1 Safety instructions 3 5 Please comply with these instructions. If you do not, any damage resulting is not covered by the warranty. This appliance conforms with the following EU Directives: – 73/23/EEC dated 19.02.1973 Low Voltage Directive – 89/336/EEC dated 03.05.1989 EMC Directive inclusive of Amending Directive 92/31/EEC – 93/68/EEC dated 22.07.1993 CE Marking Directive Correct use • This appliance should be used only for normal domestic cooking and frying of food.
Safety during use • Overheated fats and oils can ignite quickly. When cooking with fat or oil (e.g. chips) do not leave the appliance unattended. • There is the risk of burns from the appliance if used carelessly. • Remove stickers and film from the glass ceramic. • Cables from electrical appliances must not touch the hot surface of the appliance or hot cookware. • Switch the cooking zones off after each use. Safety when cleaning • For cleaning, the appliance must be switched off and cooled down.
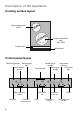
Description of the Appliance Cooking surface layout Single cooking zone 1200W Double ring cooking zone 700/1700W Frontline strip Control panel Control panel layout Child lock pilot light Warm up pilot light Heat setting indicator Heat setting selection Child lock 6 Automatic warm-up func- Double ring pilot light Timer indicator Timer selection Timer Heat setting indicator Warm up pilot light Automatic warm-up Outside ring On/Off On/Off pilot light On/Off Heat setting selection
Touch Control sensor fields The appliance is operated using Touch Control sensor fields. Functions are controlled by touching sensor fields and confirmed by displays and acoustic signals. Touch the sensor fields from above, without covering other sensor fields.
Operating the appliance Switching the appliance on and off 3 3 Control panel Display Pilot light Switch on Touch for 2 seconds lights up Switch off Touch for 1 second ¾/h h / none goes out After switching on, within approx. 10 seconds a heat setting or a function must be set, otherwise the appliance automatically switches itself off. Switching off also works by touching and at the same time. This applies for all individual functions, for example, ”Switching off the Timer”.
Using the automatic warm-up function All cooking zones are equipped with an automatic warm-up function. The automatic warm-up function sets the cooking zone to the highest setting for a certain period of time and then automatically switches back to the cooking setting that was originally set.
Using the child safety device 3 The child safety device prevents unintentional use of the appliance. The child safety device can only be switched on and off, if the appliance is switched on, but no cooking zone has a heat setting set. Activating the child safety device Step Control panel Indicator/Signal 1. Switch on the appliance (Do not set a heat setting) ¾ 2. Touch l Appliance switches off. The child safety device is activated.
Using the timer All cooking zones can use each use one of the two timer functions at the same time. 3 Function Condition Outcome after time has elapsed Safety cut-out When a heat setting is set acoustic signal 0 lights up Cooking zone switches off Countdown timer When cooking zones are not used acoustic signal 0 lights up If a heat setting is set on this cooking zone in addition to a countdown timer, the cooking zone is switched off after the time set has elapsed.
Switching off the Timer function Step Control panel Indicator 1. Select cooking zone Pilot light for the selected cooking zone flashes more quickly Remaining time is displayed 2. Touch The remaining time counts down to 0. The pilot light goes out. The Timer function for the selected cooking zone is switched off. Changing the time Step Control panel Indicator 1. Select zone Pilot light of the selected cooking zone flashes faster Time remaining is displayed 2.
Safety cut-out Cooking surface • If after switching on the cooking surface, a heat setting is not set for a cooking zone within approx. 10 seconds, the cooking surface automatically switches itself off. • If one or more sensor fields are covered for longer than approx. 10 seconds, e.g. by a pan placed upon it, a signal sounds and the cooking surface switches off automatically. • If all cooking zones are switched off, the cooking surface automatically switches itself off after approx. 10 seconds.
Tips on Cooking and Frying 3 Information on acrylamides According to the latest scientific knowledge, intensive browning of food, especially in products containing starch, can constitute a health risk due to acrylamides. Therefore we recommend cooking at the lowest possible temperatures and not browning foods too much. Cookware • You can recognise good cookware from the bottoms of the pans. The bottom should be as thick and flat as possible.
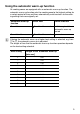
Examples of cooking applications The information given in the following table is for guidance only. Heat setting Cookingprocess 0 suitable for Cooking time Tips/Hints Off position Keeping food warm Keeping cooked foods warm as required Cover Melting Hollandaise sauce, melting butter, chocolate, gelatine 5-25 mins. Stir occasionally Solidifying Fluffy omelettes, baked eggs 10-40 mins.
Cleaning and Care 1 1 1 Take care! Risk of burns from residual heat. Warning! Sharp objects and abrasive cleaning materials will damage the appliance. Clean with water and washing up liquid. Warning! Residues from cleaning agents will damage the appliance. Remove residues with water and washing up liquid. Cleaning the appliance after each use 1. Wipe the appliance with a damp cloth and a little washing up liquid. 2. Rub the appliance dry using a clean cloth. Removing deposits 1.
What to do if … Problem Possible cause The cooking zones will not More than 10 seconds have switch on or are not function- passed since the appliance ing was switched on 1 3 Remedy Switch the appliance on again.
Disposal 2 2 Packaging material The packaging materials are environmentally friendly and can be recycled. The plastic components are identified by markings, e.g. >PE<, >PS<, etc. Please dispose of the packaging materials in the appropriate container at the community waste disposal facilities. Old appliance W on the product or on its packaging indicates that this prodThe symbol uct may not be treated as household waste.
Installation Instructions Safety instructions 1 1 The laws, ordinances, directives and standards in force in the country of use are to be followed (safety regulations, proper recycling in accordance with the regulations, etc.) Installation may only be carried out by a qualified electrician. The minimum distances to other appliances and units are to be observed.
Assembly 20
Installing more than one Frontline hob 3 Additional parts: cross bar(s), heat resistant silicon, rubber block, shaving blade. Only use special heat-resistant silicon. Cut-out section Distance from the wall: at least 50 mm Depth:490 mm Width: The widths of all appliances to be built-in are added together, minus 20 mm (see also “Overview of all appliance widths”) Example: Installing more than one appliance 1. Work out the size of the cut-out section and saw it out. 2.
5. Place first appliance in the cut-out. Lay connecting cross bar in the cutout and push up halfway against the appliance. 6. Put silicon on the appliance corners that will touch one another. Put silicon on the end of the cross bar. 7. Loosely screw in fixing plates / retaining grips from below on the worktop and on the connecting cross bar.
8. Place Frontline strips on the appliances. Check that the Frontline strips are in line with one another. 9. Tighten the fixing plate / retaining grip screws. 10.Inject a line of silicon into the gap between the appliances. 11.Dampen silicon line with a little soapy water. 12.Press rubber block hard against the glass ceramic and draw it slowly along the gap. 13.Leave silicon until the next day to harden. 14.Carefully remove projecting silicon with a shaving blade. 15.Clean glass ceramic thoroughly. 16.
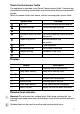
Overview of all appliance widths 180 mm Worktop-mounted cooker hood 360 mm Glass ceramic cooking surface with 2 radiation cooking zones Glass ceramic cooking surface with 2 induction cooking zones Gas hob with 2 burners Grill Grill/Deep fat fryer Wok 580 mm Glass ceramic cooking surface with 4 radiation cooking zones Gas hob with 4 burners 720 mm Glass ceramic cooking surface with 4 radiation cooking zones Glass ceramic cooking surface with 4 induction cooking zones Gas hob with 4 burners Rating Plate 941
Service In the event of technical faults, please first check whether you can remedy the problem yourself with the help of the operating instructions (section “What to do if…”). If you were not able to remedy the problem yourself, please contact the Customer Care Department or one of our service partners. In order to be able to assist you quickly, we require the following information: – Model description – Product number (PNC) – Serial number (S No.
315 821 903-B-050406-02 Subject to change without notice The Electrolux Group. The world´s No.1 choice. The Electrolux Group is the world´s largest producer of powered appliances for kitchen, cleaning and outdoor use. More than 55 million Electrolux Group products (such as refrigerators, cookers, washing machines, vacuum cleaners, chain saws and lawn mowers) are sold each year to a value of approx. USD 14 billion in more than 150 countries around the world.