user manual notice d’utilisation gebruiksaanwijzing Induction hob Table de cuisson vitrocéramique à induction Inductiekookplaat EHD 60150 P
electrolux Electrolux. Thinking of you. Share more of our thinking at www.electrolux.com Contents Safety instructions.................................. 3 Description of the Appliance .................. 4 Operating the appliance ......................... 6 Tips on Cooking and Frying ................... 14 Cleaning and Care ................................. 16 What to do if … ..................................... 17 5 Disposal ................................................ Installation Instructions ..
electrolux 3 1 Safety instructions Please comply with these instructions. If you do not, any damage resulting is not covered by the warranty. Correct use • This appliance is not intended for use by children or other persons whose physical, sensory or mental capabilities or lack of experience and knowledge prevents them from using the appliance safely without supervision or instruction by a responsible person to ensure that they can use the appliance safely.
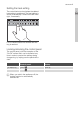
electrolux Description of the Appliance Cooking surface layout Induction cooking zone 1800 W with power function 2800 W Induction cooking zone 1800 W with power function 2800 W Induction cooking zone 2300 W with power function 3700 W Control panel Induction cooking zone 1400 W with power function 1800 W Cooking zone indicators Timer function Pan recognition and automatic switch-off indicator Control panel layout Child lock with STOP+GO with indicator display Power function Timer display Heat se
electrolux 5 Touch Control sensor fields The appliance is operated using Touch Control sensor fields. Functions are controlled by touching sensor fields and confirmed by displays and acoustic signals. Touch the sensor fields from above, without covering other sensor fields.
electrolux Control bar The heat setting and the power function are set via the control bar. The heat setting indicator consists of a chain of light elements. Operational readiness indicator for cooking zone Heat setting indicator Power function indicator Power function Heat setting selection Cooking zone Off 3 If the control bar is touched for longer than 6 seconds, a signal sounds and the appliance switches itself off.
electrolux 7 Setting the heat setting The control bar is touched where the desired heat setting is positioned. The heat setting is shown in the display. Correct to the left or the right, if necessary. Do not release before the desired heat setting is reached. Locking/unlocking the control panel The control panel, with the exception of the “On/Off” sensor field, can be locked at any time in order to prevent the settings being changed e.g. by wiping over the panel with a cloth.
electrolux Turning the STOP+GO function on and off The STOP+GO function simultaneously toggles all active cooking zones to keep-warm mode then back to the heat setting they were at before. Control panel To switch on To switch off Display Touch Keep-warm setting Touch Previous heat setting (not automatic warm-up or power function) 3 STOP+GO does not stop timer functions. 3 STOP+GO controls the entire control panel apart from the sensor field .
electrolux 9 Heat setting Warm-up time [min:sec] 1 0:10 2 0:10 3 3:10 4 5:50 5 10:10 6 2:00 7 2:30 8 2:50 9 --- Using the child safety device The child safety device prevents unintentional use of the appliance. Switching on the child safety device Control panel Pilot light 1. Step Switch on appliance. (Do not set a heat setting.) lights up. The operational readiness indicators of the individual cooking zones light up. 2.
electrolux Overriding the child safety device The child safety device can be switched off in this way for a single cooking session; it remains activated afterwards. Step Control panel 1. 2. Switch appliance on Touch for 4 seconds Pilot light over lights up over goes out. Until the appliance is next switched off, it can used as normal. The child safety device is still active after switching off. 3 After overriding the child safety device, a heat setting or a function must be set within approx.
electrolux 11 Power Management The cooking zones of the cooking surface have a maximum power. Example: the heat setting 9 is selected on one cooking zone. The power function is switched on for the corresponding cooking zone. The power function is carried out but the heat setting 9 of one of the cooking zones and the power function for the other cooking zone of the pair exceed the maximum power for both at the same time.
electrolux Selecting a cooking zone Step Control panel Display 1. Touch once Pilot light of the first cooking zone flashes 2. Touch once Pilot light of the second cooking zone flashes 3. Touch once Pilot light of the third cooking zone flashes 4. Touch once Pilot light of the fourth cooking zone flashes 3 If other timer functions are set, after a few seconds the shortest remaining time of all the timer functions is displayed and the corresponding pilot light flashes.
electrolux 13 Changing the time Step Control panel Indicator 1. Select Pilot light of the selected cooking zone flashes faster Time remaining is displayed 2. Touch cooking zone or 01 to 99 minutes After a few seconds, the pilot light flashes more slowly. The time is set. The time counts down. Displaying the time remaining for a cooking zone Step 1.
electrolux Heat setting Switches off after 1-2 6 hours 3-4 5 hours 5 4 hours 6-9 1.5 hours Tips on Cooking and Frying 3 Information on acrylamides According to the latest scientific knowledge, intensive browning of food, especially in products containing starch, can constitute a health risk due to acrylamides. Therefore we recommend cooking at the lowest possible temperatures and not browning foods too much.
electrolux 15 Pan size Up to a certain limit, induction cooking zones adapt themselves to the size of the bottom of the cookware automatically. However, depending on the cooking zone size, themagnetic part of the bottom of the cookware must have a minimum diameter. Diameter of cooking zone [mm] Minimum diameter of dish base [mm] 210 180 180 145 145 120 3 The cookware must be placed centrally on the cooking zone. Tips on energy saving 2 Place cookware on the cooking zone before it is switched on.
electrolux Heat setting Cookingprocess suitable for Cooking time Tips/Hints 6-7 Gentle Frying Frying escalopes, veal cordon bleu, cutlets, rissoles, sausages, liver, roux, eggs, pancakes, doughnuts Steady frying Turn halfway through cooking 7-8 Heavy Frying Hash browns, loin steaks, steaks, Flädle (pancakes for garnishing soup) 5-15 mins.
electrolux 17 What to do if … Problem Possible cause The appliance cannot be switched More than 10 seconds have on or is not operating passed since the appliance was switched on The lock is switched on Remedy Switch the appliance on again.
electrolux Problem and number are displayed Possible cause Electronics fault If you are unable to remedy the problem by following the above suggestions, please contact your local Service Force Centre. 1 Warning! Repairs to the appliance are only to be carried out by qualified service engineers. Considerable danger to the user may result from improper repairs. 3 If the appliance has been operated incorrectly, the engineer's visit will be chargeable, even during the warranty period.
electrolux 19 2 1 3 Disposal 2 Packaging material The packaging materials are environmentally friendly and can be recycled. The plastic components are identified by markings, e.g. >PE<, >PS<, etc. Please dispose of the packaging materials in the appropriate container at the community waste disposal facilities. 2 Old appliance W on the product or on its The symbol packaging indicates that this product may not be treated as household waste.
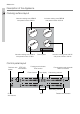
electrolux Installation Instructions 1 Safety instructions Warning! This must be read! The laws, ordinances, directives and standards in force in the country of use are to be followed (safety regulations, proper recycling in accordance with the regulations, etc.) Installation may only be carried out by a qualified electrician. The minimum distances to other appliances and units are to be observed.
electrolux 21 Service In the event of technical faults, please first check whether you can remedy the problem yourself with the help of the operating instructions (section “What to do if…”). If you were not able to remedy the problem yourself, please contact the Customer Care Department or one of our service partners. In order to be able to assist you quickly, we require the following information: – – – Model description Product number (PNC) Serial number (S No.
electrolux Electrolux. Thinking of you. Share more of our thinking at www.electrolux.com Sommaire Avertissements importants..................... Description de l'appareil......................... Utilisation de l’appareil ........................... Conseils de cuisson ............................... Nettoyage et entretien............................ Que faire si … ........................................ 23 24 26 34 36 37 Protection de l’environnement ............... Instructions d'installation ....
electrolux 23 1 Avertissements importants Pour ne pas perdre le bénéfice de la garantie en cas de panne, veuillez observer ces recommandations.
electrolux • • Ne pas placer de plats de cuisson vides sur les zones de cuisson et ne pas mettre ces dernières en fonctionnement sans récipient. Eviter de faire chauffer à vide les casseroles et les poêles. Cela peut endommager l'ustensile de cuisson ou la vitrocéramique. • Ne recouvrez pas l’espace de 5cm permettant d’aérer l’espace entreestiné le plan de travail et la face avant du meuble.
electrolux 25 Touche sensitive “Touch Control” Les touches sensitives Touch Control permettent de commander l’appareil. Une pression sur les touches sensitives permet d’activer les fonctions et le fonctionnement de ces dernières est confirmé par des voyants ou par des signaux sonores. Appuyez sur les touches sensitives par un mouvement de haut en bas, en évitant de recouvrir les autres touches.
electrolux Bandeau de commande Le niveau de cuisson et la fonction Puissance se règlent à partir du bandeau de commande. L’indicateur du niveau de cuisson consiste en une chaîne d’éléments lumineux.
electrolux 27 3 Après la mise sous tension, il est nécessaire d’activer un niveau de cuisson ou une fonction dans les 10 secondes environ qui suivent dans le cas contraire l’appareil se déconnecte automatiquement. Sélectionner le niveau de cuisson Appuyez sur la touche correspondant au niveau de cuisson souhaité. Le niveau de cuisson s’affiche. Corrigez-le au besoin en effleurant une autre position, à droite ou à gauche.
electrolux Activer/désactiver la fonction STOP+GO La fonction STOP+GO active la fonction de maintien au chaud pour toutes les zones de cuisson actives en même temps, et les fait repasser ensuite au niveau de cuisson initial.
electrolux 29 La durée du démarrage automatique de la cuisson dépend du niveau cuisson sélectionné. Niveau de cuisson Durée du démarrage automatique de cuisson [min:sec] 1 0:10 2 0:10 3 3:10 4 5:50 5 10:10 6 2:00 7 2:30 8 2:50 9 --- Utilisation de la sécurité enfants La sécurité enfants évite toute activation non souhaitée de l’appareil. Activer la sécurité enfants Étape Bandeau de commande 1. Mettre l’appareil en fonctionnement (ne pas sélectionner de niveau de cuisson) 2.
electrolux Brider la sécurité enfant La sécurité enfant peut être désactivée le temps d'une cuisson seulement, elle reste active ensuite. Étape Bandeau de commande 1. 2. Mettre l’appareil en fonctionnement effleurer pendant 4 secondes Voyant de contrôle s’allume s’éteint. Jusqu'à la prochaine mise à l'arrêt de l’appareil, celui-ci peut être utilisé normalement. La sécurité enfants reste active après la mise hors tension.
electrolux 31 Gestion de la puissance Les zones de cuisson de la plaque de cuisson disposent d’un niveau de puissance maximum. La puissance maximale est atteinte lorsque le niveau de puissance 9 est activé pour toutes les zones de cuisson Deux zones de cuisson forment une paire, (voir graphique), c’est-à-dire que le dispositif de gestion de puissance répartit la puissance maximale disponible entre ces deux zones de cuisson.
electrolux Sélection d’une zone de cuisson Etape Bandeau de commande Affichage 1. Appuyez sur 1fois Le voyant de contrôle de la première zone de cuisson clignote 2. Appuyez sur 1fois Le voyant de contrôle de la seconde zone de cuisson clignote 3. Appuyez sur 1fois Le voyant de contrôle de la troisième zone de cuisson clignote 4.
electrolux 33 Modifier la durée Etape Bandeau de commande Voyant 1. Sélectionner une zone de cuisson Le voyant de contrôle de la zone de cuisson sélectionnée clignote plus rapidement. Le temps restant s’affiche 2. ou effleurer 01 à 99 minutes Au bout de quelques secondes, le voyant de contrôle clignote plus lentement. Le temps est à présent réglé. Le temps est désormais décompté. Affichage du temps restant d’une zone de cuisson Etape Bandeau de commande 1.
electrolux Niveau de cuisson Désactivation après 1-2 6 heures 3-4 5 heures 5 4 heures 6-9 1 heure 30 Conseils de cuisson 3 Conseils relatifs à l’acrylamide Selon les connaissances scientifiques les plus récentes, faire brunir les aliments de manière intensive, en particulier les produits contenant de l’amidon, peut provoquer des problèmes de santé dus à l’acrylamide. C’est pourquoi nous vous recommandons de faire cuire à basse température et de ne pas trop faire brunir les aliments.
electrolux 35 Fond de l’ustensile de cuisine Le fond de l’ustensile de cuisine doit être aussi épais et plan que possible. Taille des casseroles Jusqu’à une limite déterminée, les zones de cuisson par induction s’adaptent automatiquement à la taille du fond de l’ustensile de cuisine. Cependant, selon la taille de la zone de cuisson, il faut que la partie magnétique sur le fond de cet ustensile dispose d’un diamètre minimal.
electrolux Niveau de cuisson Type de cuisson adapté à Durée Remarques/conseils Faire cuire des pommes de terre à l’étuvée 20-60 min Utilisez juste un peu d’eau, par ex. max.
electrolux 37 Enlever les salissures 1. Placez le grattoir de nettoyage obliquement par rapport à la surface de la vitrocéramique. 2. Enlevez les salissures en faisant glisser la lame. 3. Nettoyez l’appareil à l’aide d’un chiffon humide et un peu de produit de nettoyage. 4. Séchez l’appareil avec un chiffon propre.
electrolux Symptôme Cause possible Bandeau de commande sale Solution Les touches à effleurement doivent être sèches et exemptes de traces graisse. L’indicateur de chaleur résiduelle ne s'affiche pas La zone de cuisson fonctionne Si la zone de cuisson est chaude, seulement depuis peu et n’est par contactez le service après-vente.
electrolux 39 Bruits lors du fonctionnement Selon le matériau et l’usinage du fond de l’appareil de cuisson les bruits suivants peuvent être perçus lorsque les zones de cuisson par induction sont en marche : • Crépitement (1) lorsque la batterie de cuisson est composée de plusieurs matériaux (usinage en sandwich) • Sifflement (1) lorsqu’une ou plusieurs zones de cuisson sont utilisées à haute puissance et que la batterie de cuisson est composée de plusieurs matériaux (usinage en sandwich) • Bourdonnement
electrolux clage de ce produit, veuillez prendre contact avec les services de votre commune ou le magasin où vous avez effectué l’achat. Instructions d'installation 1 Conseils de sécurité Attention! A lire impérativement! L’utilisateur est tenu de respecter la législation, la réglementation, les directives et les normes en vigueur dans le pays de destination de l’appareil (dispositions réglementaires en matière de sécurité, de recyclage, etc.
electrolux 41 Service après-vente En cas d’anomalie de fonctionnemet vérifiez d’abord si vous ne pouvez pas remédier vous-même au dysfonctionnement à l’aide de la notice d’utilisation (chapitre “Que faire, si...“). Si vous ne parvenez pas à remédier au dysfonctionnement, veuillez contacter votre vendeur ou à défaut le Centre Contact Consommateurs qui vous communiquera l’adresse service après-vente.
electrolux Electrolux. Thinking of you. Share more of our thinking at www.electrolux.com Inhoud Veiligheidsvoorschriften .......................... Beschrijving van het apparaat ................ Bediening van het apparaat ................... Tips voor koken en braden .................... Reiniging en onderhoud ......................... Wat is er aan de hand als … .................. 43 44 46 54 56 57 Afvalverwerking ..................................... Montageaanwijzing...............................
electrolux 43 1 Veiligheidsvoorschriften Neem deze aanwijzingen in acht, omdat anders bij eventuele schade het recht op garantie vervalt. Gebruik volgens de voorschriften • Personen (waaronder begrepen kinderen) die op grond van hun fysieke, sensorische of verstandelijke vermogens, dan wel op grond van onervarenheid of onkunde niet in staat zijn het apparaat veilig te gebruiken, dienen dit apparaat niet zonder het toezicht of zonder de instructies van een verantwoordelijke persoon te gebruiken.
electrolux • Het droogkoken van pannen moet worden voorkomen. Hierdoor kan het kookgerei of glaskeramiek worden beschadigd. • De luchtopening van 5 mm tussen de werkplaat en het daaronder liggende meubelfront mag niet niet worden afgedekt.
electrolux 45 Touch-control-sensorvelden Het apparaat wordt bediend door middel van touch-control-sensorvelden. Functies worden door het aanraken van de sensorvelden gestuurd en door indicaties en akoestische signalen bevestigd. De sensorvelden moeten van bovenaf worden aangeraakt, zonder andere sensorvelden te bedekken.
electrolux Bedieningsstrip De kookstand en de Powerfunctie worden via de bedieningsstrip ingesteld. De kookstandindicatie bestaat uit een reeks lichtelementen. Standby-indicatie kookzone Indicatie kookstand Indicatie Powerfunctie Powerfunctie Uit kookzone Kookstandkeuze 3 Wordt de bedieningsstrip langer dan 6 seconden aangeraakt, dan klinkt er een akoestisch signaal en wordt het apparaat uitgeschakeld.
electrolux 47 Kookstand instellen De bedieningsstrip op de plaats van de gewenste kookstand aanraken. De kookstand wordt in de indicatie aangegeven. Eventueel naar links of rechts corrigeren. Niet loslaten voordat de gewenste kookstand is bereikt. Bedieningsveld vergrendelen / ontgrendelen Het bedieningsveld kan met uitzondering van het sensorveld ”Aan/Uit“ op ieder gewenst moment worden vergrendeld, bijv. om het wijzigen van de instellingen als gevolg van het met een lap afnemen, te voorkomen.
electrolux STOP+GO-functie in- en uitschakelen De STOP+GO-functie schakelt alle ingeschakelde kookzones gelijktijdig in die warmhoudstand en weer in de vooraf ingestelde kookstand. Bedieningsveld Indicatie Inschakelen aanraken Warmhoudstand Uitschakelen aanraken Vooraf ingestelde kookstand (niet aankook-/automatische functie of Powerfunctie) 3 De timer-functies worden door STOP+GO niet stop gezet. 3 STOP+GO vergrendelt het totale bedieningsveld tot het sensorveld .
electrolux 49 De duur van de automatische kookactivering is afhankelijk van de ingestelde kookstand. Kookstand Duur van de automatische kookactivering [min.:sec.] 1 0:10 2 0:10 3 3:10 4 5:50 5 10:10 6 2:00 7 2:30 8 2:50 9 --- Kinderbeveiliging gebruiken De kinderbeveiliging voorkomt ongewenst gebruik van het apparaat. Kinderbeveiliging inschakelen Stap Bedieningsstrip Controlelampje 1. Apparaat inschakelen (geen kookstand instellen) brandt.
electrolux Kinderbeveiliging tijdelijk uitschakelen De kinderbeveiliging kan op deze wijze voor een eenmalig kookproces worden uitgeschakeld; bij het volgende gebruik is de beveiliging weer actief. Stap Bedieningsstrip 1. Apparaat inschakelen 2. 4 seconden aanraken Controlelampje boven brandt boven dooft Het apparaat kan normaal worden gebruikt totdat het de volgende keer wordt uitgeschakeld. Na het uitschakelen is de kinderbeveiliging nog steeds actief.
electrolux 51 Powermanagement De kookzones van het kookveld beschikken over een maximaal vermogen. Voorbeeld: bij een kookzone is de kookstand 9 gekozen. Voor de bijbehorende kookzone wordt de powerfunctie ingeschakeld. De powerfunctie wordt uitgevoerd, maar kookstand 9 bij een kookzone en tegelijk powerfunctie bij de andere kookzone van een paar overschrijdt het maximale vermogen voor beide.
electrolux Kookzone kiezen Stap Bedieningsveld Indicatie 1. 1xaanraken Controlelampje van de eerste kookzone knippert 2. 1xaanraken Controlelampje van de tweede kookzone knippert 3. 1xaanraken Controlelampje van de derde kookzone knippert 4. 1xaanraken Controlelampje van de vierde kookzone knippert 3 Als meerdere Timerfuncties zijn inge- steld, dan wordt na een aantal seconden de kortste resterende tijd van alle Timerfuncties aangegeven en knippert het bijbehorende controlelampje.
electrolux 53 Tijd wijzigen Stap 1. 2. Bedieningsveld Kookzone kiezen of aanraken Indicatie Controlelampje van de gekozen kookzone knippert sneller. Resterende tijd wordt aangegeven 01 tot 99 minuten Na een aantal seconden knippert het controlelampje langzamer. De tijd is ingesteld. De tijd telt terug. Resterende tijd van een kookzone aangeven Stap 1.
electrolux Kookstand Uitschakeling na 1-2 6 uur 3-4 5 uur 5 4 uur 6-9 1,5 uur Tips voor koken en braden 3 Aanwijzing met betrekking tot acrylamide Volgens de laatste wetenschappelijke inzichten kan een intensieve bruining van levensmiddelen, met name bij zetmeelhoudende producten, een gevaar voor de gezondheid door acrylamide veroorzaken. Om die reden adviseren wij levensmiddelen zoveel mogelijk bij lage temperaturen te bereiden en de gerechten niet te veel te bruinen.
electrolux 55 Pangrootte Inductie-kookzones passen zich automatisch aan aan de grootte van de kookgereibodem, tot een bepaalde grens. Wel moet het magnetische deel van de kookgereibodem afhankelijk van de kookzonegrootte een minimale doorsnede hebben. Diameter kookzone [mm] Minimumdiameter panbodem [mm] 210 180 180 145 145 120 3 Het kookgerei moet op het midden van de kookzones staan. Tips voor energiebesparing 2 Kookgerei vóór het inschakelen van de kookzone plaatsen.
electrolux Kookstand Kookproces Geschikt voor Duur Aanwijzingen/tips 6-7 Zacht braden Schnitzel, cordon bleu, karbonade, gehaktballen, braadworst, lever, roux, eieren, omelets, oliebollen Voortdurend bakken Tussendoor keren 7-8 Sterk braden Aardappel koekjes, lendestukken, steaks, pannenkoeken 5-15 min.
electrolux 57 3 Hardnekkige verontreinigingen verwijde- 3 Krassen of donkere vlekken in het glasren met een speciaal schoonmaakmiddel voor glaskeramiek of roestvrij staal. keramiek kunnen niet meer worden verwijderd, zij hebben echter geen invloed op het functioneren van het apparaat. Wat is er aan de hand als … Storing Mogelijke oorzaak Oplossing De kookzones kunnen niet worden Sinds het inschakelen van het ap- Apparaat opnieuw inschakelen.
electrolux Storing brandt Mogelijke oorzaak Oplossing Oververhittingsbeveiliging van de kookzone ingeschakeld Kookzone uitschakelen Kookzone weer inschakelen Automatische uitschakeling geac- Apparaat uitschakelen. Apparaat tiveerd weer inschakelen en nummer wordt aangegeven Fout in de elektronica Wanneer u de storing niet kunt verhelpen met de hierboven gegeven aanwijzingen, neem dan contact op met uw vakhandel of met onze service-afdeling.
electrolux 59 2 1 3 Afvalverwerking 2 Verpakkingsmateriaal De verpakkingsmaterialen zijn niet schadelijk voor het milieu en herbruikbaar. De kunststoffen hebben de volgende aanduidingen, bijv. >PE<, >PS<, enz. Verwijder de verpakkingsmaterialen in overeenstemming met de aanduiding bij de gemeentelijke inzamelplaatsen in de daarvoor bestemde containers. 2 Oud apparaat verwijderen W Het symbool op het product of op de verpakking wijst erop dat dit product niet als huishoudafval mag worden behandeld.
electrolux Montageaanwijzing 1 Veiligheidsaanwijzingen Let op! Lees deze informatie! De in het land van gebruik geldende wetgeving, verordeningen, richtlijnen en normen dienen te worden nageleefd (veiligheidsvoorschriften, vakkundige recycling volgens de voorschriften, enz.). De montage mag slechts door een gekwalificeerd technicus worden uitgevoerd. De minimumafstanden tot andere apparaten en meubelen dienen in acht te worden genomen.
electrolux 61 Service Controleer bij technische storingen eerst of u met behulp van de gebruiksaanwijzing (hoofdstuk „Wat te moet doen als…“) het probleem zelf kunt oplossen. Wanneer u het probleem niet kunt oplossen, neemt u contact op met onze service-afdeling. Om u snel te kunnen helpen, hebben wij de volgende gegevens nodig: – – – Modelaanduiding Productnummer (PNC) Serienummer (S-No.
electrolux assembly / montage / montage Assembly / Montage / Montage
assembly / montage / montage electrolux 63
electrolux assembly / montage / montage
assembly / montage / montage electrolux 65
electrolux Rating Plate / Plaque signalétique / Typeplaatje EHD60150P 55GADD5AU 230 V 949 592 880 50 Hz Induction 7,4 kW 7,4 kW ELECTROLUX
www.electrolux.com www.electrolux.fr www.electrolux.nl www.electrolux.