user manual Gas hob EHG60412
electrolux Electrolux. Thinking of you. Share more of our thinking at www.electrolux.com CONTENTS Safety information Installation Product description Operating instructions Helpful hints and tips 2 4 8 8 9 Care and cleaning What to do if… Technical data Environment concerns 9 10 11 12 Subject to change without notice SAFETY INFORMATION Warning! These instructions are only valid in the countries whose symbols appear on this booklet's cover.
electrolux 3 • Use only the accessories supplied with appliance. • Be careful when you connect the appliance to the near sockets. Do not let electricity bonds touch the appliance or hot cookware. Do not let electricity bonds tangle. Installation • You must read these instructions. The manufacturer is not responsible for any injury to persons and pets or damage to property caused by failure to obey these requirements.
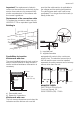
electrolux with applicable cable. Speak to your local Service Force Centre. • The appliance must have the electrical installation which lets you disconnect the appliance from the mains at all poles with a contact opening width of minimum 3 mm. • If the fixing bracket is near to the terminal block, always make sure the connection cable does not come in contact with the edge of the bracket.
electrolux 5 components as shown in the diagram. Screw the parts together without using excessive force. 1 2 3 1 End of shaft with nut 2 Washer 3 Elbow Connection to the gas supply should be with either rigid or semi-rigid pipe, i.e. steel or copper. The connection should be suitable for connecting to R 1/2 (1/2 BSP male thread). When the final connection has been made, it is essential that a thorough leak test is carried out on the hob and installation.
electrolux • Always use a correctly installed shockproof socket. • Make sure that there is an access to the mains plug after installation. • Do not pull the mains cable to disconnect the appliance. Always pull the mains plug. • The appliance must not be connected with an extension cable, an adapter or a multiple connection (risk of fire). Check that the ground connection is in conformity with the standard and regulations force.
electrolux 7 Important! The replacement of electric cable must be carried out exclusively by the service force centre or by personnel with similar competencies, in accordance with the current regulations. sure that the cable section is applicable to the voltage and the working temperature. The yellow/green earth wire must be approximately 2 cm longer than the brown (or black) phase wire. Replacement of the connection cable To replace the connection cable use only H05V2V2-F T90 or equivalent type.
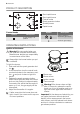
electrolux PRODUCT DESCRIPTION 2 1 3 6 4 5 1 2 3 4 5 6 Control knobs Semi-rapid burner Semi-rapid burner Control knobs Spark generator button Auxiliary burner Rapid burner Symbol Symbol Description Description ignition position / maximum gas supply no gas supply / off position minimum gas supply OPERATING INSTRUCTIONS Ignition of the burner Warning! Be very careful when you use open fire in kitchen environment.
electrolux 9 If the burner accidentally goes out, turn the control knob to the off position and try to light the burner again after minimum 1 minute. The spark generator can start automatically when you switch on the mains, after installation or a power cut. It is normal. Turning the burner off To put the flame out, turn the knob to the . symbol Warning! Always turn the flame down or switch it off before you remove the pans of the burner.
electrolux After cleaning, dry the appliance with a soft cloth. The stainless steel can become tarnished if it is too much heated. Refer to this you must not cook with potstones, earthenware pans or cast iron plates. Do not use aluminium foil to prevent damage the top during operation. Removing the dirt: 1. – Remove immediately: melting plastic, plastic foil, and food containing sugar.
electrolux 11 If there is a fault, first try to find a solution to the problem yourself. If you cannot find a solution to the problem yourself, speak your dealer or the local Service Force Centre. If you operated the appliance incorrectly, or the installation was not carried out by a registered engineer, the visit from the customer service technician or 1 dealer may not take place free of charge, even during the warranty period.
electrolux Gas connection: R 1/2 " Category: II2H3+ Gas supply: G20 (2H) 20 mbar Appliance class: Burner Ø By-pass in 1/100 mm. Semi-rapid 32 Rapid 42 3 By-pass diameters Burner Ø By-pass in 1/100 mm. Auxiliary 28 Gas burners NORMAL POWER REDUCED POWER NORMAL POWER NATURAL GAS G20 (2H) 20 mbar BURNER kW kW inj. 1/100 mm m³/h LPG (Butane/Propane) G30/G31 (3+) 28-30/37 mbar inj. 1/100 mm G30 28–30 mbar G31 37 mbar g/h g/h Auxiliary burner 1.0 0.33 70 0.
electrolux 13
electrolux
electrolux 15
www.electrolux.