user manual Gas hob GB EHG 9832
electrolux Electrolux. Thinking of you. Share more of our thinking at www.electrolux.com CONTENTS Safety information Installation Product description Operating instructions Helpful hints and tips 2 4 8 8 9 Care and cleaning What to do if… Technical data Environment concerns 10 11 12 12 Subject to change without notice SAFETY INFORMATION Warning! These instructions are only valid in the countries whose symbols appear on this booklet's cover.
electrolux 3 • Use only the accessories supplied with appliance. • Be careful when you connect the appliance to the near sockets. Do not let electricity bonds touch the appliance or hot cookware. Do not let electricity bonds tangle. Installation • You must read these instructions. The manufacturer is not responsible for any injury to persons and pets or damage to property caused by failure to obey these requirements.
electrolux with applicable cable. Speak to your local Service Force Centre. • The appliance must have the electrical installation which lets you disconnect the appliance from the mains at all poles with a contact opening width of minimum 3 mm. • If the fixing bracket is near to the terminal block, always make sure the connection cable does not come in contact with the edge of the bracket.
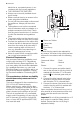
electrolux 5 components as shown in the diagram. Screw the parts together without using excessive force. 1 2 3 1 End of shaft with nut 2 Washer 3 Elbow Connection to the gas supply should be with either rigid or semi-rigid pipe, i.e. steel or copper. The connection should be suitable for connecting to R 1/2 (1/2 BSP male thread). When the final connection has been made, it is essential that a thorough leak test is carried out on the hob and installation.
electrolux electrician or competent person, in accordance with the current regulations. • THIS HOB MUST BE EARTHED. • Always use a correctly installed shockproof socket. • Make sure that there is an access to the mains plug after installation. • Do not pull the mains cable to disconnect the appliance. Always pull the mains plug. • The appliance must not be connected with an extension cable, an adapter or a multiple connection (risk of fire).
electrolux 7 Important! The replacement of electric cable must be carried out exclusively by the service force centre or by personnel with similar competencies, in accordance with the current regulations. Replacement of the connection cable To replace the connection cable use only H05V2V2-F T90 or equivalent type. Make sure that the cable section is applicable to the voltage and the working temperature. The yellow/green earth wire must be approximately 2 cm longer than the brown (or black) phase wire.
electrolux 50 cm2 120 cm2 360 cm2 180 cm2 MANUFACTURER: ELECTROLUX ITALIA S.p.A. C.
electrolux 9 2 Burner crown 3 Ignition candle 4 Thermocouple 1 Warning! If the burner does not light after 15 seconds, release the control knob, turn it into off position and try to light the burner again after minimum 1 minute. 2 Important! In the absence of electricity you can ignite the burner without electrical device; in this case approach the burner with a flame, push the relevant knob down and turn it counter-clockwise to maximum gas release position.
electrolux Warning! Make sure pot handles do not protrude over the front edge of the cooktop and that pots are centrally positioned on the rings in order to achieve maximum stability and to obtain lower gas consumption. Do not place unstable or deformed pots on the rings to prevent from spill and injury. Warning! Flame diffuser are not recommended. CARE AND CLEANING Warning! Switch the appliance off and let it cool down before you clean it.
electrolux 11 WHAT TO DO IF… Problem Possible cause There is no spark when lighting the gas Remedy • There is no electrical supply • Make sure that the unit is connected and the electrical supply is switched on. • Control the fuse. If the fuse is released more than one time, refer to a qualified electrician. • Burner cap and crown are placed uneven • Make sure that the burner cap and crown are in correct positions.
electrolux available on the identification plate from the injectors kit. • Model description ................. • Product number (PNC) ................. • Serial Number (S.N.) ................. Use the original spare parts only. They are available at Service Force Centre and approved spare parts shops.
electrolux 13 caused by inappropriate waste handling of this product. For more detailed information about recycling of this product, please contact your local council, your household waste disposal service or the shop where you purchased the product. Packaging material The packaging materials are friendly to the environment and can be recycled. The plastic components are identified by marking: >PE<,>PS<, etc.
electrolux
electrolux 15
www.electrolux.