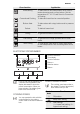
EN ACCESSORIES
www.electrolux.com SAFETY INFORMATION Before the installation and use of the appliance, carefully read the supplied instructions. The manufacturer is not responsible if an incorrect installation and use causes injuries and damages. Always keep the instructions with the appliance for future reference. CHILDREN AND VULNERABLE PEOPLE SAFETY WARNING! Risk of suffocation, injury or permanent disability.
ENGLISH 3 • Do not use harsh abrasive cleaners or sharp metal scrapers to clean the glass door since they can scratch the surface, which may result in shattering of the glass. • To remove the shelf supports first pull the front of the shelf support and then the rear end away from the side walls. Install the shelf supports in the opposite sequence. SAFETY INSTRUCTIONS INSTALLATION WARNING! Only a qualified person must install this appliance. • Remove all the packaging.
www.electrolux.com • Do not change the specification of this appliance. • Make sure that the ventilation openings are not blocked. • Do not let the appliance stay unattended during operation. • Deactivate the appliance after each use. • Be careful, when you open the appliance door while the appliance is in operation. Hot air can release. • Do not operate the appliance with wet hands or when it has contact with water. • Do not apply pressure on the open door.
ENGLISH • Dispose of the appliance at any shop that sells new appliances or at the official SENS collection point. You can find the list of the official SENS collection points at www.sens.ch.
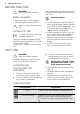
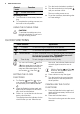
www.electrolux.com BEFORE FIRST USE WARNING! Refer to the Safety chapters. After approximately five seconds, the flashing stops and the display shows the time of day you set. INITIAL CLEANING Useful information: • Remove all parts from the appliance. • Clean the appliance before first use. Refer to chapter "Care and Cleaning". SETTING THE TIME You must set the time before you operate the appliance.
ENGLISH Oven function 7 Application Pizza Setting To bake food on one shelf position for a more intensive browning and a crispy bottom. Set the temperature 20 - 40 °C lower than for Conventional Cooking. Conventional Cooking To bake and roast food on one shelf position. Bottom Heat To bake cakes with crispy bottom and to preserve food. Defrost To defrost frozen food. Grilling To grill flat food and to toast bread. Fast Grilling To grill flat food in large quantities and to toast bread.
www.electrolux.com Control knob Function 1. 2. Double zone switch Operating the hob: 1. Turn the knob to a necessary heat setting. 2. To complete the cooking process, turn the knob to the off position. 3. Turn the knob clockwise to position 9. Turn the knob slowly to the symbol until you can hear a click. The two cooking zones are on. To set the necessary heat setting refer to "Heat settings". USING THE DOUBLE ZONE CAUTION! To activate the double zone, turn the knob clockwise.
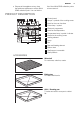
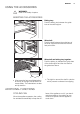
ENGLISH 9 USING THE ACCESSORIES WARNING! Refer to the Safety chapters. INSERTING THE ACCESSORIES Baking tray: Push the baking tray between the guide bars of the shelf support. Wire shelf: Push the shelf between the guide bars of the shelf support and make sure that the feet point down. Wire shelf and baking tray together: Push the baking try between the guide bars of the shelf support and the wire shelf on the guide bars above.
www.electrolux.com HELPFUL HINTS AND TIPS For build - under ovens: EXAMPLES OF COOKING APPLICATIONS FOR HOB The data in the table is for guidance only.
ENGLISH • Cakes and pastries at different heights do not always brown equally at first. If this occurs, do not change the temperature setting. The differences equalize during the baking procedure. 11 • Unless otherwise stated, the values in the tables assume that the appliance is cold when the cooking starts. TIPS ON BAKING Baking results Possible cause Remedy The bottom of the cake is not browned sufficiently. The shelf position is incorrect. Put the cake on a lower shelf.
www.electrolux.
ENGLISH 13 Oven function Shelf position Temperature (°C) Time (min) Conventional Cooking 3 170 35 - 55 True Fan Cooking 3 160 - 170 40 - 80 Conventional Cooking 3 160 - 180 1) 40 - 80 Oven function Shelf position Temperature (°C) Time (min) Short pastry biscuits True Fan Cooking 3 150 - 160 10 - 20 Short bread / Short bread / Pastry Stripes True Fan Cooking 3 140 20 - 35 Short bread / Short bread / Pastry Stripes Conventional Cooking 3 160 1) 20 - 30 Biscuits made with sp
www.electrolux.
ENGLISH 15 True Fan Cooking Type of baking Shelf position Temperature (°C) Time (min) 2 levels 3 levels Biscuits made with sponge mixture 1/4 --- 160 - 170 25 - 40 Biscuits made with egg white, meringues 1/4 --- 80 - 100 130 - 170 Macaroons 1/4 --- 100 - 120 40 - 80 Biscuits made with yeast dough 1/4 --- 160 - 170 30 - 60 Puff pastries 1/4 --- 170 - 180 1) 30 - 50 Rolls 1/4 --- 180 30 - 55 Small cakes / Small cakes (20 per tray) 1/4 --- 1501) 25 - 40 1) Preheat the
www.electrolux.com ROASTING Roasting dishes • Use heat-resistant ovenware to roast (refer to the instructions of the manufacturer). • You can roast large roasting joints directly in the deep pan (if present) or on the wire shelf above the deep pan. • Roast lean meats in the roasting tin with the lid. This keeps the meat more succulent. • All types of meat that can be browned or have crackling can be roasted in the roasting tin without the lid.
ENGLISH 17 Veal Type of meat Quantity Oven function Shelf position Temperature (°C) Time (min) Roast veal 1 kg Turbo Grilling 1 160 - 180 90 - 120 Knuckle of veal 1.5 - 2 kg Turbo Grilling 1 160 - 180 120 - 150 Type of meat Quantity Oven function Shelf position Temperature (°C) Time (min) Leg of lamb, roast lamb 1 - 1.5 kg Turbo Grilling 1 150 - 170 100 - 120 Saddle of lamb 1 - 1.
www.electrolux.com Type of meat Quantity Oven function Shelf position Temperature (°C) Time (min) Turkey 2.5 - 3.5 kg Turbo Grilling 1 160 - 180 120 - 150 Turkey 4 - 6 kg Turbo Grilling 1 140 - 160 150 - 240 Type of meat Quantity Oven function Shelf position Temperature (°C) Time (min) Whole fish 1 - 1.5 kg Conventional Cooking 1 210 - 220 40 - 60 Fish (steamed) GRILLING • Always grill with the maximum temperature setting.
ENGLISH 19 CONVENIENCE FOOD True Fan Cooking Convenience food Shelf position Temperature (°C) Time (min) Pizza, frozen 2 200 - 220 15 - 25 Pizza American, frozen 2 190 - 210 20 - 25 Pizza, chilled 2 210 - 230 13 - 25 Pizza Snacks, frozen 2 180 - 200 15 - 30 French Fries, thin 3 200 - 220 20 - 30 French Fries, thick 3 200 - 220 25 - 35 Wedges / Croquettes 3 220 - 230 20 - 35 Hash Browns 3 210 - 230 20 - 30 Lasagne / Cannelloni, fresh 2 170 - 190 35 - 45 Lasagne / Can
www.electrolux.
ENGLISH 21 Vegetables Temperature (°C) Cooking time until simmering (min) Continue to cook at 100 °C (min) Carrots 1) 160 - 170 50 - 60 5 - 10 Cucumbers 160 - 170 50 - 60 --- Mixed pickels 160 - 170 50 - 60 5 - 10 Kohlrabi, peas, asparagus 160 - 170 50 - 60 15 - 20 Preserve 1) Leave standing in oven when switched off For best results: deactivate the appliance after half the time required. Open the appliance door and let the appliance cool down. After that finish the drying process.
www.electrolux.com can cause a damage to the nonstick coating. SHELF SUPPORTS Removing the shelf supports You can remove the shelf supports to clean the side walls. 1. Pull the front of the shelf support away from the side wall. 2. Pull the rear end of the shelf support away from the side wall and remove it. 2 1 Installing the shelf supports Install the shelf supports in the opposite sequence. OVEN CEILING You can fold down the heating element on the oven ceiling to clean the oven ceiling easily.
ENGLISH 2. Install the heating element correctly above the supports on the inner walls of the appliance. Install the shelf supports. 23 REMOVING / INSERTING THE DOOR To clean the door remove it. CAUTION! Be careful when you remove the door from the appliance. The door is heavy. There is a risk of injury or damage to the appliance. A A Removing the door 1. Open the door as far as it goes. 2. Press down the clamping levers (A) on the two door hinges. 3. 4.
www.electrolux.com 3. 4. 5. Replace the lamp with a halogen, 230 V, 25 W, 300 °C heat resistant oven lamp. Install the glass cover. Install the shelf support. WHAT TO DO IF… WARNING! Refer to the Safety chapters. Problem Possible cause Remedy The cooking zone do not operate. Refer to the user manual for the hob. The appliance does not heat up. The appliance is not activated. Activate the appliance. Refer to the chapter "Daily use". The appliance does not heat up. The clock is not set.
ENGLISH Serial number (Serie:) 25 ......................................... INSTALLATION WARNING! Refer to the Safety chapters. The handle profile can be replaced to match the décor of your kitchen. The change must be done by an authorized person. Use only genuine replacement parts. min. 3 mm To lift the appliance, do not use the door handle.
www.electrolux.com A 4. min. 20 B WARNING! When installing next to a wood-fuelled boiler, a heatproof and heatinsulating plate must be mounted at the height of the appliance and at least 30 cm deep. 10 20 Use at least 2 screws to fix the oven on both sides (Detail A). A ELECTRICAL CONNECTION Use a power cable of H05VV-F or higher. Connect the appliance to a socket supply line.
ENGLISH 2 3 4 1 1 = 45 mm 2 = 45 mm 3 = 60 mm 4 = 60 mm = 70 mm 1 2 3 4 CH GARANTIE, GARANZIA, GUARANTEE KUNDENDIENST, SERVICE-CLIENTÈLE, SERVIZIO CLIENTI, CUSTOMER SERVICE CENTRES Servicestellen Points de Service Servizio dopo vendita 5506 Mägenwil/Zürich Industriestrasse 10 3018 Bern Morgenstrasse 131 9000 St. Gallen Zürcherstrasse 204e 4052 Basel St.
www.electrolux.com Ersatzteilverkauf/Points de vente de rechange/Vendita pezzi di ricambio/ spare parts service: 5506 Mägenwil, Industriestrasse 10, Tel. 0848 848 111 Fachberatung/Verkauf/Demonstration/ Vente/Consulente (cucina)/Vendita 8048 Zürich, Badenerstrasse 587, Tel. 044 405 81 11 Garantie Für jedes Produkt gewähren wir ab Verkauf bzw. Lieferdatum an den Endverbraucher eine Garantie von 2 Jahren. (Ausweis durch Garantieschein, Faktura oder Verkaufsbeleg).
ENGLISH 29
www.electrolux.
ENGLISH 31
www.electrolux.