EHGL3X ................................................ .............................................
www.electrolux.com CONTENTS 1. 2. 3. 4. 5. 6. 7. 8. 9. 10. 11. 12. 13. SAFETY INFORMATION . . . . . . . . . . . . . . . . . . . . . . . . . . . . . . . . . . . . . . . . . . . . . . . . . . . 3 SAFETY INSTRUCTIONS . . . . . . . . . . . . . . . . . . . . . . . . . . . . . . . . . . . . . . . . . . . . . . . . . . 4 PRODUCT DESCRIPTION . . . . . . . . . . . . . . . . . . . . . . . . . . . . . . . . . . . . . . . . . . . . . . . . . 6 BEFORE FIRST USE . . . . . . . . . . . . . . . . . . . . . . . . . . .
ENGLISH 3 1. SAFETY INFORMATION Before the installation and use of the appliance, carefully read the supplied instructions. The manufacturer is not responsible if an incorrect installation and use causes injuries and damages. Always keep the instructions with the appliance for future reference. 1.1 Children and vulnerable people safety WARNING! Risk of suffocation, injury or permanent disability.
www.electrolux.com • Before maintenance cut the power supply. • Do not use harsh abrasive cleaners or sharp metal scrapers to clean the glass door since they can scratch the surface, which may result in shattering of the glass. • Be careful, when you touch the storage drawer. It can get hot. • To remove the shelf supports first pull the front of the shelf support and then the rear end away from the side walls. Install the shelf supports in the opposite sequence.
ENGLISH • Make sure not to cause damage to the mains plug and to the mains cable. Contact the Service or an electrician to change a damaged mains cable. • Do not let mains cables to come in touch with the appliance door, specially when the door is hot. • The shock protection of live and insulated parts must be fastened in such a way that it cannot be removed without tools. • Connect the mains plug to the mains socket only at the end of the installation.
www.electrolux.com • Replace immediately the door glass panels when they are damaged. Contact the Service. • Be careful when you remove the door from the appliance. The door is heavy! • Clean regularly the appliance to prevent the deterioration of the surface material. • Remaining fat or food in the appliance can cause fire. • Clean the appliance with a moist soft cloth. Only use neutral detergents. Do not use abrasive products, abrasive cleaning pads, solvents or metal objects.
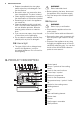
ENGLISH 7 3.1 Accessories Wire shelf For cookware, cake tins, roasts. Baking tray For cakes and biscuits. Grill- / Roasting pan To bake and roast or as a pan to collect fat. Storage drawer Below the oven cavity is the storage drawer. WARNING! The storage drawer can become hot when the appliance operates. Do not store any flammable materials in the drawer. 4. BEFORE FIRST USE WARNING! Refer to the Safety chapters. 4.1 Initial Cleaning • Remove all parts from the appliance.
www.electrolux.com You must not set the Duration or ) function at the same time. End • In case of a power cut up to 1 hour, the time of day is shown and the indicator for the Time of Day function flashes. Make sure that the time is correct and press the Selection button to stop the flashing. • In case of a power cut longer than 1 hour, you must set the time again. 5. DAILY USE WARNING! Refer to the Safety chapters. To use the appliance, press the control knob. The control knob comes out. 5.
ENGLISH Oven function 9 Application Fast Grilling To grill flat food in large quantities and to toast bread. Turbo Grilling To roast larger meat joints or poultry with bones on one shelf position. Also to make gratins and to brown. 5.3 Electronic programmer 1 2 3 1 Function indicators 2 Time display 3 Function indicator 4 Button + hr min 5 Selection button 6 Button - 6 5 4 If you do not use the appliance for 3 minutes, the brightness of the display decreases to lower the power consumption.
www.electrolux.com 6. CLOCK FUNCTIONS Clock function Duration End Minute Minder Time of day Application To set how long the appliance must operate. To set when the appliance must be deactivated. To set a countdown time. An acoustic signal sounds after the time period is completed. This function has no effect on the operation of the appliance. To set, change or check the time of day.
ENGLISH 11 Wire shelf: Push the shelf between the guide bars of the shelf support and make sure that the feet point down. Wire shelf and baking tray together: Push the baking try between the guide bars of the shelf support and the wire shelf on the guide bars above. • All accessories have small indentations at the top of the right and left side to increase safety. The indentations are also anti-tip devices. • The high rim around the shelf is a device which prevents cookware from slipping. 8.
www.electrolux.com Heat setting Use to: Time (min) Hints 2-3 Simmer rice and milkbased dishes, heating up readycooked meals 25 - 50 Add at least twice as much liquid as rice, stir milk dishes part way through 3-4 Steam vegetables, fish, meat 20 - 45 Add a few tablespoons of liquid 4-5 Steam potatoes 20 - 60 Use max.
ENGLISH Baking results 13 Possible cause Remedy The cake sinks and becomes soggy, lumpy or streaky. The baking time is too short. Set a longer baking time. You cannot decrease baking times by setting higher temperatures. The cake sinks and becomes soggy, lumpy or streaky. There is too much liquid in the mixture. Use less liquid. Be careful with mixing times, especially if you use a mixing machine. The cake is too dry. The oven temperature is too low.
www.electrolux.com Type of baking Oven function Shelf position Temperature (°C) Time (min) Apple pie / Apple pie (2 tins Ø20 cm, diagonally off set) Conventional Cooking 1 180 70 - 90 Cheesecake Conventional Cooking 1 170 - 190 60 - 90 Oven function Shelf position Temperature (°C) Time (min) Plaited bread / bread crown Conventional Cooking 3 170 - 190 30 - 40 Christmas stollen Conventional Cooking 2 160 - 180 1) 50 - 70 Bread (rye bread): 1. First part of baking process. 2.
ENGLISH 15 Biscuits Oven function Shelf position Temperature (°C) Time (min) Short pastry biscuits True Fan Cooking 3 150 - 160 10 - 20 Short bread / Short bread / Pastry Stripes True Fan Cooking 3 140 20 - 35 Short bread / Short bread / Pastry Stripes Conventional Cooking 3 160 1) 20 - 30 Biscuits made with sponge mixture True Fan Cooking 3 150 - 160 15 - 20 Pastries made with egg white, merungues True Fan Cooking 3 80 - 100 120 - 150 Macaroons True Fan Cooking 3 100 - 120
www.electrolux.com Oven function Shelf position Temperature (°C) Time (min) Sweet bakes Conventional Cooking 1 180 - 200 40 - 60 Fish bakes Conventional Cooking 1 180 - 200 30 - 60 Turbo Grilling or True Fan Cooking 1 160 - 170 30 - 60 Dish Stuffed vegetables 1) Preheat the oven 9.
ENGLISH 17 True Fan Cooking Type of baking Small cakes / Small cakes (20 per tray) Shelf position 2 levels 3 levels 1/4 --- Temperature (°C) Time (min) 1501) 25 - 40 1) Preheat the oven. 9.
www.electrolux.com 9.8 Roasting with Turbo Grilling Beef Type of meat Quantity Oven function Shelf position Temperature (°C) Time (min) Pot roast 1 - 1.
ENGLISH Type of meat 19 Quantity Oven function Shelf position Temperature (°C) Time (min) 1 - 1.5 kg Turbo Grilling 1 160 - 180 40 - 60 Type of meat Quantity Oven function Shelf position Temperature (°C) Time (min) Saddle of hare, leg of hare up to 1 kg Conventional Cooking 1 230 1) 30 - 40 Saddle of venison 1.5 - 2 kg Conventional Cooking 1 210 - 220 35 - 40 Haunch of venison 1.
www.electrolux.com 9.9 Grilling • Always grill with the maximum temperature setting. • Set the shelf in the shelf position as recommended in the grilling table. • Always set the pan to collect the fat into the first shelf position. • Grill only flat pieces of meat or fish. • Always preheat the empty oven with the grill functions for 5 minutes. CAUTION! Always grill with the oven door closed.
ENGLISH Shelf position Temperature (°C) Time (min) French Fries, thick Convenience food 3 200 - 220 25 - 35 Wedges / Croquettes 3 220 - 230 20 - 35 Hash Browns 3 210 - 230 20 - 30 Lasagne / Cannelloni, fresh 2 170 - 190 35 - 45 Lasagne / Cannelloni, frozen 2 160 - 180 40 - 60 Oven baked cheese 3 170 - 190 20 - 30 Chicken Wings 2 190 - 210 20 - 30 21 Frozen Ready Meals Food to be cooked Oven functions Shelf position Temperature (°C) Time (min) Frozen pizza Conventional
www.electrolux.com Dish Weight (g) Defrosting time (min) Further defrosting time (min) Comment 250 30 - 40 10 - 15 --- Butter Cream 2 x 200 80 - 100 10 - 15 Cream can also be whipped when still slightly frozen in places Gateau 1400 60 60 --- 9.12 Preserving - Bottom Heat Things to note: • Use only preserve jars of the same dimensions available on the market. • Do not use jars with twist-off and bayonet type lids, or metal tins. • Use the first shelf from the bottom for this function.
ENGLISH 23 1) Leave standing in oven when switched off For best results: deactivate the appliance after half the time required. Open the appliance door and let the appliance cool down. After that finish the drying process. 9.13 Drying - True Fan Cooking Cover the oven shelves with baking parchment.
www.electrolux.com WARNING! Do not attempt to clean catalytic surface with oven sprays, abrasive cleaners, soap or other cleaning agents. This will damage the catalytic surface. Spots or discolouration of the catalytic surface have no effect on the catalytic properties. 10.2 Shelf supports Removing the shelf supports You can remove the shelf supports to clean the side walls. 1. Pull the front of the shelf support away from the side wall. 2.
ENGLISH 3. 4. 25 Close the door until it is at an angle of approximately 45°. Hold the door with one hand on each side and pull it away from the appliance at an upwards angle. Put the door with the outer side down on a soft and level surface to prevent scratches. 45° Inserting the door To insert the door do the above steps in the opposite sequence. 10.4 Lamp WARNING! Danger of electrocution! Disconnect the fuse before you replace the lamp. The lamp and the lamp glass cover can be hot.
www.electrolux.com Problem Possible cause Remedy The cooking zone do not operate. Refer to the user manual for the hob. The appliance does not heat up. The appliance is not activated. Activate the appliance. Refer to the chapter "Daily use". The appliance does not heat up. The clock is not set. Set the clock. Refer to "Setting the time". The appliance does not heat up. The necessary settings are not set. Make sure that the settings are correct. The appliance does not heat up.
ENGLISH 27 12.1 Installing the oven under a work surface 600 A A A ca.50 A 757 N 762 + 3 A 435 170 A 160 A A 767 N 780 A = appliance N = recess 1. Install the hotplates according to the installation instruction no. 374307900 / 374307901 so that the hotplate socket connections can be carried out before the cooker is inserted. Make sure the correct socket connections are used. A separate earthing is not required. 2.
www.electrolux.com Only a qualified person can connect the appliance to the electricity supply. D E 1. 2. 3. 4. F 5. 6. Open the mains terminal cover (D). Put the connection cable into the supplied rings (E). This is to prevent the cable from rubbing against the drawer. The connection cable is on the housing side. Install the cable grip (F). Connect the terminal as in the illustration. Put the cable into the strain relief clamp. Close the mains terminal cover. 12.
ENGLISH Ersatzteilverkauf/Points de vente de rechange/Vendita pezzi di ricambio/ spare parts service: 5506 Mägenwil, Industriestrasse 10, Tel. 0848 848 111 Fachberatung/Verkauf/Demonstration/Vente/Consulente (cucina)/Vendita 8048 Zürich, Badenerstrasse 587, Tel. 044 405 81 11 Garantie Für jedes Produkt gewähren wir ab Verkauf bzw. Lieferdatum an den Endverbraucher eine Garantie von 2 Jahren. (Ausweis durch Garantieschein, Faktura oder Verkaufsbeleg).
www.electrolux.
ENGLISH 31
892956593-B-412013 www.electrolux.