EHGL4X ................................................ .............................................
www.electrolux.com CONTENTS 1. 2. 3. 4. 5. 6. 7. 8. 9. 10. 11. 12. 13. 14. SAFETY INFORMATION . . . . . . . . . . . . . . . . . . . . . . . . . . . . . . . . . . . . . . . . . . . . . . . . . . . 3 SAFETY INSTRUCTIONS . . . . . . . . . . . . . . . . . . . . . . . . . . . . . . . . . . . . . . . . . . . . . . . . . . 4 PRODUCT DESCRIPTION . . . . . . . . . . . . . . . . . . . . . . . . . . . . . . . . . . . . . . . . . . . . . . . . . 6 BEFORE FIRST USE . . . . . . . . . . . . . . . . . . . . . . . . .
ENGLISH 3 1. SAFETY INFORMATION Before the installation and use of the appliance, carefully read the supplied instructions. The manufacturer is not responsible if an incorrect installation and use causes injuries and damages. Always keep the instructions with the appliance for future reference. 1.1 Children and vulnerable people safety WARNING! Risk of suffocation, injury or permanent disability.
www.electrolux.com • Before maintenance cut the power supply. • Do not use harsh abrasive cleaners or sharp metal scrapers to clean the glass door since they can scratch the surface, which may result in shattering of the glass. • Only use the core temperature sensor recommended for this appliance. • Be careful, when you touch the storage drawer. It can get hot. • To remove the shelf supports first pull the front of the shelf support and then the rear end away from the side walls.
ENGLISH • Make sure that the electrical information on the rating plate agrees with the power supply. If not, contact an electrician. • Always use a correctly installed shockproof socket. • Do not use multi-plug adapters and extension cables. • Make sure not to cause damage to the mains plug and to the mains cable. Contact the Service or an electrician to change a damaged mains cable. • Do not let mains cables to come in touch with the appliance door, specially when the door is hot.
www.electrolux.com • Before maintenance, deactivate the appliance and disconnect the mains plug from the mains socket. • Make sure the appliance is cold. There is the risk that the glass panels can break. • Replace immediately the door glass panels when they are damaged. Contact the Service. • Be careful when you remove the door from the appliance. The door is heavy! • Clean regularly the appliance to prevent the deterioration of the surface material.
ENGLISH 7 3.1 Accessories Wire shelf For cookware, cake tins, roasts. Baking tray For cakes and biscuits. Grill- / Roasting pan To bake and roast or as a pan to collect fat. Core temperature sensor To measure how far the food is cooked. Storage drawer Below the oven cavity is the storage drawer. WARNING! The storage drawer can become hot when the appliance operates. Do not store any flammable materials in the drawer. 4. BEFORE FIRST USE WARNING! Refer to the Safety chapters. 4.
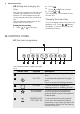
www.electrolux.com 4.2 Setting and changing the time 2. Touch . 3. Touch or After the first connection to the mains, all symbols in the display are on for some seconds. For the subsequent few seconds the display shows the software version. After the software version goes off, the display shows h and 12:00. 4. Changing the time of day You can change the time of day only if the appliance is off. Touch . flashes in the display. To set new time of day use the above procedure.
ENGLISH Sensor Field Function Description 6 DOWN, UP 7 OK 8 LIGHT To activate or deactivate the lamp in the appliance. 9 CLOCK To set the clock functions. 10 MINUTE MINDER To set the minute minder. To choose a heating function or a clock function and to set the minute minder, temperature or time of day. To confirm the selection or setting. 5.
www.electrolux.com Symbols Name Description Minute minder The minute minder function operates. 5.4 Heat-up indicator If you activate a heating function, the bars in the display come on one by one. The bars show that the temperature in the appliance increases or decreases. When the appliance is at the set temperature, the Heat-up indicator goes off the display. 5.5 Cooking zones You can operate the hob with the control knobs for the cooking zones. Refer to the user manual for hob.
ENGLISH Heating function 11 Application 2 Pizza Setting To bake food on one oven level for a more intensive browning and a crispy bottom. Set the oven temperatures 20 - 40 °C lower than when using Conventional Cooking. 3 Conventional Cooking To bake and roast food on one shelf position. 4 Slow Cook 5 Bottom heat 6 Defrost 7 Keep Warm 8 Grilling 9 Fast Grilling 10 Turbo Grilling To prepare tender, succulent roasts. To bake cakes with a crispy bottom and to preserve food.
www.electrolux.com • The Fast heat up is not available with every oven function. An acoustic signal sounds if the Fast heat up is not available for the set function if Faulty tone is activated in the “Settings menu”. 6.5 Energy saving The appliance contains features which help you save energy during everyday cooking: • Residual heat: – When the heating function or programme operates, the heating elements are deactivated 10% earlier (the lamp and fan continue to operate).
ENGLISH 13 2. Touch again and again until the . flashes in the display shows display. 2. Use or to set the MINUTE MINDER. First you set the seconds and then minutes and hours. 3. Touch or to set END (first you set the minutes and then the hours) and to confirm. When the set time ends, an acoustic signal sounds for two minutes. 3. Touch and at the same time to reset the set time. 4. and the time setting flash in the display. The appliance deactivates.
www.electrolux.com 5. 6. The appliance starts. The display shows a symbol of the weight. During this time you can change the default or . Touch weight value with . When set time ends, an acoustic signal operates for two minutes. flashes. 7. The appliance deactivates. Touch any sensor field to stop an acoustic signal. 9. USING THE ACCESSORIES WARNING! Refer to the Safety chapters. 3. 9.1 Core temperature sensor The core temperature sensor measures the core temperature of the meat.
ENGLISH 8. 15 for two minutes and the value of the core temperature and flash. The appliance deactivates. Touch a sensor field to deactivate the acoustic signal. Remove the core temperature sensor from the socket and remove the meat from the appliance. When you cook with the core temperature sensor, you can change the temperature shown in the display. After you put the core temperature sensor in the socket and set a heating function and temperature, the display shows the current core temperature.
www.electrolux.com • The high rim around the shelf is a device which prevents cookware from slipping. 10. ADDITIONAL FUNCTIONS 10.1 My Favourite Programme function Use this function to save your favourite settings of temperature and time for a heating function. 1. Set the temperature and time for a heating function or programme. 2. 3. Touch and hold for more than three seconds. An acoustic signal sounds. Deactivate the appliance.
ENGLISH Indicator of the setting menu Description Value to set SET5 SERVICE MENU --- SET6 RESTORE SETTINGS YES / NO 17 1) It is not possible to deactivate the tone of the ON / OFF sensor field. Activate the Settings menu: 1. When the appliance is deactivated, for three seconds. touch and hold The display shows "SET1" and "1" flashes. 2. Touch / 3. Touch . 4. Touch / of the setting. to set the setting. 5. Touch . 10.
www.electrolux.com • To clean metal surfaces, use a usual cleaning agent. • Clean the oven interior after each use. Then you can remove dirt more easily and it does not burn on. • Clean all oven accessories after each use and let them dry. • If you have nonstick accessories, do not clean them using aggressive agents, sharp-edged objects or a dishwasher. It can cause a damage to the nonstick coating. 2. 3. 4. 5. 6. 11.
ENGLISH 2. 19 Pull the rear end of the shelf support away from the side wall and remove it. 2 1 Installing the shelf supports Install the shelf supports in the opposite sequence. 11.3 Removing / inserting the door To clean the door remove it. CAUTION! Be careful when you remove the door from the appliance. The door is heavy. There is a risk of injury or damage to the appliance. A A Removing the door Open the door as far as it goes. Press down the clamping levers (A) on the two door hinges. 1. 2.
www.electrolux.com 2. 3. 4. Clean the glass cover. Replace the lamp with a halogen, 230 V, 40 W, 300 °C heat resistant oven lamp. Install the glass cover. Replacing the side lamp: Remove the left shelf support to get access to the lamp. 2. Use a narrow, blunt object (e.g. a teaspoon) to remove the glass cover. Clean the glass cover. 1. 3. 4. 5. Replace the lamp with a halogen, 230 V, 25 W, 300 °C heat resistant oven lamp. Install the glass cover. Install the shelf support. 12.
ENGLISH Problem The display shows an error code that is not in this table. Possible cause Solution There is an electronic fault. • Deactivate the appliance with the house fuse or the safety switch in the fuse box and activate it again. • If the display shows the error code again, refer to the Service Center. The appliance is activated The test mode is activaand does not heat up. ted. The fan does not operate. The display shows “Demo”. 1. 2. 3.
www.electrolux.com 13.1 Installing the oven under a work surface 600 A A A ca.50 A 757 N 762 + 3 A 435 170 A 160 A A 767 N 780 A = appliance N = recess 1. Install the hotplates according to the installation instruction no. 374307900 / 374307901 so that the hotplate socket connections can be carried out before the cooker is inserted. Make sure the correct socket connections are used. A separate earthing is not required. 2.
ENGLISH 23 Only a qualified person can connect the appliance to the electricity supply. D E 1. 2. 3. 4. F 5. 6. Open the mains terminal cover (D). Put the connection cable into the supplied rings (E). This is to prevent the cable from rubbing against the drawer. The connection cable is on the housing side. Install the cable grip (F). Connect the terminal as in the illustration. Put the cable into the strain relief clamp. Close the mains terminal cover. 13.
www.electrolux.com Ersatzteilverkauf/Points de vente de rechange/Vendita pezzi di ricambio/ spare parts service: 5506 Mägenwil, Industriestrasse 10, Tel. 0848 848 111 Fachberatung/Verkauf/Demonstration/Vente/Consulente (cucina)/Vendita 8048 Zürich, Badenerstrasse 587, Tel. 044 405 81 11 Garantie Für jedes Produkt gewähren wir ab Verkauf bzw. Lieferdatum an den Endverbraucher eine Garantie von 2 Jahren. (Ausweis durch Garantieschein, Faktura oder Verkaufsbeleg).
ENGLISH 25
www.electrolux.
ENGLISH 27
892946742-D-412013 www.electrolux.