EHH3320FOK ................................................ NL KOOKPLAAT EN HOB FR TABLE DE CUISSON DE KOCHFELD .............................................
www.electrolux.com INHOUD 1. 2. 3. 4. 5. 6. 7. 8. 9. VEILIGHEIDSINFORMATIE . . . . . . . . . . . . . . . . . . . . . . . . . . . . . . . . . . . . . . . . . . . . . . . . . 3 VEILIGHEIDSVOORSCHRIFTEN . . . . . . . . . . . . . . . . . . . . . . . . . . . . . . . . . . . . . . . . . . . . . 4 BESCHRIJVING VAN HET PRODUCT . . . . . . . . . . . . . . . . . . . . . . . . . . . . . . . . . . . . . . . . . 6 DAGELIJKS GEBRUIK . . . . . . . . . . . . . . . . . . . . . . . . . . . . . . . . . . . . . . . . . .
NEDERLANDS 3 1. VEILIGHEIDSINFORMATIE Lees zorgvuldig de meegeleverde instructies voor installatie en gebruik van het apparaat. De fabrikant is niet verantwoordelijk voor letsel en schade veroorzaakt door een foutieve installatie. Bewaar de instructies van het apparaat voor toekomstig gebruik. 1.1 Veiligheid van kinderen en kwetsbare mensen WAARSCHUWING! Gevaar voor verstikking, letsel of permanente invaliditeit.
www.electrolux.com • Zonder toezicht koken op een kookplaat met vet of olie kan gevaarlijk zijn en brandgevaar opleveren. • Probeer brand nooit met water te blussen, maar schakel in plaats daarvan het apparaat uit en bedek de vlam, d.w.z. met een deksel of blusdeken. • Bewaar geen voorwerpen op de kookplaten. • Gebruik geen stoomreiniger om het apparaat schoon te maken.
NEDERLANDS Aansluiting aan het elektriciteitsnet WAARSCHUWING! Gevaar voor brand en elektrische schokken. • Alle elektrische aansluitingen moeten door een gediplomeerd elektromonteur worden gemaakt. • Dit apparaat moet worden aangesloten op een geaard stopcontact. • Verzeker u ervan dat de stekker uit het stopcontact is getrokken, voordat u welke werkzaamheden dan ook uitvoert. • Gebruik de juiste stroomkabel. • Voorkom dat de stroomkabels verstrikt raken.
www.electrolux.com • Laat geen voorwerpen of kookgerei op het apparaat vallen. Het oppervlak kan beschadigen. • Activeer de kookzones niet met lege pannen of zonder pannen erop. • Geen aluminiumfolie op het apparaat leggen. • Pannen van gietijzer, aluminium of met beschadigde bodems kunnen krassen veroorzaken in het glas of glaskeramiek. Til deze voorwerpen altijd op als u ze moet verplaatsen op het kookoppervlak. 2.3 Onderhoud en reiniging WAARSCHUWING! Risico op schade aan het apparaat.
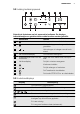
NEDERLANDS 7 3.2 Indeling bedieningspaneel 1 2 3 10 4 9 5 8 6 7 Gebruik de tiptoetsen om het apparaat te bedienen. De displays, indicatielampjes en geluiden tonen welke functies worden gebruikt. sensorveld functie 1 Het apparaat in- en uitschakelen. 2 Het bedieningspaneel vergrendelen/ontgrendelen. Het verhogen of verlagen van de kookstand. / 3 4 Een kookstanddisplay De kookstand weergeven. 5 Indicatielampjes timer voor de kookzones Geeft aan voor welke zone u de tijd instelt.
www.electrolux.com Display Beschrijving Slot/kinderbeveiliging is in werking. De Powerfunctie is in werking. De automatische uitschakeling is in werking getreden. 3.4 Restwarmte-indicatie WAARSCHUWING! Verbrandingsgevaar door restwarmte! De inductiekookzones creëren de voor het koken benodigde warmte direct in de bodem van de pan. Het glaskeramiek wordt verwarmd door de warmte van de pannen. 4. DAGELIJKS GEBRUIK WAARSCHUWING! Raadpleeg de hoofdstukken Veiligheid. 4.
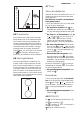
NEDERLANDS 9 4.7 Timer 11 10 9 8 7 6 5 4 3 2 1 0 Timer met aftelfunctie 1 2 3 4 5 6 7 8 9 4.5 Powerfunctie De Powerfunctie maakt meer vermogen beschikbaar voor de inductiekookzones. De Powerfunctie kan een beperkte tijd worden ingeschakeld (zie het hoofdstuk Technische informatie). Daarna wordt de inductiekookzone automatisch teruggeschakeld naar de hoogste kookstand. aan om de functie in te schakeRaak len; gaat branden. Wijzig de kookstand om de kookstand uit te schakelen. 4.
www.electrolux.com • Voor het inschakelen van deze functie, raakt u aan. Het symbool gaat branden. • Raak voor het uitschakelen van deze functie aan. De kookstand die u eerder hebt ingesteld, wordt weergegeven. 4.9 Slot Wanneer de kookzones in gebruik zijn, kunt u het bedieningspaneel vergrendelen, maar niet . Hiermee wordt voorkomen dat de kookstand per ongeluk wordt veranderd. Stel eerst de kookstand in. aan. Raak om deze functie te starten Het symbool verschijnt gedurende vier seconden.
NEDERLANDS 5.2 Lawaai tijdens gebruik Als u dit hoort: • krakend geluid: de pan is gemaakt van verschillende materialen (sandwichconstructie). • fluitend geluid: bij gebruik van één of meer kookzones met een hoge kookstand en als de pan is gemaakt van verschillende materialen (sandwichconstructie) • Zoemen: als u hoge kookstanden gebruikt. • Klikken: er treedt elektrische schakeling op. • Sissen, zoemen: de ventilator werkt. Deze geluiden zijn normaal en hebben niets met een defect te maken. 5.
www.electrolux.com Te Te gebruiken voor: mp era tuu rinste llin g Tijd Tips Nominaal stroomverbruik 34 Stomen van groenten, vis en vlees 20 – 45 min Enkele eetlepels vloeistof toevoegen 10 – 15 % 45 Aardappelen stomen 20 – 60 min Gebruik max.
NEDERLANDS 2. Reinig het apparaat met een vochtige doek en een beetje afwasmiddel. 3. 13 Wrijf het apparaat ten slotte droog met een schone doek. 7. PROBLEEMOPLOSSING Probleem Mogelijke oorzaak U kunt het apparaat niet inschakelen of bedienen. Oplossing Schakel het apparaat opnieuw in en stel de kookstand binnen 10 seconden in. U hebt twee of meer tiptoetsen tegelijk aangeraakt. Raak slechts één tiptoets tegelijk aan. De STOP+GO-functie is in werking.
www.electrolux.com Probleem Mogelijke oorzaak Oplossing gaat branden. De kinderbeveiliging of toetsblokkering is actief. Raadpleeg het hoofdstuk "Dagelijks gebruik". gaat branden. Geen kookgerei op de kookzone. Zet kookgerei op de kookzone. De pan is niet goed. Gebruik het juiste kookgerei. De diameter aan de bo- Zet het kookgerei op een dem van het kookgerei is kleinere kookzone. te klein voor de kookzone. en een getal gaat branden. gaat branden.
NEDERLANDS A B C MOD. MOD. PROD.NO. PROD.NO. SER.NO SER.NO 03 IT DATA DATA MADE IN ITALY MODEL 15 MOD. PROD.NO. SER.NO. 0049 TYPE 230V-50Hz IP20 MODEL A) Plak de sticker op de garantiekaart en B) Plak de sticker op de garantiekaart en verstuur dit deel (indien van toepassing) C) Plak de sticker op het instructieboekje. bewaar dit deel (indien van toepassing) 8. MONTAGE WAARSCHUWING! Raadpleeg de hoofdstukken Veiligheid.
www.electrolux.com 8.4 Assemblage min. 500mm min. 50mm min. 2mm B A min. 2 mm < 20 mm B A min. 2 mm > 20 mm min. 500 mm B A 12 mm 57 mm 28 mm 41 mm 38 mm 31 mm min 30 mm min. 500 mm B A 12 mm 57 mm 28 mm 41 mm 38 mm 31 mm min. 12 mm R 5mm min. 55mm min. 2 mm 490+1mm 270+1mm min. 38 mm min.
NEDERLANDS 17 9. TECHNISCHE INFORMATIE Vermogen van kookzones Kookzone Nominaal vermogen (max warmte-instelling) [W] Powerfunctie Maximale ingeschakeld duur van de [W] Powerfunctie [min] Minimale diameter van het kookgerei [mm] Achter —145 mm 1400 W 2500 W 4 125 Voor — 210 mm 2300 W 3700 W 10 180 10. MILIEUBESCHERMING Recycle de materialen met het symbool . Gooi de verpakking in een geschikte elektronische apparaten.
www.electrolux.com CONTENTS 1. 2. 3. 4. 5. 6. 7. 8. 9. SAFETY INFORMATION . . . . . . . . . . . . . . . . . . . . . . . . . . . . . . . . . . . . . . . . . . . . . . . . . . SAFETY INSTRUCTIONS . . . . . . . . . . . . . . . . . . . . . . . . . . . . . . . . . . . . . . . . . . . . . . . . . PRODUCT DESCRIPTION . . . . . . . . . . . . . . . . . . . . . . . . . . . . . . . . . . . . . . . . . . . . . . . . DAILY USE . . . . . . . . . . . . . . . . . . . . . . . . . . . . . . . . . . . . . . . . . . . . .
ENGLISH 19 1. SAFETY INFORMATION Before the installation and use of the appliance, carefully read the supplied instructions. The manufacturer is not responsible if an incorrect installation and use causes injuries and damages. Always keep the instructions with the appliance for future reference. 1.1 Children and vulnerable people safety WARNING! Risk of suffocation, injury or permanent disability.
www.electrolux.com • Never try to extinguish a fire with water, but switch off the appliance and then cover flame e.g. with a lid or a fire blanket. • Do not store items on the cooking surfaces. • Do not use a steam cleaner to clean the appliance. • Metallic objects such as knives, forks, spoons and lids should not be placed on the hob surface since they can get hot. • If the glass ceramic surface is cracked, switch off the appliance to avoid the possibility of electric shock.
ENGLISH • • • • • • pliance or hot cookware, when you connect the appliance to the near sockets Make sure the appliance is installed correctly. Loose and incorrect electricity mains cable or plug (if applicable) can make the terminal become too hot. Make sure that a shock protection is installed. Use the strain relief clamp on cable. Make sure not to cause damage to the mains plug (if applicable) or to the mains cable. Contact the Service or an electrician to change a damaged mains cable.
www.electrolux.com • Contact your municipal authority for information on how to discard the appliance correctly. • Disconnect the appliance from the mains supply. • Cut off the mains cable and discard it. not use abrasive products, abrasive cleaning pads, solvents or metal objects. 2.4 Disposal WARNING! Risk of injury or suffocation. 3. PRODUCT DESCRIPTION 3.1 General overview 1 145 mm 1 Induction cooking zone. 2 Induction cooking zone. 3 Control panel 210 mm 2 3 3.
ENGLISH 23 sensor field function 5 Timer indicators of cooking zones To show for which zone you set the time. 6 The timer display To show the time in minutes. To select a cooking zone. 7 To increase or decrease the time. / 8 To activate the Power function. 9 To activate and deactivates the STOP +GO function. 10 3.3 Heat setting displays Display Description The cooking zone is deactivated. Keep warm / STOP+GO function operates. - / - The cooking zone operates.
www.electrolux.com • • • • seconds, (a pan, a cloth, etc.). An acoustic signal sounds some time and the appliance deactivates. Remove the object or clean the control panel. The appliance becomes too hot (e.g. when, a saucepan boils dry). Before you use the appliance again, the cooking zone must be cool. You use incorrect cookware. The symcomes on and the cooking zone bol deactivates automatically after 2 minutes. You do not deactivate a cooking zone or change the heat setting.
ENGLISH 4.7 Timer Count Down Timer Use the Count Down Timer to set how long the cooking zone operates for only this one time. Set the Timer after the selection of the cooking zone. You can set the heat setting before or after you set the timer. • To set the cooking zone: touch again and again until the indicator of a necessary cooking zone comes on. • To activate or change the Timer: touch or of the timer to set the time ( 00 - 99 minutes).
www.electrolux.com 5. HELPFUL HINTS AND TIPS INDUCTION COOKING ZONES For induction cooking zones a strong electro-magnetic field creates the heat in the cookware very quickly. 5.1 Cookware for induction cooking zones Use the induction cooking zones with correct cookware. Cookware material • correct: cast iron, steel, enamelled steel, stainless steel, the bottom made of multi-layer (with correct mark from a manufacturer). • not correct: aluminium, copper, brass, glass, ceramic, porcelain.
ENGLISH He Use to: at set tin g 1 Keep warm the food you cooked 27 Time Hints Nominal power consumption as required Put a lid on a cookware 3% 12 Hollandaise sauce, 5 - 25 min melt: butter, chocolate, gelatine Mix from time to time 3–5% 12 Solidify: fluffy omelettes, baked eggs 10 - 40 min Cook with a lid on 3–5% 23 Simmer rice and milkbased dishes, heating up ready-cooked meals 25 - 50 min Add the minimum twice as much liquid as rice, mix milk dishes part procedure through 5 – 10 %
www.electrolux.com an acute angle and move the blade on the surface . – Remove after the appliance is sufficiently cool: limescale rings , water rings, fat stains, shiny metallic discolorations. Use a special 2. 3. cleaning agent for glass ceramic or stainless steel. Clean the appliance with a moist cloth and some detergent. At the end rub the appliance dry with a clean cloth. 7. TROUBLESHOOTING Problem Possible cause You cannot activate the appliance or operate it.
ENGLISH Problem Possible cause 29 Remedy comes on. The Automatic Switch Off operates. Deactivate the appliance and activate it again. comes on. The Child Safety Device or the Lock function operates. Refer to the chapter “Daily Use”. comes on. No cookware is on the cooking zone. Put cookware on the cooking zone. The cookware is incorrect. Use the correct cookware. The diameter of the bottom of the cookware is too small for the cooking zone. Move cookware to a smaller cooking zone.
www.electrolux.com A B C MOD. MOD. PROD.NO. PROD.NO. SER.NO SER.NO 03 IT DATA DATA MADE IN ITALY MODEL MOD. PROD.NO. SER.NO. 0049 TYPE 230V-50Hz IP20 MODEL A) Stick it on Guarantee Card and send C) Stick it on instruction booklet this part (if applicable) B) Stick it on Guarantee Card and keep this part (if applicable) 8. INSTALLATION WARNING! Refer to the Safety chapters.
ENGLISH 8.4 Assembly min. 500mm min. 50mm min. 2mm B A min. 2 mm < 20 mm B A min. 2 mm > 20 mm min. 500 mm B A 12 mm 57 mm 28 mm 41 mm 38 mm 31 mm min 30 mm min. 500 mm B A 12 mm 57 mm 28 mm 41 mm 38 mm 31 mm min. 12 mm R 5mm min. 55mm min. 2 mm 490+1mm 270+1mm min. 38 mm min.
www.electrolux.com 9. TECHNICAL INFORMATION Cooking zones power Cooking zone Nominal Power (Max heat setting) [W] Power Function activated [W] Power function maximum duration [min] Minimum cookware diameter [mm] Rear — 145 mm 1400 W 2500 W 4 125 Front — 210 mm 2300 W 3700 W 10 180 10. ENVIRONMENT CONCERNS Recycle the materials with the symbol . Put the packaging in applicable and electronic appliances. Do not dispose appliances marked with the symbol containers to recycle it.
FRANÇAIS 33 SOMMAIRE 1. 2. 3. 4. 5. 6. 7. 8. 9. CONSIGNES DE SÉCURITÉ . . . . . . . . . . . . . . . . . . . . . . . . . . . . . . . . . . . . . . . . . . . . . . . INSTRUCTIONS DE SÉCURITÉ . . . . . . . . . . . . . . . . . . . . . . . . . . . . . . . . . . . . . . . . . . . . DESCRIPTION DE L'APPAREIL . . . . . . . . . . . . . . . . . . . . . . . . . . . . . . . . . . . . . . . . . . . . UTILISATION QUOTIDIENNE . . . . . . . . . . . . . . . . . . . . . . . . . . . . . . . . . . . . . . . . . . . . . .
www.electrolux.com 1. CONSIGNES DE SÉCURITÉ Avant d'installer et d'utiliser cet appareil, lisez soigneusement les instructions fournies. Le fabricant ne peut être tenu pour responsable des dommages et blessures liés à une mauvaise installation ou utilisation. Conservez toujours cette notice avec votre appareil pour vous y référer ultérieurement. 1.1 Sécurité des enfants et des personnes vulnérables AVERTISSEMENT Risque d'asphyxie, de blessure ou d'invalidité permanente.
FRANÇAIS 35 • Ne faites pas fonctionner l'appareil avec un minuteur externe ou un système de commande à distance. • Il peut être dangereux de laisser chauffer de la graisse ou de l'huile sans surveillance sur une table de cuisson car cela pourrait provoquer un incendie. • N'essayez jamais d'éteindre un feu avec de l'eau. Mettez à l'arrêt l'appareil puis couvrez les flammes, par exemple avec un couvercle ou une couverture ignifuge. • N'entreposez rien sur les surfaces de cuisson.
www.electrolux.com • Le dessous de l'appareil peut devenir très chaud. Nous vous recommandons d'installer un panneau de séparation ignifuge sous l'appareil pour en bloquer l'accès. 2.2 Utilisation Branchement électrique • Avant la première utilisation, retirez les emballages, les étiquettes et les films de protection (si présents). • Utilisez cet appareil dans un environnement domestique. • Ne modifiez pas les caractéristiques de cet appareil.
FRANÇAIS • Ne placez pas de produits inflammables ou d'éléments imbibés de produits inflammables à l'intérieur ou à proximité de l'appareil, ni sur celui-ci. AVERTISSEMENT Risque d'endommagement de l'appareil. • Ne laissez pas de récipients chauds sur le bandeau de commande. • Ne laissez pas le contenu des récipients de cuisson s'évaporer complètement. • Prenez soin de ne pas laisser tomber d'objets ou de récipients sur l'appareil. Sa surface risque d'être endommagée.
www.electrolux.com 3.2 Description du bandeau de commande 1 2 3 10 4 9 5 8 6 7 Appuyez sur les touches sensitives pour faire fonctionner l'appareil. Les affichages, les voyants et les signaux sonores indiquent quelles fonctions sont activées. touche sensitive fonction 1 Pour allumer et éteindre l'appareil. 2 Pour verrouiller ou déverrouiller le bandeau de commande. Pour augmenter ou diminuer le niveau de cuisson / 3 4 Affichage du niveau de cuisson Pour indiquer le niveau de cuisson.
FRANÇAIS Affichage 39 Description Une zone de cuisson est encore chaude (chaleur résiduelle). Le dispositif de verrouillage/sécurité enfants est activé. La fonction Booster est activée. La fonction d'arrêt automatique est activée. 3.4 Voyant de chaleur résiduelle AVERTISSEMENT La chaleur résiduelle peut être source de brûlures ! Les zones de cuisson à induction génèrent la chaleur nécessaire directement sur le fond des plats de cuisson.
www.electrolux.com 1. Appuyez sur . Le symbole paraît sur l'affichage. 2. Appuyez immédiatement sur . Le symbole apparaît sur l'affichage. ap- 3. Appuyez immédiatement sur à plusieurs reprises jusqu'à ce que le niveau de cuisson souhaité s'affiche. s'affiche. Au bout de 3 secondes, Pour désactiver cette fonction, appuyez sur . 4.7 Minuteur 11 10 9 8 7 6 5 4 3 2 1 0 Minuteur dégressif 1 2 3 4 5 6 7 8 9 4.
FRANÇAIS Minuterie Vous pouvez utiliser le minuteur comme minuterie lorsque les zones de cuisson ne sont pas en fonctionnement. Appuyez sur . Appuyez sur la touche ou pour régler la durée souhaitée. Une fois le temps écoulé, le signal sonore retentit et 00 clignote. • Arrêt du signal sonore : appuyez sur 4.8 STOP+GO La fonction permet de basculer simultanément toutes les zones de cuisson actives en position de maintien au chaud ( ).
www.electrolux.com Matériaux des récipients • adaptés : fonte, acier, acier émaillé, acier inoxydable, fond multicouche (homologué par le fabricant). • inadaptés : aluminium, cuivre, laiton, verre, céramique, porcelaine. Un récipient convient à l'induction si : • ... une petite quantité d'eau contenue dans un récipient chauffe dans un bref laps de temps sur une zone de cuisson réglée sur le niveau de cuisson maximal. • ... un aimant adhère au fond du récipient.
FRANÇAIS Ni- Utilisation : vea u de cui ss on 43 Durée Conseils Consommation énergétique nominale Maintenir au chaud les plats que vous venez de cuire selon les besoins. Mettez un couvercle sur le récipient 3% 12 Sauce hollandaise, faire fondre : du beurre, du chocolat, de la gélatine 5 - 25 min Remuez de temps en temps 3–5% 12 Solidifier : omelettes 10 - 40 min baveuses, œufs au plat Couvrez pendant la cuisson.
www.electrolux.com 6. ENTRETIEN ET NETTOYAGE Nettoyez l'appareil après chaque utilisation. Utilisez toujours des récipients de cuisson dont le fond est propre. Les égratignures ou les taches sombres sur la vitrocéramique n'ont aucune influence sur le fonctionnement de l'appareil. Pour enlever les salissures : – Enlevez immédiatement : plastique fondu, films plastiques et aliments contenant du sucre. Sinon, la saleté pourrait endommager l'appareil. Utilisez un racloir spécial 1. 2. 3. pour la vitre.
FRANÇAIS Problème Cause probable La fonction de démarrage La zone de cuisson est automatique de la cuischaude. son ne fonctionne pas. 45 Solution Laissez la zone de cuisson refroidir. Le niveau de cuisson le plus élevé est réglé. Le niveau de cuisson le plus élevé est identique à la fonction de démarrage automatique de la cuisson. Le niveau de cuisson change. Le gestionnaire de puissance est activé. Reportez-vous au chapitre « Gestionnaire de puissance ». Les touches sensitives sont chaudes.
www.electrolux.com Problème s'allume. Cause probable Solution Une erreur s'est produite dans l'appareil car un récipient chauffe à vide. La protection anti-surchauffe des zones de cuisson et l'arrêt automatique sont activés. Éteignez l'appareil. Enlevez le récipient chaud. Au bout d'environ 30 secondes, remettez la zone de cuisson en fonctionnement. Si le récipient était la cause du problème, le message d'erreur disparaît de l'affichage, mais le voyant de chaleur résiduelle peut demeurer.
FRANÇAIS 47 B) Collez-la sur la carte de garantie et conservez cette partie (le cas échéant) C) Collez-la sur la notice d'utilisation 8. INSTALLATION AVERTISSEMENT Reportez-vous aux chapitres concernant la sécurité. Avant l'installation Avant l'installation de l'appareil, notez cidessous les informations figurant sur la plaque signalétique. La plaque signalétique se trouve au bas de l'enveloppe extérieure de l'appareil. • Modèle ........................... • PNC .............................
www.electrolux.com B A min. 2 mm < 20 mm B A min. 2 mm > 20 mm min. 500 mm B A 12 mm 57 mm 28 mm 41 mm 38 mm 31 mm min 30 mm min. 500 mm B A 12 mm 57 mm 28 mm 41 mm 38 mm 31 mm min. 12 mm R 5mm min. 55mm min. 2 mm 490+1mm 270+1mm min. 38 mm min.
FRANÇAIS 49 9. CARACTERISTIQUES TECHNIQUES Puissance des zones de cuisson Zone de cuisson Puissance Fonction nominale (ni- Booster activeau de cuis- vée [W] son max.) [W] Durée maximale de la fonction Booster [min] Diamètre minimal du récipient [mm] Arrière centrale — 145 mm 1400 W 2500 W 4 125 Avant centrale — 210 mm 2300 W 3700 W 10 180 10. EN MATIÈRE DE PROTECTION DE L'ENVIRONNEMENT Recyclez les matériaux portant le symbole . Déposez les emballages dans les électroniques.
www.electrolux.com INHALT 1. 2. 3. 4. 5. 6. 7. 8. 9. SICHERHEITSINFORMATIONEN . . . . . . . . . . . . . . . . . . . . . . . . . . . . . . . . . . . . . . . . . . . SICHERHEITSHINWEISE . . . . . . . . . . . . . . . . . . . . . . . . . . . . . . . . . . . . . . . . . . . . . . . . . GERÄTEBESCHREIBUNG . . . . . . . . . . . . . . . . . . . . . . . . . . . . . . . . . . . . . . . . . . . . . . . . TÄGLICHER GEBRAUCH . . . . . . . . . . . . . . . . . . . . . . . . . . . . . . . . . . . . . . . . . . . . . .
DEUTSCH 51 1. SICHERHEITSINFORMATIONEN Lesen Sie vor der Montage und Verwendung des Geräts sorgfältig die mitgelieferte Anleitung. Der Hersteller haftet nicht für Verletzungen oder Schäden, die durch eine fehlerhafte Montage entstehen. Bewahren Sie die Anleitung zum Nachschlagen auf. 1.1 Sicherheit von Kindern und schutzbedürftigen Personen WARNUNG! Es besteht Erstickungsgefahr, das Risiko von Verletzungen oder permanenten Behinderungen.
www.electrolux.com • Kochen mit Fett oder Öl auf einem unbeaufsichtigten Kochfeld ist gefährlich und kann zu einem Brand führen. • Versuchen Sie nicht einen Brand mit Wasser zu löschen, sondern schalten Sie das Gerät aus und bedecken Sie die Flamme mit einem Deckel oder einer Feuerlöschdecke. • Legen Sie keine Gegenstände auf dem Kochfeld ab. • Benutzen Sie zum Reinigen des Gerätes keinen Dampfreiniger.
DEUTSCH gen, damit der Boden nicht zugänglich ist. Elektrischer Anschluss WARNUNG! Brand- und Stromschlaggefahr. • Die elektrischen Anschlüsse müssen von einem qualifizierten Elektriker ausgeführt werden. • Das Gerät muss geerdet sein. • Vor der Durchführung jeglicher Arbeiten muss das Gerät von der elektrischen Stromversorgung getrennt werden. • Stellen Sie sicher, dass Sie das richtige Kabel für den elektrischen Netzanschluss verwenden.
www.electrolux.com • Platzieren Sie keine entflammbaren Produkte oder Gegenstände, die mit entflammbaren Produkten benetzt sind, im Gerät, auf dem Gerät oder in der Nähe des Geräts. WARNUNG! Das Gerät könnte beschädigt werden. • Stellen Sie kein heißes Kochgeschirr auf das Bedienfeld. • Lassen Sie das Kochgeschirr nicht leerkochen. • Lassen Sie keine Gegenstände oder Kochgeschirr auf das Gerät fallen. Die Oberfläche könnte beschädigt werden.
DEUTSCH 3. GERÄTEBESCHREIBUNG 3.1 Allgemeine Übersicht 1 145 mm 1 Induktionskochzone. 2 Induktionskochzone. 3 Bedienfeld 210 mm 2 3 3.2 Bedienfeldanordnung 1 2 10 3 4 9 5 8 6 7 Bedienen Sie das Gerät über die Sensorfelder. Die Anzeigen, Kontrolllampen und akustischen Signale informieren Sie über die aktiven Funktionen. Sensorfeld Funktion 1 Ein- und Ausschalten des Geräts. 2 Verriegelung/Entriegelung des Bedienfelds. 3 / Erhöhung oder Verringerung der Kochstufe.
www.electrolux.com Sensorfeld Funktion Einschalten der Power-Funktion. 9 Ein- und Ausschalten der Funktion STOP +GO. 10 3.3 Anzeige der Kochstufen Anzeige Beschreibung Die Kochzone ist ausgeschaltet. Die Funktion Warmhalten/STOP+GO ist eingeschaltet. - / - Die Kochzone ist eingeschaltet. Die Ankochautomatik ist eingeschaltet. Das Kochgeschirr ist ungeeignet oder zu klein bzw. es befindet sich kein Kochgeschirr auf der Kochzone. Eine Störung ist aufgetreten.
DEUTSCH nicht geändert. Nach einer gewissen Zeit leuchtet das Symbol auf und das Gerät wird ausgeschaltet. Siehe unten. • Verhältnis zwischen der Kochstufe und den Zeiten der Abschaltautomatik: • , — 6 Stunden • - — 5 Stunden • — 4 Stunden • - — 1,5 Stunden 4.3 Kochstufe einstellen Durch die Berührung von , erhöht sich die Kochstufe. Durch die Berührung von , verringert sich die Kochstufe. Das Display zeigt die eingestellte Kochstufe an. Berühren Sie zum Ausschalten der und gleichzeitig.
www.electrolux.com 4.7 Timer Kurzzeitmesser Mit dem Kurzzeitmesser stellen Sie ein, wie lange eine Kochzone für einen einzelnen Kochvorgang eingeschaltet bleiben soll. Stellen Sie den Timer ein, nachdem Sie die Kochzone ausgewählt haben. Sie können die Kochstufe einstellen, bevor Sie den Timer einstellen oder umgekehrt. • Auswahl der Kochzone:Berühren Sie wiederholt, bis die Kontrolllampe der gewünschten Kochzone leuchtet.
DEUTSCH Ausschalten der Kindersicherung für einen einzelnen Kochvorgang • Schalten Sie das Gerät mit ein. Das Symbol leuchtet. • Berühren Sie 4 Sekunden lang. Stellen Sie die Kochstufe innerhalb 59 von 10 Sekunden ein. Das Gerät kann jetzt benutzt werden. • Nachdem das Gerät mit ausgeschaltet wurde, ist die Kindersicherung wieder aktiv. 5. PRAKTISCHE TIPPS UND HINWEISE INDUKTIONSKOCHZONEN Das Kochgeschirr wird bei Induktionskochzonen durch ein starkes Magnetfeld sehr schnell erhitzt. 5.
www.electrolux.com 5.4 Anwendungsbeispiele zum Kochen Das Verhältnis zwischen der Kochstufe und dem Energieverbrauch der Kochzone ist nicht linear. Bei einer höheren Kochstufe steigt der Energieverbrauch der Kochzone nicht proportional an. Ko Verwendung: ch stu fe 1 Zum Warmhalten von Speisen Das bedeutet, dass die Kochzone, die auf eine mittlere Kochstufe eingestellt ist, weniger als die Hälfte ihrer maximalen Leistung verbraucht.
DEUTSCH Ko Verwendung: ch stu fe Zeit Tipps 61 Nennleistungsaufnahme Aufkochen großer Mengen Wasser. Die Power-Funktion ist eingeschaltet. 6. REINIGUNG UND PFLEGE Reinigen Sie das Gerät nach jedem Gebrauch. Achten Sie immer darauf, dass der Boden des Kochgeschirrs sauber ist. Kratzer oder dunkle Flecken in der Glaskeramik beeinträchtigen die Funktionsfähigkeit des Geräts nicht.
www.electrolux.com Problem Mögliche Ursache Abhilfe Ein akustisches Signal er- Mindestens ein Sensortönt und das Gerät schal- feld wurde bedeckt. tet ab. Wenn das Gerät ausgeschaltet wird, ertönt ein akustisches Signal. Entfernen Sie den Gegenstand von den Sensorfeldern. Das Gerät wird ausgeschaltet. Sie haben etwas auf das gestellt. Sensorfeld Entfernen Sie den Gegenstand vom Sensorfeld. Die Restwärmeanzeige funktioniert nicht. Die Kochzone ist nicht heiß, da sie nur kurze Zeit in Betrieb war.
DEUTSCH Problem und eine Zahl werden angezeigt. leuchtet auf. Mögliche Ursache 63 Abhilfe Im Gerät ist ein Fehler aufgetreten. Trennen Sie das Gerät eine Zeit lang vom Stromnetz. Schalten Sie die Sicherung im Sicherungskasten der Hausinstallation aus. Schalten Sie die Sicherung wieder ein. erneut aufleuchWenn tet, benachrichtigen Sie den Kundendienst. Im Gerät ist ein Fehler aufgetreten, da ein Kochgeschirr leer gekocht ist.
www.electrolux.com A B C MOD. MOD. PROD.NO. PROD.NO. SER.NO SER.NO 03 IT DATA DATA MADE IN ITALY MODEL MOD. PROD.NO. SER.NO. 0049 TYPE 230V-50Hz IP20 MODEL A) Kleben Sie ihn auf die Garantiekarte und verschicken Sie diesen Teil (falls vorhanden) B) Kleben Sie ihn auf die Garantiekarte und behalten Sie diesen Teil (falls vorhanden) C) Kleben Sie ihn auf die Gebrauchsanlei- tung 8. MONTAGE WARNUNG! Siehe Sicherheitshinweise.
DEUTSCH 8.4 Montage min. 500mm min. 50mm min. 2mm B A min. 2 mm < 20 mm B A min. 2 mm > 20 mm min. 500 mm B A 12 mm 57 mm 28 mm 41 mm 38 mm 31 mm min 30 mm min. 500 mm B A 12 mm 57 mm 28 mm 41 mm 38 mm 31 mm min. 12 mm R 5mm min. 55mm min. 2 mm 490+1mm 270+1mm min. 38 mm min.
www.electrolux.com 9. TECHNISCHE DATEN Kochzonenleistung Kochzone Nennleistung Power-Funk- Max. Ein(höchste tion eingeschaltdauer Kochstufe) schaltet [W] der Power[W] Funktion [Min.] Min. Kochgeschirrdurchmesser [mm] Hinten – 145 mm 1400 W 2500 W 4 125 Vorne – 210 mm 2300 W 3700 W 10 180 10. UMWELTTIPPS Recyceln Sie Materialien mit dem Symbol . Entsorgen Sie die Verpackung in den elektronische Geräte. Entsorgen Sie Geräte mit diesem Symbol nicht mit entsprechenden Recyclingbehältern.
DEUTSCH 67
892958463-A-152013 www.electrolux.