EHH3320FOK ................................................ .............................................
www.electrolux.com CONTENTS 1. 2. 3. 4. 5. 6. 7. 8. 9. SAFETY INFORMATION . . . . . . . . . . . . . . . . . . . . . . . . . . . . . . . . . . . . . . . . . . . . . . . . . . . 3 SAFETY INSTRUCTIONS . . . . . . . . . . . . . . . . . . . . . . . . . . . . . . . . . . . . . . . . . . . . . . . . . . 4 PRODUCT DESCRIPTION . . . . . . . . . . . . . . . . . . . . . . . . . . . . . . . . . . . . . . . . . . . . . . . . . 6 DAILY USE . . . . . . . . . . . . . . . . . . . . . . . . . . . . . . . . . . . . . . .
ENGLISH 3 1. SAFETY INFORMATION Before the installation and use of the appliance, carefully read the supplied instructions. The manufacturer is not responsible if an incorrect installation and use causes injuries and damages. Always keep the instructions with the appliance for future reference. 1.1 Children and vulnerable people safety WARNING! Risk of suffocation, injury or permanent disability.
www.electrolux.com • Never try to extinguish a fire with water, but switch off the appliance and then cover flame e.g. with a lid or a fire blanket. • Do not store items on the cooking surfaces. • Do not use a steam cleaner to clean the appliance. • Metallic objects such as knives, forks, spoons and lids should not be placed on the hob surface since they can get hot. • If the glass ceramic surface is cracked, switch off the appliance to avoid the possibility of electric shock.
ENGLISH • • • • • • pliance or hot cookware, when you connect the appliance to the near sockets Make sure the appliance is installed correctly. Loose and incorrect electricity mains cable or plug (if applicable) can make the terminal become too hot. Make sure that a shock protection is installed. Use the strain relief clamp on cable. Make sure not to cause damage to the mains plug (if applicable) or to the mains cable. Contact the Service or an electrician to change a damaged mains cable.
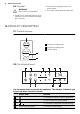
www.electrolux.com • Disconnect the appliance from the mains supply. • Cut off the mains cable and discard it. 2.4 Disposal WARNING! Risk of injury or suffocation. • Contact your municipal authority for information on how to discard the appliance correctly. 3. PRODUCT DESCRIPTION 3.1 General overview 1 145 mm 1 Induction cooking zone. 2 Induction cooking zone. 3 Control panel 210 mm 2 3 3.2 Control panel layout 1 2 10 3 4 9 5 8 6 7 Use the sensor fields to operate the appliance.
ENGLISH sensor field function 5 Timer indicators of cooking zones To show for which zone you set the time. 6 The timer display To show the time in minutes. 7 To select a cooking zone. 7 To increase or decrease the time. / 8 To activate the Power function. 9 10 To activate and deactivates the STOP +GO function. 3.3 Heat setting displays Display Description The cooking zone is deactivated. Keep warm / STOP+GO function operates. - / - The cooking zone operates.
www.electrolux.com • • • • seconds, (a pan, a cloth, etc.). An acoustic signal sounds some time and the appliance deactivates. Remove the object or clean the control panel. The appliance becomes too hot (e.g. when, a saucepan boils dry). Before you use the appliance again, the cooking zone must be cool. You use incorrect cookware. The symcomes on and the cooking zone bol deactivates automatically after 2 minutes. You do not deactivate a cooking zone or change the heat setting.
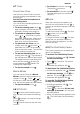
ENGLISH 4.7 Timer Count Down Timer Use the Count Down Timer to set how long the cooking zone operates for only this one time. Set the Timer after the selection of the cooking zone. You can set the heat setting before or after you set the timer. • To set the cooking zone: touch again and again until the indicator of a necessary cooking zone comes on. • To activate or change the Timer: touch or of the timer to set the time ( 00 - 99 minutes).
www.electrolux.com 5. HELPFUL HINTS AND TIPS INDUCTION COOKING ZONES For induction cooking zones a strong electro-magnetic field creates the heat in the cookware very quickly. 5.1 Cookware for induction cooking zones Use the induction cooking zones with correct cookware. Cookware material • correct: cast iron, steel, enamelled steel, stainless steel, the bottom made of multi-layer (with correct mark from a manufacturer). • not correct: aluminium, copper, brass, glass, ceramic, porcelain.
ENGLISH He Use to: at set tin g 1 Keep warm the food you cooked 11 Time Hints Nominal power consumption as required Put a lid on a cookware 3% 12 Hollandaise sauce, 5 - 25 min melt: butter, chocolate, gelatine Mix from time to time 3–5% 12 Solidify: fluffy omelettes, baked eggs 10 - 40 min Cook with a lid on 3–5% 23 Simmer rice and milkbased dishes, heating up ready-cooked meals 25 - 50 min Add the minimum twice as much liquid as rice, mix milk dishes part procedure through 5 – 10 %
www.electrolux.com an acute angle and move the blade on the surface . – Remove after the appliance is sufficiently cool: limescale rings , water rings, fat stains, shiny metallic discolorations. Use a special 2. 3. cleaning agent for glass ceramic or stainless steel. Clean the appliance with a moist cloth and some detergent. At the end rub the appliance dry with a clean cloth. 7. TROUBLESHOOTING Problem Possible cause You cannot activate the appliance or operate it.
ENGLISH Problem Possible cause 13 Remedy comes on. The Automatic Switch Off operates. Deactivate the appliance and activate it again. comes on. The Child Safety Device or the Lock function operates. Refer to the chapter “Daily Use”. comes on. No cookware is on the cooking zone. Put cookware on the cooking zone. The cookware is incorrect. Use the correct cookware. The diameter of the bottom of the cookware is too small for the cooking zone. Move cookware to a smaller cooking zone.
www.electrolux.com 8. INSTALLATION WARNING! Refer to the Safety chapters. Before the installation Before the installation of the appliance, record the information below from the rating plate. The rating plate is on the bottom of the appliance casing. • Model ........................... • PNC ............................. • Serial number .................... 8.1 Built-in appliances • Replace the damaged mains cable with a special cable (type H05BB-F Tmax 90°C; or higher).
ENGLISH min. 12 mm R 5mm min. 55mm min. 2 mm 490+1mm 270+1mm min. 38 mm min. 2 mm 9. TECHNICAL DATA Modell EHH3320FOK Prod.Nr. 949 596 012 00 Typ 58 GAD D9 AT 220-240 V 50-60 Hz Induction 3.7 kW Made in Germany Ser.Nr. .......... 3.
www.electrolux.com Cooking zones power Cooking zone Nominal Power (Max heat setting) [W] Power Function activated [W] Power function maximum duration [min] Minimum cookware diameter [mm] Middle rear — 145 mm 1400 W 2500 W 4 125 Middle front — 2300 W 210 mm 3700 W 10 180 10. ENVIRONMENT CONCERNS Recycle the materials with the symbol . Put the packaging in applicable and electronic appliances. Do not dispose appliances marked with the symbol containers to recycle it.
ENGLISH 17
www.electrolux.
ENGLISH 19
892952011-E-012013 www.electrolux.