EHH6332XOK EN KO ES Hob 호브 Placa de cocción User Manual 사용자 설명서 Manual de instrucciones 2 19 36
www.electrolux.com CONTENTS 1. SAFETY INFORMATION....................................................................................2 2. SAFETY INSTRUCTIONS..................................................................................4 3. INSTALLATION.................................................................................................. 6 4. PRODUCT DESCRIPTION................................................................................ 9 5. DAILY USE..................................
ENGLISH 3 instructions in a safe and accessible location for future reference. 1.1 Children and vulnerable people safety • • • • • • • This appliance can be used by children aged from 8 years and above and persons with reduced physical, sensory or mental capabilities or lack of experience and knowledge if they have been given supervision or instruction concerning the use of the appliance in a safe way and understand the hazards involved. Do not let children play with the appliance.
www.electrolux.com • • • • • • • • CAUTION: The cooking process has to be supervised. A short term cooking process has to be supervised continuously. WARNING: Danger of fire: Do not store items on the cooking surfaces. Metallic objects such as knives, forks, spoons and lids should not be placed on the hob surface since they can get hot. Do not use a steam cleaner to clean the appliance. After use, switch off the hob element by its control and do not rely on the pan detector.
ENGLISH • Make sure that the ventilation space of 2 mm, between the worktop and the front of the below unit, is free. The warranty does not cover damages caused by the lack of an adequate ventilation space. • • 2.2 Electrical Connection • WARNING! Risk of fire and electrical shock. • • • • • • • • • • • • • • • All electrical connections should be made by a qualified electrician. The appliance must be earthed.
www.electrolux.com other purposes, for example room heating. WARNING! Risk of fire and explosion • • • • Fats and oil when heated can release flammable vapours. Keep flames or heated objects away from fats and oils when you cook with them. The vapours that very hot oil releases can cause spontaneous combustion. Used oil, that can contain food remnants, can cause fire at a lower temperature than oil used for the first time.
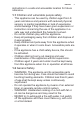
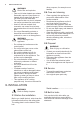
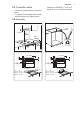
ENGLISH 3.3 Connection cable • • The hob is supplied with a connection cable. To replace the damaged mains cable use the following (or higher) mains cable type: H05V2V2-F T min 90°C. Speak to your local Service Centre. 3.4 Assembly min. 500mm min. 50mm min. 2mm min. 2 mm A min. 2 mm B < 20 mm B 57 mm 41 mm 31 mm B > 20 mm min. 500 mm A 12 mm 28 mm 38 mm A min 30 mm min.
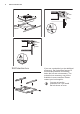
www.electrolux.com min. 38 mm min. 2 mm R 5mm min. 55mm 490+1mm 560+1mm min. 12 mm min. 2 mm 3.5 Protection box If you use a protection box (an additional accessory), the front airflow space of 2 mm and the protective floor directly below the hob are not necessary. The protection box accessory may not be available in some countries. Please contact your local supplier. You can not use the protection box if you install the hob above an oven.
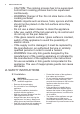
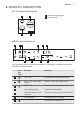
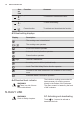
ENGLISH 4. PRODUCT DESCRIPTION 4.1 Cooking surface layout 1 1 Induction cooking zone 2 Control panel 1 145 mm 180/280 mm 210 mm 1 2 4.2 Control panel layout 1 2 3 4 10 9 5 8 6 7 Use the sensor fields to operate the appliance. The displays, indicators and sounds tell which functions operate. Sen‐ sor field Function Comment 1 ON / OFF To activate and deactivate the hob. 2 Lock / The Child Safety Device To lock / unlock the control panel.
www.electrolux.com Sen‐ sor field 8 9 Function Comment / - To increase or decrease the time. / - To set a heat setting. Power function To activate and deactivate the function. 10 4.3 Heat setting displays Display Description The cooking zone is deactivated. The cooking zone operates. - STOP+GO function operates. Automatic Heat Up function operates. Power function operates. + digit There is a malfunction. A cooking zone is still hot (residual heat).
ENGLISH 5.2 Automatic Switch Off The function deactivates the hob automatically if: • • • • • • all cooking zones are deactivated, you do not set the heat setting after you activate the hob, you spill something or put something on the control panel for more than 10 seconds (a pan, a cloth, etc.). An acoustic signal sounds and the hob deactivates. Remove the object or clean the control panel. the hob gets too hot (e.g. when a saucepan boils dry).
www.electrolux.com To set the cooking zone: touch again and again until the indicator of a necessary cooking zone comes on. To activate the function or change the time: touch or of the timer to set the time (00 - 99 minutes). When the indicator of the cooking zone starts to flash slowly the time counts down. To see the remaining time: set the cooking zone with . The indicator of the cooking zone starts to flash quickly. The display shows the remaining time.
ENGLISH • • • 13 The function activates when the total electricity loading of the cooking zones connected to a single phase exceeds 3700 W. The function decreases the power to the other cooking zones connected to the same phase. The heat setting display of the reduced zones alternates between the chosen heat setting and the reduced heat setting. After some time the heat setting display of the reduced zones stays on the reduced heat setting. 6. HINTS AND TIPS WARNING! Refer to Safety chapters. 6.
www.electrolux.com Heat setting -1 Use to: Time (min) Hints Keep cooked food warm. as nec‐ Put a lid on the cookware. essary 1-3 Hollandaise sauce, melt: but‐ 5 - 25 ter, chocolate, gelatine. Mix from time to time. 1-3 Solidify: fluffy omelettes, baked eggs. 10 - 40 Cook with a lid on. 3-5 Simmer rice and milkbased dishes, heating up readycooked meals. 25 - 50 Add the minimum twice as much liquid as rice, mix milk dishes part procedure through. 5-7 Steam vegetables, fish, meat.
ENGLISH • Remove shiny metallic discoloration: use a solution of water 15 with vinegar and clean the glass surface with a moist cloth. 8. TROUBLESHOOTING WARNING! Refer to Safety chapters. 8.1 What to do if... Problem Possible cause Remedy You cannot activate or op‐ erate the hob. The hob is not connected to an electrical supply or it is connected incorrectly. Check if the hob is correct‐ ly connected to the electri‐ cal supply. Refer to the connection diagram. The fuse is blown.
www.electrolux.com Problem Possible cause Remedy The highest heat setting is set. The highest heat setting has the same power as the function. The heat setting changes between two levels. Power management func‐ tion operates. Refer to "Daily use" chap‐ ter. The sensor fields become hot. The cookware is too large Put large cookware on the or you put it too near to the rear zones if possible. controls. comes on. Automatic Switch Off oper‐ Deactivate the hob and ac‐ ates. tivate it again.
ENGLISH 8.2 If you cannot find a solution... If you cannot find a solution to the problem yourself, contact your dealer or an Authorised Service Centre. Give the data from the rating plate. Give also three digit letter code for the glass ceramic (it is in the corner of the glass 17 surface) and an error message that comes on. Make sure, you operated the hob correctly. If not the servicing by a service technician or dealer will not be free of charge, also during the warranty period.
www.electrolux.com Diameter of circular cook‐ Left front ing zones (Ø) Left rear Right front 21.0 cm 14.5 cm 28.0 cm Energy consumption per Left front cooking zone (EC electric Left rear cooking) Right front 176.6 Wh / kg 177.8 Wh / kg 169.2 Wh / kg Energy consumption of the hob (EC electric hob) 174.5 Wh / kg EN 60350-2 - Household electric cooking appliances - Part 2: Hobs - Methods for measuring performance • 10.
한국어 19 목차 1. 안전 정보.......................................................................................................... 19 2. 안전 지침.......................................................................................................... 21 3. 설치...................................................................................................................23 4. 제품 설명.......................................................................................................... 25 5. 일상적 사용..............
www.electrolux.com 않습니다. 필요할 때 참고하기 위해 지침은 항상 안전하 고 접근 가능한 위치에 보관해 주십시오. 1.1 어린이 및 노약자 안전 수칙 • • • • • • • 만 8 세 이상의 어린이나, 신체적, 감각적, 또는 정신적 능력이 저하되거나 경험과 지식이 부족한 사람이 이 전 자 제품을 사용하고자 하는 경우, 안전한 사용 방법에 대해 감독 또는 주의를 받고 관련 위험 요소에 대해 이 해하는 경우 사용이 가능합니다. 어린이가 전자 제품을 가지고 장난을 하지 못하게 하십 시오. 모든 포장재는 어린이의 손에 닿지 않게 하고 적절하게 폐기하십시오. 전자 제품이 작동되거나 열을 식힐 때 어린이나 애완동 물이 전자 제품 가까이 오지 못하도록 주의합니다. 표 면의 부품은 뜨겁습니다. 제품에 어린이 안전 장치가 있는 경우 이를 작동해야 합니다. 어린이는 감독 없이 제품을 세척하거나 유지보수해서 는 안됩니다.
한국어 • • • • • • • • 21 주의: 조리 과정을 감독해야 합니다. 단기 조리 과정을 지속적으로 감독해야 합니다. 경고: 화재 위험: 조리면 위에 물건을 보관하지 마십시 오. 칼, 포크, 숟가락, 뚜껑 등과 같은 금속 물체는 호브 표 면이 뜨거워질 수 있으니 올려 놓지 마십시오. 전자 제품을 세척하기 위해 증기 소독기를 사용하지 마 십시오. 사용 후에는 제어판을 사용해 호브 발열체를 끄고 팬 탐지기에 의존하지 마십시오. 글라스 세라믹 표면/글라스 표면에 금이 간 경우 감전 을 예방하기 위해 전자 제품 스위치를 끄십시오. 전원 코드가 손상된 경우 위험을 방지하려면 제조사, 공식 서비스 기술자 또는 자격을 갖춘 전문가가 교체해 야 합니다. 경고: 조리 제품 제조 업체 또는 적합한 사용 지침이 있 는 제품 제조업체에서 표시하는 호브 가드나 제품에 통 합된 호브 가드만 사용하십시오. 부적합한 가드를 사용 하면 사고가 일어날 수 있습니다. 2. 안전 지침 2.
www.electrolux.com • • • • • • • • • • • • • • • • • 이 전자 제품은 반드시 접지해야 합니 다. 모든 작동을 수행하기 전에 전자 제품 이 전원에서 분리되어 있는지 확인하 십시오. 정격판의 전기 정보가 사용자의 가정 용 전압 공급과 일치하는지 확인하십 시오. 그렇지 않은 경우 전기 기술자에 게 연락하십시오. 전자 제품이 제대로 설치되었는지 확 인하십시오. 전원 케이블 또는 플러그 (해당되는 경우)를 헐겁거나 잘못 연결 할 경우, 단자가 필요 이상으로 뜨거워 질 수 있습니다. 올바른 전원 케이블을 사용하십시오. 전원 케이블이 꼬이지 않도록 합니다. 충격 보호대를 설치해야 합니다. 케이블에 스트레인 릴리프 클램프를 이용합니다 콘센트 근처에서 전자 제품을 연결할 경우, 전원 케이블 또는 플러그(해당되 는 경우)가 뜨거운 전자 제품 또는 뜨 거운 조리 용기에 닫지 않도록 하십시 오. 멀티탭 및 연장 케이블을 사용하지 마 십시오.
한국어 경고 전자 제품이 손상될 위험이 있습니다. • • • • • • • • 제어판에는 뜨거운 조리 용기를 올려 놓지 마십시오. 호브 유리 표면에 뜨거운 팬 커버를 올 려 놓지 마십시오. 조리 용기를 가열하여 건조시키지 마 십시오. 물건이나 조리 용기가 전자 제품에 떨 어지지 않도록 주의하십시오. 표면이 손상될 수 있습니다. 내용물 없이 비어있는 냄비를 올려 놓 거나 아무 것도 올려 놓지 않은 채로 쿠 킹존을 작동하지 마십시오. 전자 제품에 알루미늄 호일을 올려놓 지 마십시오. 조리 용기가 주철 또는 알루미늄으로 되어 있거나 바닥이 손상되어 있으면 글라스/글라스 세라믹에 흠집이 날 수 있습니다. 쿠킹판에서 이동해야 하는 경우 항상 물체를 들어 올려 이동시키 십시오. 본 전자 제품은 주방용으로만 사용하 도록 제작되었습니다. 예를 들어 실내 난방과 같이, 설계된 목적 이외의 다른 용도로 사용할 수 없습니다. 2.
www.electrolux.com 3.4 조립 min. 500mm min. 50mm min. 2mm min. 2 mm A min. 2 mm A B < 20 mm > 20 mm min. 500 mm B 57 mm 41 mm 31 mm A 12 mm 28 mm 38 mm B min 30 mm min. 500 mm A 12 mm 28 mm 38 mm B 57 mm 41 mm 31 mm min. 38 mm min. 2 mm R 5mm min.
한국어 25 min. 12 mm min. 2 mm 3.5 보호 상자 보호 상자(추가 부속품)를 사용하는 경우 에는 전면 통풍 공간 2mm 와 호브 바로 아래 보호용 바닥이 필요 없습니다. 보호 상자 부속품은 국가에 따라 제공되지 않 을 수 있습니다. 가까운 공급업체에 문의 하십시오. 호브를 오븐 위에 설치하는 경우에는 보호 상자를 사용할 수 없습니다. 4. 제품 설명 4.
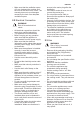
www.electrolux.com 4.2 제어판 구성 1 2 3 4 10 9 5 6 8 7 전자 제품을 작동하려면 센서 필드를 사용하십시오. 표시창, 표시등 및 소리는 어떤 기 능이 작동하는지 알려줍니다. 센서 필드 기능 메모 1 켜짐/꺼짐 호브의 작동 및 작동 중지 2 잠금 / 어린이 안전 장치 제어판 잠금/잠금 해제 3 STOP+GO 기능의 작동 및 작동 해제. 4 - 온도 설정 표시창 온도 설정 상태를 표시 5 - 쿠킹존의 타이머 표시등 시간을 설정하는 존(구역) 표시. 6 - 타이머 표시 시간을 분 단위로 표시 - 쿠킹존 선택 / - 시간을 늘리거나 줄임 / - 온도 설정 선택 파워 기능 기능의 작동 및 작동 해제. 7 8 9 10 4.3 온도 설정 표시창 표시창 설명 쿠킹존이 작동 해제됩니다. - 쿠킹존이 작동합니다. STOP+GO 기능이 작동합니다. 자동 예열 기능 기능이 작동합니다.
한국어 표시창 27 설명 파워 기능가 작동합니다. + 자릿수 기능이 제대로 작동하지 않습니다. 쿠킹존이 아직 뜨거움(아직 열기가 남아 있음). 잠금 /어린이 안전 장치 기능이 작동합니다. 쿠킹존에 잘못된 조리 용기 또는 너무 작은 조리 용기가 올려져 있 거나 조리 용기가 올려져 있지 않습니다. 스위치 자동 꺼짐 기능이 작동합니다. 4.4 잔열 표시등 경고 잔열로 인한 화상의 위험 이 있습니다. 인덕션 쿠킹존은 조리 과정에 필요한 열 을 조리기구 바닥에 직접 전달합니다. 글 라스 세라믹은 조리기구의 열에 의해 가 열됩니다. 5. 일상적 사용 경고 안전 장을 참조하십시오. 5.1 작동 및 작동 중지 을 1 초간 눌러 호브를 작동 또는 작동 중지합니다. • 쿠킹존을 작동 해제하지 않거나 온도 설정을 변경한 경우. 잠시 후 가 켜 지고 호브가 작동 해제됩니다. 온도 설정 및 이후 호브가 작동 해제되는 시간의 관계: 온도 설정 5.
www.electrolux.com 된 다음 올바른 온도 설정으로 낮아집니 다. 기능을 작동시키려면 쿠킹존 을 식혀야 합니다. 쿠킹존의 기능 작동 방법: 다( ( 이 나타남). 즉시 이 나타남). 올바른 온도 설정이 켜질 때까지 즉시 에 를 터치합니 를 터치합니다 를 터치하십시오. 3 초 후 이 나타납니다. 기능 작동 해제 방법: 를 터치합니다. 5.5 파워 기능 이 기능은 인덕션 쿠킹존에 더 많은 출력 을 전달할 수 있습니다. 이 기능은 정해진 시간 동안만 인덕션 쿠킹존에서 작동합니 다. 이 시간이 지나면 인덕션 쿠킹존이 최 고 온도 설정으로 자동 전환됩니다. "기술 정보" 장을 참조하십시 오. 쿠킹존의 기능 작동하기: 다. 를 터치합니 이 나타납니다. 기능 작동 해제 방법: 합니다. 또는 를 눌러 시간을 설정하십시오 (00 - 99 분). 쿠킹존의 표시등이 느리게 깜박이기 시작하면 시간이 카운트다운됩 니다. 남은 시간 보는 방법: 로 쿠킹존을 설정 하십시오.
한국어 5.9 잠금 쿠킹존을 작동하는 동안에도 제어판을 잠 글 수 있습니다. 이렇게 하면 온도를 실수 로 변경하는 것을 방지할 수 있습니다. 할 수 있습니다. 로 호브를 작동 중지하 면, 기능이 다시 작동합니다. 5.11 출력 관리 먼저 온도 설정을 선택합니다. • 기능 작동 방법: 를 터치합니다. 가 4 초 동안 켜집니다.타이머가 계속 켜져 있 습니다. • 기능 작동 해제 방법: 를 터치합니다. 이전 온도 설정이 켜집니다. 호브를 작동 중지하면 이 기 능도 작동 해제됩니다. • • • 5.10 어린이 안전 장치 • 이 기능은 실수로 인한 호브의 작동을 방 지합니다. 기능 작동 방법: 로 호브를 작동합니다. 온도 설정을 하지 마십시오. 를 4 초간 터치합니다. 가 켜집니다. 작동 중지합니다. 로 호브를 기능 작동 해제 방법: 29 쿠킹존은 호브의 상 번호와 위치에 따 라 그룹화됩니다. 그림을 참조하십시 오. 각 상의 최대 전기 부하는 3,700 W 입 니다.
www.electrolux.com 조리 용기의 바닥은 두껍고 반드시 평평해야 합니다. 조리 용기 치수 인덕션 쿠킹존은 조리 용기 바닥의 치수 에 맞춰 자동적으로 한계선까지 조절됩니 다. 쿠킹존 효율성은 조리 용기의 지름에 따 라 다릅니다. 조리 용기의 지름이 쿠킹존 의 최소 지름보다 작은 경우 쿠킹존에서 발생하는 출력이 일부만 전달됩니다. "기술 정보" 장을 참조하십시 오. 6.2 작동 중 소음 • 휘파람 소리: 출력 레벨이 높은 상태로 쿠킹존을 사용하며 조리 용기가 여러 재질로 구성되어 있습니다(샌드위치 구성). • 윙윙거림: 출력 레벨이 높음. • 찰칵 소리: 전기 스위칭이 일어남. • 쉿쉿 소리, 와글와글거림: 팬이 작동함. 소음은 정상적이며 호브 결함이 아닙니 다. 6.3 요리 사례 온도 설정과 쿠킹존에서 소비하는 전력은 선형관계가 아닙니다. 다시 말해, 온도 설 정을 높인다고 해서 쿠킹존의 전력 소비 가 비례해서 증가하지 않습니다.
한국어 온도 설정 용도: 시간 (min) 31 힌트 많은 양의 물 끓이기. 전원 기능이 작동됩니다. 7. 관리 및 청소 경고 안전 장을 참조하십시오. 7.1 일반 정보 • • • • • 매 사용 후 호브를 청소하십시오. 항상 바닥이 깨끗한 조리 용기를 사용 하십시오. 표면의 스크래치나 진한 얼룩은 호브 의 작동에 영향을 미치지 않습니다. 호브 표면에 적합한 특수 클리너를 사 용합니다. 특수 스크레이퍼(긁기 도구)를 사용하 십시오. • • 지 않으면 오염물이 호브에 손상을 입 힐 수 있습니다. 화상을 피하도록 주의 해야 합니다. 특수 스크레이퍼가 글라 스 표면에 예각을 이루도록 놓고 칼날 을 표면 위에서 이동시키십시오. 호브가 충분히 식었을 때 물때, 수봉, 지방 얼룩, 빛나는 금속의 변색 부분을 청소합니다. 비연마성 세제를 적신 천 으로 호브를 청소합니다. 청소한 후에 는 부드러운 천으로 호브를 닦아냅니 다.
www.electrolux.com 문제점 예상 원인 해결책 STOP+GO 기능이 작동합 니다. "일상적 사용" 장을 참조하 십시오. 제어판에 물기나 지방 얼룩 제어판을 청소합니다. 이 있습니다. 신호음이 들리고 호브가 작 한 개 이상의 센서 필드에 센서 필드에서 물건을 치웁 동 중지됩니다. 무언가를 올려 놓았습니다. 니다. 호브가 작동 중지될 때 신호 음이 들립니다. 호브가 작동 중지됩니다. 센서 필드 위에 물건을 올려 놓았습니다. 센서 필드에서 물건을 치웁 니다. 잔열 표시등이 켜지지 않습 쿠킹존이 단시간 동안만 작 쿠킹존이 충분히 오래 작동 니다. 동했으므로 뜨겁지 않습니 하여도 뜨겁지 않은 경우, 다. 공식 서비스 센터에 문의하 십시오. 자동 가열 기능이 작동하지 쿠킹존이 뜨겁습니다. 않습니다. 쿠킹존이 충분히 식을 때까 지 기다립니다. 최고 온도로 설정되어 있습 최고 온도 설정은 해당 기능 니다. 과 동일한 출력이 전달됩니 다.
한국어 문제점 및 숫자가 표시됩니다. 33 예상 원인 해결책 호브에 오류가 발생했습니 다. 잠시 호브의 전기 공급을 차 단합니다. 집안의 전기 시스 템에서 퓨즈를 분리합니다. 다시 연결합니다. 가 다 시 켜지면 공식 서비스 센터 에 문의하십시오. 호브의 물이 모두 졸아 호브 에 오류가 발생했습니다. 존 의 스위치 자동 꺼짐 및 과 열 방지 기능이 작동 중입니 다. 가 켜집니다. 8.2 해결책을 찾을 수 없는 경 우... 스스로 해결책을 찾을 수 없는 경우, 판매 처 또는 공식 서비스 센터에 문의하십시 오. 정격판의 데이터를 제공하십시오. 또 한 글라스 세라믹의 3 자리 문자 코드(글 라스 표면 모서리에 있음) 및 표시되는 오 호브를 작동 중지합니다. 뜨 거운 조리 용기를 꺼내십시 오. 약 30 초 후 쿠킹존을 다 시 작동하십시오. 만약 조리 용기가 문제라면, 오류 메시 지가 꺼집니다. 잔열 표시등 은 그대로 유지될 수 있습니 다. 조리 용기가 충분히 식 을 때까지 기다립니다.
www.electrolux.com 쿠킹존의 출력은 표에 나타난 데이터와 미세한 차이가 있을 수 있습니다. 조리 용 기의 소재 및 크기에 따라 달라질 수 있습 니다. 최적의 조리 결과를 위해 표에 있는 지름 보다 작은 조리 용기를 사용하십시오. 10. 에너지 효율성 10.1 EU 66/2014 에 따른 제품 정보 모델 ID EHH6332XOK 호브 유형 붙박이형 호브 쿠킹존의 수 3 가열 기술 인덕션 원형 쿠킹존 직경(Ø) 좌측 전면 좌측 후면 우측 정면 21.0 cm 14.5 cm 28.0 cm 쿠킹존별 에너지 소비 (EC electric cooking) 좌측 전면 좌측 후면 우측 정면 176.6 Wh / kg 177.8 Wh / kg 169.2 Wh / kg 호브의 에너지 소비 (EC electric hob) EN 60350-2 - - 가정용 전기 조리 전자 제 품 - 파트 2: 호브 - 성능 측정 방법 10.
한국어 의 교환을 무상으로 해드릴 것을 보증 합니다. 보증 기간이 지났거나 보증기간이내의 잘못된 사용이나 사고로 인한 제품손 상, 사용부주 의, 설치상의 잘못, 자의 적 변경 및 수리, 영업용 목적의 사용, 제품설명서에 규정된 요 건이나 규정 의 미준수 등으로 인한 고장이나 성능 상 하자의 경우 제품보증이 적용되지 않습니다. 또한 전구나 유리 용기 및 플 라스틱 용기 같은 부속품에는 적용되 지 않습니다. 고장이 아닌 경우 서비스를 요청하시 면 요금을 받게 되므로 반드시 사용설 명서를 읽어 주십시오. 사용 중 의문나는 사항이 있거나 서비 스를 원하실 경우에는 당사 고객센터 로 연락하시기 바랍니다. • • • 서울시 중구 을지로 100 파인에비뉴빌딩 B 동 9 층 고객센터: 1644-8746 홈페이지: www.electrolux.co.kr 제품제조일표시 제품 제조시기는 기기의 별도 라벨에 표 시되어 있습니다. 제조시기 확인 방법 시리얼 넘버“( SER. NO.
www.electrolux.com CONTENIDO 1. INFORMACIÓN SOBRE SEGURIDAD............................................................ 36 2. INSTRUCCIONES DE SEGURIDAD................................................................38 3. INSTALACIÓN..................................................................................................41 4. DESCRIPCIÓN DEL PRODUCTO................................................................... 43 5. USO DIARIO..............................................................
ESPAÑOL 37 Conserve siempre estas instrucciones en lugar seguro y accesible para futuras consultas. 1.
www.electrolux.com • • • • • • • • • NUNCA intente apagar un fuego con agua; apague el aparato y cubra la llama con una tapa o una manta ignífuga. ATENCIÓN: El proceso de cocción debe ser supervisado. Un proceso de cocción breve debe estar permanentemente supervisado. ADVERTENCIA: Peligro de incendio: No utilice las superficies de cocción para almacenar alimentos. No deje objetos metálicos, como cuchillos, tenedores, cucharas o tapas sobre la superficie de cocción para evitar que se calienten.
ESPAÑOL • • • esta forma se evita que los utensilios de cocina calientes caigan del aparato cuando la puerta o la ventana estén abiertas. Cuando instale el aparato encima de cajones, asegúrese de que hay suficiente espacio entre la parte inferior del aparato y el cajón superior para que circule el aire. La base del aparato se puede calentar. Asegúrese de colocar un panel de separación incombustible bajo el aparato para evitar acceder a la base.
www.electrolux.com • • • • • • • • • • Cerciórese de que los orificios de ventilación no están obstruidos. No deje nunca el aparato desatendido mientras está en funcionamiento. Apague las zonas de cocción después de cada uso. No se confíe por el detector de tamaño. No coloque cubiertos ni tapaderas sobre las zonas de cocción. Pueden alcanzar temperaturas elevadas. No utilice el aparato con las manos mojadas ni cuando entre en contacto con el agua.
ESPAÑOL 2.6 Asistencia • • Para reparar el aparato, póngase en contacto con un centro de servicio autorizado. 41 Utilice solamente piezas de recambio originales. 3. INSTALACIÓN ADVERTENCIA! Consulte los capítulos sobre seguridad. 3.1 Antes de la instalación Antes de instalar la placa de cocción, anote la información siguiente de la placa de características. La placa de características está situada en la parte inferior de la placa de cocción. Número de serie ........................... 3.
www.electrolux.com min. 2 mm A min. 2 mm A B < 20 mm > 20 mm min. 500 mm min 30 mm B 57 mm 41 mm 31 mm A 12 mm 28 mm 38 mm B min. 500 mm A 12 mm 28 mm 38 mm B 57 mm 41 mm 31 mm min. 38 mm min. 2 mm R 5mm min. 55mm 490+1mm 560+1mm min. 12 mm min.
ESPAÑOL 3.5 Caja de protección No se puede utilizar la caja de protección si se instala la placa de cocción encima de un horno. 4. DESCRIPCIÓN DEL PRODUCTO 4.1 Disposición de las zonas de cocción 1 1 Zona de cocción por inducción 2 Panel de control 1 145 mm 180/280 mm 210 mm 1 2 4.
www.electrolux.com Sen‐ sor Función Comentario 1 ENCENDIDO/APAGADO Para activar y desactivar la placa. 2 Cierre / Bloqueo de segu‐ Para bloquear y desbloquear el panel de ridad para niños control. 3 STOP+GO 4 5 6 Para activar y desactivar la función . - Indicador del nivel de ca‐ Para mostrar el nivel de calor. lor - Indicadores de tiempo de Muestra la zona para la que se ha ajusta‐ las zonas de cocción do la hora. - Indicador del temporiza‐ dor Para mostrar la hora en minutos.
ESPAÑOL 4.4 Indicador de calor residual ADVERTENCIA! Riesgo de quemaduras por calor residual. 45 proceso de cocción directamente en la base del recipiente, lo que hace que la superficie vitrocerámica se caliente por el calor del mismo. Las zonas de cocción por inducción generan el calor necesario para el 5. USO DIARIO ADVERTENCIA! Consulte los capítulos sobre seguridad. 5.
www.electrolux.com Para desactivar la función: toque Para comprobar el tiempo restante: . 5.5 La función Power La función suministra potencia adicional a las zonas de cocción por inducción, La función puede activarse para la zona de cocción por inducción solo un período de tiempo limitado. Transcurrido ese tiempo, la zona de cocción cambia automáticamente al nivel de calor más alto. seleccione la zona de cocción con . El indicador de la zona de cocción comienza a parpadear rápidamente.
ESPAÑOL 5.9 Cierre Se puede bloquear el panel de control mientras funcionan las zonas de cocción. Evita el cambio accidental del nivel de calor. placa de cocción con vuelve a activarse. se Para desactivar la función: toque . Se enciende el ajuste de calor anterior. La función también se desactiva cuando se apaga la placa. • • • • 5.10 Bloqueo de seguridad para niños • Esta función impide el uso accidental o indebido de la placa. • Para activar la función: encienda la placa de cocción con .
www.electrolux.com Utilice las zonas de cocción con los utensilios de cocina adecuados. Material de los recipientes • correcto: hierro fundido, acero, acero esmaltado y acero inoxidable con bases formadas por varias capas (indicados por el fabricante como aptos para inducción). • incorrecto: aluminio, cobre, latón, cristal, cerámica, porcelana.
ESPAÑOL 49 Ajuste del nivel de ca‐ lor Utilícelo para: Tiempo Sugerencias (min) 1-3 Cuajar: tortilla, huevos re‐ vueltos. 10 - 40 Cocinar con tapa. 3-5 Arroces y platos cocinados con leche, calentar comidas preparadas. 25 - 50 Añadir al menos el doble de líquido que de arroz; los pla‐ tos lácteos deben remover‐ se entremedias. 5-7 Cocinar al vapor verduras, pescados o carnes. 20 - 45 Añadir varias cucharadas de líquido. 7-9 Cocinar patatas al vapor.
www.electrolux.com • seque la placa de cocción con un paño suave. Elimine cualquier decoloración metálica brillante: utilice una solución de agua y vinagre para limpiar la superficie de cristal con un paño húmedo. 8. SOLUCIÓN DE PROBLEMAS ADVERTENCIA! Consulte los capítulos sobre seguridad. 8.1 Qué hacer si... Problema Posible causa Solución La placa no se enciende o no funciona. La placa no está conecta‐ da a un suministro eléctri‐ co o está mal conectada.
ESPAÑOL 51 Problema Posible causa Solución El indicador de calor resi‐ dual no se enciende. La zona no está caliente porque ha funcionado po‐ co tiempo. Si la zona ha funcionado el tiempo suficiente como pa‐ ra estar caliente, consulte con el centro de servicio autorizado. La función de calentamien‐ La zona está caliente. to automático no se activa. El valor de la temperatura varía entre dos ajustes. Deje que la zona se enfríe suficientemente. Se ha ajustado el nivel de calor más alto.
www.electrolux.com Problema se enciende. Posible causa Solución Se ha producido un error en la placa de cocción por‐ que el utensilio de cocina ha hervido hasta agotar el líquido. La desconexión automática y la protección contra sobrecalentamien‐ tos de las zonas se han activado. Apague la placa de coc‐ ción. Retire el utensilio de cocina caliente. Espere unos 30 segundos antes de encender de nuevo la zona. Si el utensilio de co‐ cina era el problema, el mensaje de error desapa‐ rece.
ESPAÑOL 53 9.2 Especificaciones de las zonas de cocción Zona de coc‐ ción Potencia no‐ La función Po‐ La función Po‐ minal (ajuste wer [W] wer duración de calor máx.) máxima [min] [W] Diámetro de los utensilios de cocina [mm] Anterior iz‐ quierda 2300 3700 10 180 - 210 Posterior iz‐ quierda 1400 2500 4 125 - 145 Anterior dere‐ cha 1800 3500 2800 3700 5 5 145 - 245 245 - 280 La potencia de las zonas de cocción puede variar ligeramente de los datos de la tabla.
www.electrolux.com • • Coloque los utensilios de cocina pequeños en zonas de cocción pequeñas. Coloque el utensilio de cocina directamente en el centro de la zona de cocción. • Utilice el calor residual para mantener calientes los alimentos o derretirlos. 11. ASPECTOS MEDIOAMBIENTALES Recicle los materiales con el símbolo . Coloque el material de embalaje en los contenedores adecuados para su reciclaje.
ESPAÑOL 55
867331984-B-192019 www.electrolux.