user manual Cooker EH K1-3 / K1-4
electrolux Electrolux. Thinking of you. Share more of our thinking at www.electrolux.com Contents Safety instructions.................................. 3 Description of the Appliance .................. 4 Before Using for the first time ................. 6 Using the Rings...................................... 6 Using the Oven ...................................... 8 Uses, Tables and Tips ............................ 10 Cleaning and Care................................. What to do if …...................
electrolux 3 1 Safety instructions Electrical safety • This appliance must be only connected by a registered electrician. • In the event of a fault or damage to the appliance: Take the fuses out or switch off. • Repairs to the appliance must only be carried out by qualified service engineers. Considerable danger may result from improper repairs. If repairs become necessary, please contact our Customer Services or your dealer. Child Safety • Never leave children unsupervised when the appliance is in use.
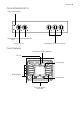
electrolux Description of the Appliance General Overview Control panel Door handle Oven door Appliance drawer Control Panel EH K1-4 Oven Power Indicator Temperature Pilot Light Oven Functions Hob Cooking Zone Control Knobs Temperature selector Hob Cooking Zone Control Knobs
electrolux 5 Control Panel EH K1-3 Oven Power Indicator Temperature Pilot Temperature selector Light Oven Functions Hob Cooking Zone Control Knobs Oven Features Top heat and heating elements Fat trap Oven lighting Shelf positions Bottom Heat Oven shelf runners, removable
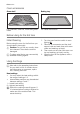
electrolux Oven accessories Oven shelf Baking tray For cookware, cake tins, roasts and grilled foods. For cakes and biscuits. Before Using for the first time Initial Cleaning Before using the oven for the first time you should clean it thoroughly. 1 Caution: Do not use any caustic, abrasive cleaners! The surface could be damaged. 3 To clean metal fronts use commercially available cleaning agents. Using the Rings 3 Also refer to the operating instructions for your built-in hob.
electrolux 7 front left rear left rear right Hob Cooking Zone Control Knobs Setting the heat setting 1. Select the heat setting. 2. To end the cooking process, turn back to the Off position. 3 The power indicator light is lit as long as a ring is on.
electrolux Using the Oven Switching the Oven On and Off Oven Power Indicator Temperature selector Oven Functions Temperature Pilot Light 1. Turn the oven functions dial to the desired function. 2. Turn the temperature selector to the desired temperature. The power indicator is lit as long as the oven is in operation. The temperature pilot light is lit as long as the oven is heating up. 3. To turn the oven off, turn the oven functions dial and the temperature selector to the Off position.
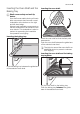
electrolux 9 Inserting the Oven Shelf and the Baking Tray Inserting the oven shelf: 3 Shelf runner safety and anti-tip device As a shelf runner safety device, all insertable components have a small curved indentation at the bottom on the right and left-hand edge. Always insert insertable components so that this indentation is at the back of the oven interior. This indentation is also important for preventing the insertable components from tipping.
electrolux Uses, Tables and Tips Cooking table The information given in the following table is for guidance only. Heat setting Cookingprocess 0 1 1-2 2-3 3-4 4-5 suitable for Cooking time Tips/Hints Residual heat, Off position Keeping food warm Keeping cooked foods warm as required Cover Melting Hollandaise sauce, melting butter, chocolate, gelatine 5-25 mins. Stir occasionally Solidifying Fluffy omelettes, baked eggs 10-40 mins. Cook with lid on 25-50 mins.
electrolux 11 3 When frozen foods are used the trays in- Baking Oven function: Conventional Baking tins For Conventional dark metal and nonstick tins are suitable. Oven levels Baking with Conventional is only possible on one level. 1 baking tray: e.g. oven level 3 1 cake tin: e.g. oven level 1 General Instructions • Insert the tray with the bevel at the front. • With Conventional you can also bake with two tins next to one another on the oven shelf at the same time.
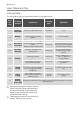
electrolux Oven level Temperature ºC Time Mins. Apple pie (2tins Ø20cm, placed diagonally to one another) 1 180-200 20-30 Savoury flan (e. g., quiche lorraine) 1 180-200 30-70 Cheesecake 1 160-180 60-90 Type of baking Cakes/pastries/breads on baking trays Plaited bread/bread crown 3 170-190 30-40 Christmas stollen 3 160-1801) 40-60 2501) 160-180 20 30-60 190-210 25-40 Bread (rye bread) first of all .......................................
electrolux 13 Tips on baking Baking results Possible cause Remedy The cake is not browned enough at the bottom Wrong oven level Place cake lower in the oven The cake sinks (becomes soggy, lumpy, streaky) Oven temperature too high Use a slightly lower setting Baking time too short Set a longer baking time Baking times cannot be reduced by setting higher temperatures Too much liquid in the mixture Use less liquid Pay attention to mixing times, especially if using mixing machines Oven temperature
electrolux Roasting table Type of meat Amount Weight Oven level Temperature ºC 1-1.5 kg 1 200-250 Time Mins. Beef Pot roast Roast beef or fillet 120-150 per cm. of thickness 1 - rare per cm. of thickness 1 230-2501) 6-8 - medium per cm. of thickness 1 230-2501) 8-10 - well done per cm. of thickness 1 210-2301) 10-12 1-1.5 kg 1 210-220 90-120 Pork Shoulder, neck, ham joint, Chop, spare rib 1-1.
electrolux 15 Grill sizes • Oven function: Grill or Dual grill with maximum temperature setting 1 Important: Always grill with the oven • 3 • • door closed. The empty oven should always be preheated with the grill functions for 5 minutes. For grilling, place the shelf in the recommended shelf position. Always insert the tray into the first shelf position from the bottom. The grilling times are guidelines. Grilling is particularly suitable for flat pieces of meat or fish.
electrolux Preserves table The times and temperatures for making preserves are for guidance only. Preserve Temperature in°C Cooking time until Continue to cook simmering at 100°C in mins. in mins.
electrolux 17 Shelf Support Rails 3 Important! The rounded ends of the The shelf support rails on the left and right hand sides of the oven can be removed for cleaning the side walls. Removing the shelf support rails guide rails must be pointing forwards! To re-insert, first hook the rail into place at the back (1) and then insert the front and press into place (2).
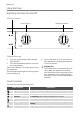
electrolux 2. Rotate the fat trap to the left from the oven roof (see illustration). 2. 3. If necessary: replace with 25 watt, 230 V, 300 °C heat-resistant oven lighting. Refit the glass cover. Oven Ceiling The upper heating element can be folded down to make it easier to clean the oven ceiling. Folding down the heating element 3. 4. Wash the fat trap in hot water with washing-up liquid and a soft brush or simply wash in the dishwasher.
electrolux 19 Repositioning the heating element Oven door For easier cleaning of the oven interior the oven door of your appliance can be taken off its hinges. Removing the oven door from its hinges 1. Open the oven door as far as it will go. 1. 2. 3. 4. Move the heating element back up towards the oven ceiling. Pull the heating element forwards against the spring pressure and guide it over the oven support lug. Settle it onto the support. Insert shelf support rail.
electrolux 4. Take hold of the oven door with a hand on each side and pull it away from the oven at an upwards angle (Take care: It is heavy). 2. Open the oven door as far as it will go. 3. Fold up the clamping levers (A) on both door hinges back into their original positions. 4. Close the oven door. 3 Lay the oven door with the outer side facing downwards on something soft and level, for example, a blanket in order to prevent scratches. Hanging the oven door back on its hinges 1.
electrolux 21 What to do if … Problem Possible cause Remedy The cooking zones are not functioning Consult the operating instructions for the built-in cooking surface The oven does not heat up The oven is not switched on Switch the oven on The required settings have not been set Check the settings The house wiring fuse (in the fuse box) has tripped Check the fuse. If the fuses trip repeatedly, please call an authorised electrician.
electrolux Installation Instructions Built-in cooker SMS width 55 cm 1 Installation into flammable material must 1. comply with NIN 2005, Chapter 4.2.2 of the VKF (Association of Cantonal Fire Insurers) fire protection guidelines and regulations. a) Install the hotplates according to the installation insruction no.374307900/ 374307901 so that the hotplate socket connections can be carried out before the cooker is inserted. Make sure the correct socket connections are used.
electrolux 23 1. Opening the terminal box (detail D). 2. 3. Open the catch on the cord grip (detail E). See the connection diagram for the terminal connection. Secure the cord grip by pressing firmly on the catch (detail F). Closing the terminal box. Fix the connection cable into the holes provided to prevent it rubbing against the drawer (detail G). 4. 5. 6. 1 In case of repair the appliance must be switched off from the mains.
electrolux Disposal 2 Packaging material The packaging materials are environmentally friendly and can be recycled. The plastic components are identified by markings, e.g. >PE<, >PS<, etc. Please dispose of the packaging materials in the appropriate container at the community waste disposal facilities. 2 Old appliance W on the product or on its The symbol packaging indicates that this product may not be treated as household waste.
electrolux 25 Garantie/Kundendienst, Garantie/service-clientèle, Garanzia/Servizio clienti, Guarantee/Customer Service Centres Servicestellen 5506 Mägenwil/Zürich Industriestrasse 10 9000 St.
electrolux Service In the event of technical faults, please first check whether you can remedy the problem yourself with the help of the operating instructions (section “What to do if…”). If you were not able to remedy the problem yourself, please contact the Customer Care Department or one of our service partners. In order to be able to assist you quickly, we require the following information: – – – Model description Product number (PNC) Serial number (S No.
www.electrolux.com www.electrolux.