INSTRUCTION BOOK GB B1763 Model Product No Serie No EHP 333 X 949 600 155 HKG 1
Table of contents Contents Page no For the user Safety information ........................................................................................ 4 Description of the product ......................................................................... 5 How to use .................................................................................................... 6 Pilotlight ................................................................................................
Safety information These warnings are provided in the interests of your safety. Ensure you fully understand them before installing or using the appliance. Your safety is of paramount importance. If you are unsure about the meaning of these warnings contact the Customer Care Department for assistance. Child Safety Installing Maintenance and Cleaning Do not install the hob if the ceramic glass is damaged or cracked. Only clean this hob in accordance with the instructions given in this book.
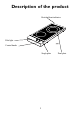
Description of the product Residual-heat indicator Pilot light Control knobs Single plate 5 Dual plate
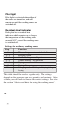
How to use Control knob (to the left) Control knob for regulating the double plate at the rear Pilot light Control knob for regulating the small plate at the front. 12 2 Regulating 10 4 The regulating of heat is graduation-free for both plates on a scale from 1 to 12. “1” Represents lowest heat “12” Represents maximum heat. “0” Represents “OFF”. 6 Operating the dual plate: When you switch on the dual plate only the centre of the cooking zone will operate. Select the required setting.
Pilot light Pilot light is activated when either of the zones are turned on, and will remain on until the cooking zones are switched off. Residual-Heat indicator Each plate has a residual heat indicator which remains on as long as the temperature of the cooking zone exceeds 80˚C, even if the cooking zone is switched off.
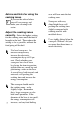
over will burn onto the hot cooking zone. Advice and hints for using the cooking zones If you use the advice below you will save energy and make your cleaning tasks easier. Saucepans with very shiny/bright bases will prolong the cooking time slightly compared with cooking utensils with matt/dark bases. Adjust the cooking zones correctly. Select the highest setting for the cooking zones until the food is brought to the boil. Then reduce the setting as far as possible, without the food going off the boil.
Check whether your cooking utensils has level bases by placing the item in question upside down on a work top and positioning a ruler on the base. A curved base, both inwards and outwards, will prolong the cooking time and increase the energy consumption. If the diameter of the base is too small, the energy consumption will increase, and any food boiling over will burn onto the hot cooking zone.
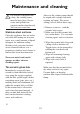
Maintenance and cleaning After use the cooking zones should be wiped with a damp cloth with washing up liquid. For severe soiling you can follow these steps: For reasons of hygiene and safety, the cooking zones must be kept clean. Grease stains and spilled food generate smoke when heated, and can even cause fire. 1. Remove stains etc., with the ceramic hob scraper. 2. Make sure that the ceramic hob has cooled down. Use a ceramic cleaning agent, such as vitroclen.
Tips on the use of the ceramic hob unit Do not slide saucepans across the surface of the hob - always lift the pan when placing it on, or removing it from the ceramic surface. Wipe the bottom surface of the pots and pans with a clean dry cloth before placing them on the ceramic surface. This helps to reduce cleaning and prevents scratching the hob glass. Wipe off spills whilst the hob is warm. Select the highest setting for the cooking zones until the food is brought to the boil, then reduce the setting.
The decorative pattern on the ceramic surface can become scratched and marred with use, depending upon maintenance, but does not adversely affect performance. Such blemishes are not covered by the warranty and do not affect the operation of the hob. Spills and melts must be removed immediately, while the surface is still warm, using the scraper supplied with the unit.
Mounting Caution: In order to avoid a hazard this appliance must be installed according to these instructions for installation Min. 47 mm The appliance unit can be mounted in any type of kitchen with a work top whose thickness is between 28 mm and 40 mm. Clearance The distance between the top side of the work top and the carpentry underneath must be at least 47 mm. Fixing Screw the fixing brackets out to such an extent that they can be turned in under the work top.
It is not necessary to attach the reinforcement beam to the work top surface, as it is held in place by a specially designed moulding, which is incorporated in the hob units flanges.
Electrical installation The electrical connection may only be performed by a qualified electrician/ competent person. The electrical connection must be carried out in accordance with prevailing regulations for appliances using heavy current. The connection must comply with any specific requirements specified by the local electricity supply authority. There must be no interference with any of the unit’s electrical parts. The cable is mounted in the pegs as shown.
Technical data Cell Voltage 220 V Electrical connection 220V - 50Hz Total wattage 2650W Instant heat effect 12/18 cm 640/1550 W Instant heat effect 14 cm 1100 W This unit is labelled to indicate conformity with the low voltage directive (73/23/EEC) and the EMC directive (89/336/EEC). Unpacking Serial number Check that the hob has no faults and is undamaged on delivery. You will find the serial number of the hob on the rating plate, which is on the underside of the hob.
Deep fat frying For safety purposes, when deep fat frying, fill the pan 1/3 full of oil. Do not cover the pan with a lid and do not leave the pan unattended. In the event of a fire, switch off at the electricity supply and cover the pan with a lid or damp cloth to assist in smothering the flames. Do not use water on the fire. Leave the pan to cool for at least 30 minutes before moving it. 4. Cooking the food Lower the food gently into the oil.
It is better to use two pans rather than overfill one, or use half quantities. 3. What to use Use firm fruit or vegetables and wash well before using. 4. Types of sugar Preserving sugar gives clear jam, however granulated sugar is cheaper and gives equally good flavour. 5. Crystallization Crystallization may be caused if sugar is not completely dissolved before bringing the jam to the boil. Over boiling will affect the flavour, setting properties and colour of the jam. 6. To test jam for setting.
Service Before calling service – Technical advice Sympton Solution The hob is not working Check your earth leak circuit breaker. Check fuses. The hob becomes hot The ceramic hob will reach a temperature of 80˚C. It may, however, become even hotter if you use cooking utensils with uneven bases or which does not match the size of the cooking zone. The fuses keep blowing Too many electrical appliances may be in use at the same time.
325 88-6320 Rev.