Electronic gas hob EHS 746 K Operating instructions CZ HR SI SK
The innovative features of your gas hob Your new gas hob offers several innovative functions that distinguish it from conventional gas hobs. z Electronic control of all functions. z Touch controls to activate the hob functions simply by touching them with a finger. z z Children safety device to prevent the controls from being accidentally operated. z General shutdown to turn off all the burners at once for an emergency. z Safety device in case of power failure or burner ignition failure.
Contents For the User The innovative features of your gas hob ........................................................ 3 For your safety ............................................................................................... 5 Description of the hob .................................................................................... 7 Operating instructions .................................................................................... 8 Touch controls ..........................................
For your safety This new appliance is easy to use. Nevertheless, it is important to carefully read this booklet before installing or using the appliance for the first time. This will allow you to obtain best performance, avoid improper actions, use the appliance in complete safety and also respect the environment. Installation z z z z z z z Installation of the appliance and connection to the power supply must only be carried out by QUALIFIED PERSONNEL.
z z persons can cause damage and accidents. Refer to the contents of this booklet (see chapter “Something not working”). If you do not find the information required, contact the nearest Assistance Centre. Servicing of this appliance must be carried out by an authorized Technical Assistance Centre. Always insist on genuine spare parts. After using the appliance, deactivate it by using the main ON/OFF touch control and make sure the relevant red indicator is off.
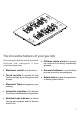
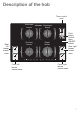
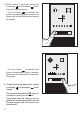
Description of the hob Timer control zone Semirapid burner Auxiliary burner Rear left burner control zone Front left burner control zone Semirapid burner Child Safety Control Main ON/OFF switch Rear right burner control zone Rapid burner Front right burner control zone 7
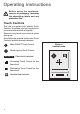
Operating instructions Before using the appliance, remove all packaging, including the advertising labels and any protective film. Touch Controls The hob is supplied with special Touch Controls. To operate your hob, simply touch the required control with a fingertip. Ensure to only touch one control at a time during use.
) How to light a burner 1. Touch the main ON/OFF Control for about 3 seconds to switch on the hob. The red indicator next to the touch control lights up, an acoustic signal sounds and the hob is ready to use. 2. Touch the Burner Ignition Control of the required burner. The flame level indicators located right below the and illuminate.
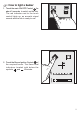
3. Within about 3 seconds, touch the Increasing or Decreasing Touch Control to light the burner. is selected, the - If touch control burner automatically lights at maximum flame level (all the flame level indicators illuminate). - If touch control is selected, the burner automatically lights at medium flame level (three flame level indicators illuminate). 4. To adjust the burner flame level, use the Increasing or Decreasing Touch Control.
)How to turn off a burner 1. To turn off a burner press the relevant . All the Burner Ignition Touch Control flame level indicators go off. The residual heat indicator remains on until the pan support and the burner have cooled down. )In case of ignition failure The hob ignition device generates a series of small sparks for about 6 seconds. If the flame does not light during this period, the gas flow to the burner is interrupted.
In case of accidental ) extinguishing (automatic reignition) If the burner flame is accidentally extinguished (draughts, spilling of liquids, etc.), the gas flow is immediately interrupted. After about 20 seconds, the ignition device automatically repeats the ignition procedure. Upon reignition, the burner flame is first set at maximum level, then it is automatically adjusted to the level set before it was accidentally extinguished.
How to turn off all the ) burners at once In case of unexpected safety hazard (spilling of liquids, children hazard, etc.), you can immediately turn off all the hob burners at once by touching the main ON/OFF Control . Burner Safety Cut-off ) Function If you leave one or more burners lit and unattended for a long time (that is, you don’t touch any control for at least 4 hours), each lit burner is automatically turned off and a safety device is set on it.
) Protection overheating against If the hob is used intensively, e.g. several burners at maximum level for a long time, a temperature sensor detects possible overheating and automatically adjusts all the lit burners to minimum. If the hob temperature keeps rising although the flame level has been reduced, all the lit burners are automatically turned off and a safety device is set on all the four burners.
The red indicator next to the “Lock” symbol goes off and an acoustic signal sounds. It is highly recommended to activate the child safety function every time the hob is not operated. In case of a power failure, the hob stores the children safety function setting in the system memory. If the controls are locked at the time of the power failure, they will still be locked when the power is restored.
to programme a ) How burner to switch off To programme a burner to switch off, proceed as follows: 1. If necessary, activate the hob by touching the main ON/OFF Control for about 3 seconds. 2. Light the burner and adjust the flame level using the Increasing or Decreasing controls (see par. “How to light a burner”). 3. Activate the Timer by touching the Timer and select the required Control burner by repeatedly touching the Timer Control . 4.
5. The timer starts the countdown a few seconds after the cooking time has been set. 6. During the last ten seconds, the timer starts beeping to advise that the cooking time is about to end. 7. An acoustic signal sounds at the end of the cooking time. To stop the acoustic . signal, touch the Timer Control To adjust the cooking time: 1. Touch the Increasing or Decreasing Control or at any time to adjust the time setting. To cancel the time setting: 1.
How to set the Minute )Minder Function You can use the timer as a simple minute minder when none of the burners are operating. The hob must be activated in order to use the timer as a minute minder. Proceed as follows: 1. If necessary, activate the hob by touching the main ON/OFF Control for about 3 seconds. 2. Touch the Timer Control the timer. to activate 3. Touch the Increasing or Decreasing Control to set the required time (max. time: 99 minutes). 4.
Safety and energy saving advice For a correct use of the hob To ensure maximum burner efficiency and lower gas consumption, you should only use pots and pans with a flat bottom fitting the size of the burner used (see table). If you use a saucepan which is smaller than the recommended size, the flame will spread beyond the bottom of the vessel, causing the handle to overheat. Pots must never be placed onto the control zones. Always turn the flame down or off before removing pots from the burners.
Cleaning and maintenance Before any maintenance or cleaning can be carried out, you must DISCONNECT the hob from the electricity supply and wait until it has cooled down. This appliance cannot be cleaned with steam or with a steam cleaning machine. The Hob Top Regularly wipe over the hob top using a soft cloth well wrung out in warm water to which a little washing up liquid has been added.
The Burners The cap and the crown of each burner are secured with two screws. To separate the two pieces, lift the cap, turn it upside down, then undo the two fixing screws as shown in the diagram. After a thoroughly cleaning, reassemble the two parts and refit the cap in its correct position on the burner. Frequently wash the burner caps and crowns using hot soapy water and remove marks with a mild paste cleaner.
Something not working Some operating problems may be solved with simple maintenance operations or and without the intervention of Technical Assistance. PROBLEM THE HOB DOESN’T WORK CAUSE z There are blown fuses in the domestic electrical system. Switches are turned off or there is no power at the power outlet. fHave the fuses replaced. z The hob is not activated. fTouch the main ON/OFF . Control fOpen the tap. z The main gas supply tap is closed. fPurchase a new bottle.
Technical assistance and spare parts Before leaving the factory this appliance was tested and verified by specialized personnel, in order to ensure best performance. Any repairs or intervention which may become necessary, must be carried out with utmost care and attention. For this reason, this hob should only be repaired or serviced by an authorised Service Engineer and only genuine approved spare parts should be used.
Instructions for the Installer Technical Data Gas burner power Rapid burner (large) 2.9 kW (G20) - 2.7 (G30/G31) Semirapid burner (medium) Auxiliary burner (small) 1.9 kW 1.
Instructions for the installer z z z z The following instructions about installation and maintenance must be carried out by qualified personnel in compliance with the regulation in force. The side walls of the unit in which the hob is going to be installed, must not exceed the height of the working top. Avoid installing the appliance in the proximity of inflammable materials (e.g. curtains, tea towels etc.). The appliance must be electrically disconnected before all interventions.
The adjustable connection is fixed to the comprehensive ramp by means of a threaded nut G 1/2". Interpose the sealing between the components as shown in the diagram. Screw the parts without forcing, adjust the connection in the required direction and tighten everything. The appliance, before leaving the factory, has been tested in order to give you the best results.
Electrical connection The appliance is designed to be connected to 230 V monophase electricity supply. The connection must be carried out in compliance with the laws and regulations in force. Before the appliance is connected: 1. check that the main fuse and the domestic installation can support the load (see the rating label); 2.
Adaptation to different types of gas Replacing the injectors 1. Remove the pan supports. 2. Remove the burner caps and crowns. 3. Using a 7 mm socket spanner unscrew and remove the injectors, then replace them with the ones required for the new type of gas (see table “Burner characteristics”). 4. Reassemble the parts, following the same procedure backwards. 5. Replace the Gas Type Label (located near the gas supply connection) with the one corresponding to the new type of gas.
Setting the hob for the new gas type 1. If necessary, activate the top by touching the main ON/OFF Control for about 3 seconds. 2. Touch the Timer Control repeatedly to select the auxiliary burner (front left burner) on the burner selection display. 3. Touch the Increasing Control and hold the finger on it until the value 99 appears on the time display. Then, touch the Decrasing Control and hold the finger on it until the value 80 is displayed. 4. Then, touch the Increasing Control until 83 is displayed.
5. Touch the Decreasing Control to select the required type of gas. 6. After selecting the type of gas, switch off the hob touching the main ON/OFF . Control 7. Touch the main ON/OFF Control again to reactivate the hob. The appliance is automatically set to the normal “User Mode”. 8. Light all the burners and adjust their flame to minimum, in order to check the flame stability (visual check). 9. At the same time, check the flame aspect (visual check).
4. While the flame is on, touch the or Decreasing Control Increasing to carry out a fine adjustment, until a small and regular flame is obtained on the whole burner crown. 5. Switch off the hob touching the main ON/OFF Control .
Building In A = Auxiliary burner SR = Semirapid burner R = Rapid burner Dimensions are given in millimetres SR SR R A 51 73 0 0 Fig. 1 The hob is designed to be inserted in modular kitchen units with depth of 550 600 mm and having proper characteristics. The building-in is also possible in modular units with a 600 mm width: in this case, the cut-out in the work top must be carried out as shown in Fig. 2. The worktop must be at least 30 mm thick.
Fitting the hob to the worktop Before fitting the hob into the cut out, an adhesive seal must be fitted to the underside outside edge of the hob. It is essential that no gaps are left in this seal in order to prevent spillage near the hob seeping into the cabinet below. ) Proceed as follows: 1. Remove the pan supports, the burner caps and crowns and turn the hob upside down, taking care that the spark plugs and the thermocouples are not damaged in this operation. 2.
Installation possibilities Building over a kitchen unit with door Proper arrangements must be taken in designing the furniture unit, in order to avoid any contact with the bottom of the hob which can be heated when it is operated. The recommended solution is shown in Fig. 5. The panel fitted under the hob ("a") should be easily removable to allow easy access if technical assistance is needed. See also Fig. 2. The space behind the kitchen unit ("b") can be used for connections. Fig.
Hanging furniture units or hoods must be placed at 650 mm. minimum from the hob (Fig. 6). The electronic gas hob can only be installed over a built-in oven equipped with cooling fan. If the hob is installed over a built-in oven equipped with pyrolytic cleaning function, the hob must not be in use while the pyrolytic cleaning cycle of the oven is running. Fig. 6 Fig. 7 Fig.
AEG Hausgeräte GmbH Postfach 1036 D-90327 Nürnberg http://www.aeg.hausgeraete.de © Electrolux plc 2003 From the Electrolux Group. The world’s No.1 choice. 35689-1501 04/05 Grafiche MDM - Forlì The Electrolux Group is the world’s largest producer of powered appliances for kitchen, cleaning and outdoor use. More than 55 million Electrolux Group products (such as refrigerators, cookers, washing machines, vacuum cleaners, chain saws and lawn mowers) are sold each year to a value of approx.