EHT7830 ................................................ .............................................
electrolux Electrolux. Thinking of you. Share more of our thinking at www.electrolux.com CONTENTS Safety instructions Installation Product description Operation Helpful hints and tips 2 4 8 9 10 Care and cleaning What to do if… Technical data Environment concerns 10 11 12 13 Subject to change without notice. SAFETY INSTRUCTIONS This appliance is suitable for the following markets: GB Warning! These instructions are only valid in the countries whose symbols appear on this booklet's cover.
electrolux 3 • • • • • surface and that it is centrally positioned on the rings in order to avoid safety risks. Do not use unstable cookware or cookware with damaged bottom. There is a risk of tilting and accident. Do not put flammable products or items that are wet with flammable products, fusible objects (made of plastic or aluminium) and/or fabrics in, near or on the appliance. There is a risk of explosion or fire. Use only the accessories supplied with the appliance.
electrolux • Disconnect the appliance from the electrical supply, before you do the maintenance work or you clean it. • The electrical mains terminal is live. • Make electrical mains terminal free of voltage. • Install correctly to give anti-shock protection. • A loose and incorrect mains plug and socket connections can make the terminal become too hot. • A qualified electrician must install the clamping connections correctly. • Use a strain relief clamp on cable.
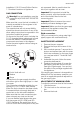
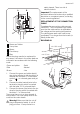
electrolux 5 Installation I.S 813 Current Edition Section 7- Permitted Locations of Appliance. not squeezed. Also be careful when the hob is put together with an oven. GAS CONNECTION Important! It is important to install the elbow correctly, with the shoulder on the end of the thread, fitted to the hob connecting pipe. Warning! Any gas installation must be carried out by a GAS SAFE REGISTER installer.
electrolux 4. With a thin screwdriver, adjust the bypass screw position. 1 1 The by-pass screw – If you change from natural gas G20 20 mbar to liquid gas, fully tighten the by-pass screw in. – If you change from liquid gas to natural gas G20 20 mbar, undo the bypass screw approximately 1/4 of a turn (1/2 of a turn for Triple Crown burner). Warning! Make sure the flame does not go out when you quickly turn the knob from the maximum position to the minimum position.
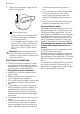
electrolux 7 A safety hazard. There is a risk of electrical shock. B Important! The replacement of the electrical cable must be done by a qualified electrician or competent person, according to the current regulations. C D E REPLACEMENT OF THE CONNECTION CABLE To replace the connection cable use only H05V2V2-F T90 or equivalent type. Make sure that the cable section is applicable to the voltage and the working temperature.
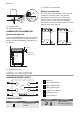
electrolux b) Space for connections Kitchen unit with oven The hob recess dimensions must obey the indication and the kitchen unit must be equipped with vents to let a continuous supply of air. The electrical connection of the hob and the oven must be installed separately for safety reasons and to let easy remove oven from the unit.
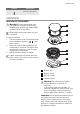
electrolux 9 Symbol Description minimum gas supply OPERATION IGNITION OF THE BURNER Warning! Be very careful when you use open fire in kitchen environment. Manufacturer decline any responsibility in case misuse of the flame 1 2 Always light the burner before you put cookware. 3 To light the burner: 1. Turn the control knob counterclockwise to the maximum position ( ) and push it down. 2. Keep the control knob pushed for approximately 5 seconds; this will let thermocouple to warm up.
electrolux If the burner accidentally goes out, turn the control knob to the off position and try to light the burner again after minimum 1 minute. The spark generator can start automatically when you switch on the mains, after installation or a power cut. It is normal. TURNING THE BURNER OFF To put the flame out, turn the knob to the . symbol Warning! Always turn the flame down or switch it off before you remove the pans from the burner.
electrolux 11 • Wash stainless steel parts with water, and then dry them with a soft cloth. • The pan supports are not dishwasher proof. They must be washed by hand. • When you wash the pan supports by hand, take care when you dry them as the enamelling process occasionally leaves rough edges. If necessary, remove stubborn stains using a paste cleaner. • Make sure you position the pan supports correctly after cleaning.
electrolux Problem Possible cause Remedy The flame is blow out immediately after ignition • Thermocouple is not heated sufficient • After lightning the flame, keep the knob pushed for approximately 5 seconds. The gas ring burns unevenly • Burner crown is blocked with food residues • Make sure that the injector is not blocked and the burner crown is clear of food particles. If there is a fault, first try to find a solution to the problem yourself.
electrolux 13 Semi-rapid burner: 1.9 kW Category: II2H3+ Auxiliary burner: 1.0 kW Gas connection: G 1/2" TOTAL POWER: G20 (2H) 20 mbar = 10.
electrolux
electrolux 15
www.electrolux.