
User manual


• Wash stainless steel parts with water,
and then dry them with a soft cloth.
• The pan supports are not dishwasher
proof. They must be washed by hand.
• When you wash the pan supports by
hand, take care when you dry them as
the enamelling process occasionally
leaves rough edges. If necessary, remove
stubborn stains using a paste cleaner.
• Make sure you position the pan supports
correctly after cleaning.
• To make the burners work correctly,
make sure that the arms of the pan sup-
ports are in the centre of the burner.
•
Be very careful when you replace the
pan supports to prevent the hob top
from damage.
After cleaning, dry the appliance with a soft
cloth.
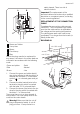
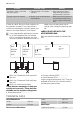
After cleaning the hob, make sure that the
pan supports are correctly positioned. In or-
der to properly place the pan supports,
make sure that an arm of the pan support is
positioned in correspondence with the hole
placed at the base of the burner as shown
in the picture. This way, the pan support will
be stable and fixed.
Removing the dirt:
1. – Remove immediately: melting plas-
tic, plastic foil, and food containing
sugar.
–
Stop the appliance and let it cool
down before you clean: limescale
rings, water rings, fat stains, shiny
metallic discolorations. Use a special
cleaner applicable for surface of hob.
2. Clean the appliance with a damp cloth
and some detergent.
3. At the end rub the appliance dry
with a clean cloth.
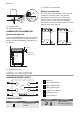
CLEANING OF THE SPARK PLUG
This feature is obtained through a ceramic
ignition candle with a metal electrode. Keep
these components well clean to prevent dif-
ficult lighting and check that the burner
crown holes are not obstructed.
PERIODIC MAINTENANCE
Periodically speak your local Service Force
Centre to check the conditions of the gas
supply pipe and the pressure adjuster, if fit-
ted.
WHAT TO DO IF…
Problem Possible cause Remedy
There is no spark when lighting
the gas
• There is no electrical supply • Make sure that the unit is
connected and the electrical
supply is switched on.
• Control the fuse. If the fuse is
released more than one time,
refer to a qualified electrician.
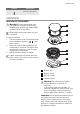
• Burner cap and crown are
placed uneven
• Make sure that the burner
cap and crown are in correct
positions.
electrolux 11