EN REFRIGERATOR/FREEZER FR RÉFRIGÉRATEUR/CONGÉLATEUR ES FRIGORÍFICO/CONGELADOR USE AND CARE GUIDE GUIDE D’UTILISATION ET D’ENTRETIEN GUÍA DE USO Y MANTENIMIENTO A14363702 September 2018
Finding Information Please read and save this guide Thank you for choosing Electrolux, our new premium brand in home appliances. This Use & Care Guide is part of our commitment to customer satisfaction and product quality throughout the service life of your new appliance. Keep a record for quick reference Purchase date Table of contents Finding Information..................................2 Safety......................................................3 Feature Overview...................................
Safety Important safety instructions Safety Precautions Do not attempt to install or operate your unit until you have read the safety precautions in this manual. Safety items throughout this manual are labeled with a Danger, Warning, or Caution based on the risk type. • • Avoid contact with any moving parts of the automatic ice maker. Remove all staples from the carton to avoid injury. Staples can also damage finishes if they come in contact with other appliances or furniture.
Safety Electrical information WARNING You must follow these guidelines to ensure that your refrigerator’s safety mechanisms are operating correctly. • • • • • • The refrigerator must be plugged into its own dedicated 115 Volt, 60 Hz, AC-only non-GFCI electric outlet. The power cord of the appliance is equipped with a three-prong grounding plug for your protection against electrical shock hazards. It must be plugged directly into a properly grounded three-prong receptacle.
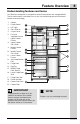
Feature Overview Understanding features and terms Your Electrolux refrigerator is designed for optimal convenience and storage flexibility. The illustration below is provided to assist you with familiarizing yourself with product features and terminology. 1. 2. 3. 4. 5. 6. 7. 8. 9. 10. 11. 12. 13. 14. 15. 16. 17. 18. 19. 20.
Installation This Use & Care Guide provides general installation and operating instructions for your model. We recommend using a service or kitchen contracting professional to install your refrigerator. Use the refrigerator only as instructed in this Use & Care Guide. Before starting the refrigerator, follow these important first steps. Location • • • • Choose a place that is near a grounded, non-GFCI, electrical outlet. Do Not use an extension cord or an adapter plug.
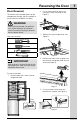
Reversing the Door Door Reversal 2 The side on which the door opens can be changed from the right side (as supplied) to the left side if the installation site allows. Pry off upper cover on top of unit using putty knife and remove (see Figure 1). WARNING When reversing the door, the appliance must not be connected to the power source. Ensure that the plug is removed from the power source. Figure 1 3 Tools you will need: Remove the upper hinge cover (see Figure 2).
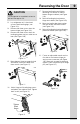
Reversing the Door 6 Unplug reed switch harness (see Figure 5) and set aside. 9 Move reed switch harness from left to right side of the cabinet (see Figures 7 & 8). Ensure harness is seated into channel. Figure 7 Figure 5 7 Remove the three screws from the top hinge and set hinge aside (see Figure 6). Figure 8 NOTE Keep the screws and hinge spacers so they can be used on the opposite side. NOTE CAUTION Place door on padded surface to avoid damage.
Reversing the Door CAUTION Lay refrigerator on a padded surface to prevent damage to unit. 12 13 14 Lay refrigerator on it's back and unscrew both leveling legs (see Figure 10C). Remove the three screws from the bottom hinge (see Figure 10A). Remove the three screws from the leveling leg plate and put aside to use later (see Figure 10B). 17 Remove leveling leg and tighten remaining two screws to secure bottom hinge to cabinet (see Figure 13A).
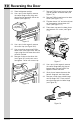
Reversing the Door 22. Stand refrigerator upright. 23. Use a putty knife to gently remove the center hinge screw plugs and reinstall on the opposite side of the cabinet (see Figure 15). Pry Plug Up With Putty Knife lugs wo p t Move 27. Remove Phillips head screw for door stop on bottom of freezer door (see Figure 17A). 28. Remove Phillips head screw for door closer (see Figure 17B). 29. Flip door closer 180˚ and reinstall part on the opposite side of door with screw (see Figure 17C). 30.
Reversing the Door 11 34. Insert hinge pin into top of freezer door and secure middle hinge to cabinet with two screws (see Figure 19). 39. Locate the top hinge and fasten an adjustable wrench on the flat sides of the top hinge pin and unscrew to remove (see Figure 21A). 40. Flip the top hinge (pointing to the left) and reinstall the hinge pin using the adjustable wrench (see Figure 21B). Figure 19 35. Remove Phillips head screw for door stop on bottom of refrigerator door (see Figure 20A). 36.
Reversing the Door 45. Unsnap the reed switch from the reed switch housing (see Figure 24A). 46. Retrieve the reed switch housing from the door reversal kit (stamped with an R) and snap in the reed switch (see Figure 24B). B A IMPORTANT Ensure that the flat edge of the reed switch housing is facing upwards before inserting. 48. Snap the reed switch housing into place (see Figure 27) ensuring that the wiring harness is not protruding above the top of the cabinet.
Controls 13 Use your appliance according to the following control regulations. Your appliance has comparable functions and modes as the control panels shown in the pictures below. When the appliance is powered on for the first time, the backlighting of the icons on the display panel starts working. If no buttons have been pressed and the doors are closed, the backlighting will turn off.
Storage Features Accessories CAUTION To avoid injury from breakage, handle tempered glass shelves carefully. NOTE Features may vary according to model. Movable shelves/trays • • • • Various glass and plastic storage shelves or wire trays are included with your appliance. The walls of the refrigerator are equipped with a series of runners so that the shelves can be positioned as desired. To permit storage of food packages of various sizes, the door shelves can be placed at different heights.
Storing Food and Saving Energy 15 Ideas for storing foods Fresh food storage • • • Do not store warm foods or evaporating liquids in the appliance. Do cover or wrap the food, particularly if it has a strong flavor. Avoid overcrowding the refrigerator shelves, which reduces air circulation and causes uneven cooling. • • Fruits and vegetables • • • Store fruits and vegetables in crisper drawers, where trapped moisture helps preserve food quality for longer time periods.
Normal Operating Sounds Understanding the sounds you may hear Your new, high-efficiency refrigerator may introduce unfamiliar sounds. These sounds normally indicate your refrigerator is operating correctly. Some surfaces on floors, walls, and kitchen cabinets may make these sounds more noticeable. Clicks Humming Bubbling Splashing Whenever the compressor switches on or off, a click can be heard. As soon as the compressor is in operation, you can hear it humming.
Care and Cleaning 17 Protecting your investment Keeping your refrigerator clean maintains its appearance and prevents odor build-up. Wipe up any spills immediately and clean the freezer and fresh food compartments at least twice a year. NOTE Do not use abrasive cleaners such as window sprays, scouring cleansers, flammable fluids, cleaning waxes, concentrated detergents, bleaches, or cleansers containing petroleum products on plastic parts, interior doors, gaskets, or cabinet liners.
Care and Cleaning Care and cleaning tips Part Interior & Door Liners Cleaning Agents Tips and Precautions • • Soap and water Baking soda and water • Door Gaskets • Soap and water • Drawers & Bins • Soap and water • • • Glass Shelves Exterior & Handles Exterior & Handles (Stainless Steel Models Only) • • • • • • • Soap and water Glass cleaner Mild liquid sprays Soap and water Non abrasive glass cleaner • Soap and water Stainless steel cleaners • • • • • • • • Use two tablespoons
Common Solutions for Concerns 19 Before you call... If you experience a concern with your refrigerator or notice a product behavior or condition that you do not understand, you can usually avoid a call to your service representative by referring to this section for an answer. Beginning with the following table, this information includes concerns, potential causes, and common solutions. Opening/Closing Of Doors/Drawers Concern Door(s) will not close. Drawers are difficult to move.
Common Solutions for Concerns Temperatures Are Too Cold Concern Freezer temperature too cold. Refrigerator temperature is satisfactory. Refrigerator temperature too cold. Freezer temperature is satisfactory. Food stored in drawers freezes. Potential Cause • Fast freeze function is activated. • Freezer control is set too cold. Common Solution • Deactivate fast freeze function. • Set freezer control to a warmer setting. Allow 24 hours for temperature to stabilize.
Warranty 21 Major Appliance Warranty Information Your appliance is covered by a one year limited warranty. For one year from your original date of purchase, Electrolux will repair or replace any parts of this appliance that prove to be defective in materials or workmanship when such appliance is installed, used, and maintained in accordance with the provided instructions.