Use _ Care Guide Side-By-Side Refrigerator Guia de Uso y Cuidado Refdgerador de dos puertas Guide d'utilisation R_fHg_fateur et d'entretien _ compaYt_me_ts i_ Z i i i i i i i '_ 241868903 ii zzzzzzzzzzzzzzzzzz ii i December i i i i i i i 2008 juxtaposes
Finding information Please read and save this TabJe of contents 9uide Finding Information ...................................................... 2 Thank you for choosing Electrolux, our new premium brand in home appliances.This Use & Care Guide is part of our commitment to customer satisfaction and product quality throughout the service life of your new appliance. Safety ............................................................................. 3 installation .................................
Safety important safety instructions WARNING Please read all safety instructions before using your new refrigerator. Safety Precautions Do not attempt to install or operate your unit until you have read the safety precautions in this manual. Safety items throughout this manual are labeled with a Danger, Warning or Caution based on the risk type. General ,, Do not operate the refrigerator in the presence of explosive fumes. Avoid contact with any moving parts of the automatic ice maker.
Safety EJectrica information iMPORTANT WARNING You must follow these guidelines to ensure that your refrigerator's safety mechanisms are operating correctly. * The refrigerator must be plugged into its own dedicated 115 Volt, 60 Hz., AConly electric outlet. The power cord of the appliance is equipped with a three-prong grounding plug for your protection against electrical shock hazards. It must be plugged directly into a properly grounded threeprong receptacle.
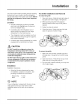
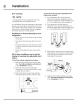
Installation This Use & Care Guide provides general operating instructions for your model. Use the refrigerator only as instructed in this Use & Care Guide. Before starting the refrigerator, follow these important first steps. Location * Choose a place that is near a grounded electrical outlet. Do Not use an extension cord or an adapter plug. ,, If possible, place the refrigerator out of direct sunlight and away from the range, dishwasher or other heat sources.
Installation To level the doors using the adjustable hinge (some models): Door opening NOTE 1 If the refrigerator door is lower than the freezer door, raise the refrigerator door by turning the adjustment screw clockwise using a 7/1G inch socket wrench. (See illustration.) 2 If the freezer door is lower than the refrigerator door, raise the freezer door by turning the adjustment screw clockwise using a 7/ieinch socket wrench. (See illustration.
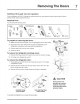
Removing T e Doors Getting through narrow spaces If your refrigerator will not fit through an entrance area, you can reduce its size by removing the doors. Check first by measuring the entrance. Required Tools You will need the following tools: Top Hir_ge Cover Front Screw-.h _"-__ Top Hinge Cover Rear _ Top ToolsNecessety: _/./Screw Screw_ Phillips '_ Head 3/8" Fixed Wretch To prepare for removing 1 the doors: Make sure the electrical power cord is unplugged from the wall outlet.
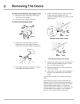
Removin To remove 1 T e Doors the freezer Detach the water tube from the connector located below the freezer door. The connector releases when you press its outer sleeve inward. top hinge cover: Remove the two screws from each cover over the top door hinges. 2 Lift hinge cover straight up and off. To remove the freezer door: r To,,I.g. '_'-.._.. r" Adjustable Hinge (some models) Detach the multi-wire cable connector located above the top hinge.
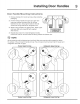
Installing Door Door Handle Mounting andles instructions 1 Remove handles from carton and any other protective packaging, 2 Position freezer handle end caps over upper and lower pre-installed shoulder bolts (A) that are fastened into door, ensuring the holes for the set screws are facing towards the refrigerator door, 3 While holding handle firmly against door, fasten upper and lower Allen set screws (B) with supplied Allen wrench, Repeat steps 2 and 3 to install refrigerator handle.
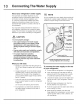
Connecting The Water Supply About your refrigerator's water supply The automatic ice & water dispenser on your refrigerator requires a permanent water supply to function correctly.
Connectin ! 7 Secure the copper tube to your refrigerator's rear panel with a steel clamp and screw (see illustration). 8 Coil the excess copper tubing (about 2V2 turns) behind your refrigerator as shown. Arrange coiled tubing to avoid vibration or wear against other surfaces. 9 Open water supply shut-off valve and tighten any connections that leak.
;2 Feature Overview Understandin 9 features and terms Your Electrolux refrigerator is designed for optimal convenience and storage flexibility.
Controls 3
4 Controls Wav÷oTOU oh TM (some mode_s) 3 rd Level: User Variable Options Your refrigerator is equipped with a Wave-Touch TM Panel user interface display, tt is only necessary to touch the glass. There is no need to press with force. There are three levels of display. 1_t Level: Sleep Mode Touching the options icon displays the following options: Sleep mode displays only the WATER, CUBES and CRUSHED options.
Controls (-) indicators will appear on either side of the displayed temperatures. Press the + or - indicator to adjust the temperature to the desired setting. The temperature display will begin to blink with the first touch. After five seconds of inactivity, the display will beep to accept the new temperature. After 10 seconds, the display times out and returns to the basic display.
6 Controls IQ°Touch (somemodems) factorydefault an elf Resets all refrigerator settings such as temp, temp display and ring tones to their factory default settings. Press and hold for three seconds to turn off the cooling system to clean the refrigerator. It also turns off all dispenser functions. The temperature display will read 0FR IMPORTANT Pressing the system off icon does not turn off power to your refrigerator, You must unplug the power cord from the wall outlet.
Controls Alarms DoorAjar If the door has been left open for an extended period of time, an alarm will sound and the door ajar indicator wilt display on the right side of the display. The alarm is turned off by closing the door. The mute sounds key wilt illuminate to prompt the reset of any pending alarms. Pressthis key to reset any system alarms. High Temp tn the event of a high temperature condition, the temperature display will display "HI".
Storage Features NOTE CAUTION To avoid injury from breakage, handle tempered glass shelves carefulJy. NOTE Features may vary according to model. You can easily adjust shelf positions and fresh food compartments to suit The shelves have mounting brackets attach to slotted supports at the rear compartment. in the freezer your needs. which of each To change the position of a shelf: 1 Before adjusting a shelf, remove all food. 2 Lift the front edge up. 3 Pull the shelf out.
Storage Features To remove the Crisper Drawer Meat keeper (some 1 Wearing safety glasses, gently place a flathead screwdriver behind the snap between the metal slide and the crisper pan. 2 Carefully rotate a quarter (1/4) turn. Do not use a prying motion as this may damage your crisper. 3 Lift the front slightly and remove the drawer. models) Some models are equipped with a meat keeper drawer for short=term storage of bulk meat items.
Storage Features Perfect Temp Drawer (some models) .... _mI_ D_°_w_ ' The Perfect Temp Drawer (PTD) was designed to keep food items at a precise temperature that is cooler, the same, or warmer than the fresh food side of the refrigerator. The PTD is shipped turned OFF. When first turned on or after a power outage the PTD may show"Hl°F '' if it is set to a temperature before the freezer and fresh food temperatures have stabilized.
Storage Features IMPORTANT The two drop in insulating inserts need to remain in place while the Perfect Temp Drawer is on. Removing the inserts will cause the temperature of the crispers below it to be affected. The drop in insulating inserts can be hand washed with mild soap. Do not wash in a dishwasher. To remove the Perfect Temp Drawer frame and pan for cleaning: 1 Wearing safety glasses, gently place a flathead screwdriver behind the snap between the metal slide and the crisper pan.
Storage Features 4 Pull the shelf assembly forward off of the rear support pins and out of the fridge. 4 Drop the shelf down insuring that the support pins fully snap into the grooves in the shelf. 5 Reconnect the frame connector to the control unit and reinstall the drawer. Refrigerator on/off button and the Perfect Temp Drawer When the refrigerator is turned off by pressing the main Wave-Touch or IQ-Touch on/off button the Perfect Temp Drawer will also be turned off.
Storage Features To change the position of an adjustable door bin: Tall bottle retainer 1 Before adjusting a bin remove all food. 2 Grip the bin firmly with both hands and lift it upward. 3 Remove the bin 4 Place the bin just above desired position. 5 Lower the bin onto supports until locked in place.
Storage Features Dairy compartment Use the dairy compartment, at the top of the fresh food compartment door, for short term storage of cheese, spreads, or butter. The dairy compartment, which includes a lift-up cover that may be locked and a dairy divider (some models), is designed to be warmer than the open storage area to accommodate these types of food.
Automatic ice Priming Water the water supply Your refrigerator's water supply system includes several tubing lines, an advanced water filter, a distribution valve bank, and a reserve tank to ensure ample supply to the ice and water dispenser at all times. This system needs to be completely filled with water when first connected to an external Using For proper dispenser operation, recommended water supply pressure should fall between 30 psi and 100 psi.
Automatic ice Water aker/Dispenser Turn off the ice maker when cleaning the freezer and during vacations. IMPORTANT Small ice cubes or ice chips jamming in the ice maker may be a sign that your water filter needs changing, tf you have a side mounted ice maker you may also experience hollow cubes -- partially frozen cubes with water inside. When these cubes are harvested they break open and spill water over the other ice cubes in the ice container, forming a solid mass of ice.
Automatic ice Water CAUTION NEVER use an ice pick or similar sharp instrument to break up the ice.This could damage the ice storage bin and dispenser mechanism. | iMPORTANT When removing or replacing the ice bin, DO NOT rotate the auger in the ice bin. If the auger is accidentally rotated, you must realign the auger by turning it in 90 degree turns (see below) until the ice bin fits into place with the drive mechanism.
Changing The Filter Locating the filters NOTE Your refrigerator is equipped with separate water and air filtering systems. The water filter system filters all dispensed drinking water, as well as the water used to produce ice. The air filter removes odors and impurities from the refrigerator compartment. The electronic touch panel, located at the freezer door, includes controls to monitor the status of your air filter. See the Controls section for more information about these controls.
Changin More about your advanced water filter The PureAdvantage TM ice and water filter system is tested and certified by NSF International, the nationally respected, not-for-profit certification organization for public health safety. The PureAdvantage TM ice and water filter system is tested and certified to ANSIiNSF Standards 42 and 53 for the reduction of claims specified on the performance data sheet.
3 Storing Food & Saving Energy ideas for storing Fresh , - door shelves. These foods are best stored in the freezer interior where the temperature varies less. foods food storage Keep the fresh food compartment between 34 ° F and 40 ° F with an optimum temperature of 37'; R Avoid overcrowding the refrigerator shelves, which reduces air circulation and causes uneven cooling.
ormal Operating Sounds Understanding the sounds ights you may hear Your new, high-efficiency refrigerator may introduce unfamiliar sounds. These sounds normally indicate your refrigerator is operating correctly. Some surfaces on floors, walls, and kitchen cabinets may make these sounds more noticeable. Following is a list of major components in your refrigerator and the sounds they can cause: A Evaporator Refrigerant through the evaporator may create a boiling or gurgling sound.
Care & Cleaning Protecting your investment Keeping your refrigerator clean maintains appearance and prevents odor build-up. Wipe up any spills immediately and clean the freezer and fresh food compartments at least twice a year.
Care Care & cleaning Part interior & Door Liners Door Gaskets Drawers & Bins Glass Shelves ToeGrille Exterior & Handles Exterior & Handles (Stainless Steel Models Only) Vacation tips CleaningAgents Tips and Precautions = Soap and water , Baking soda and water • SoaEand water • Soap and water • Use 2 tablespoons of baking soda in 1 quart of warm water. Be sure to wring excess water out of sponge or cloth before cleaninq around controls, light bulb or any electrical part.
Care Cleaning RepJacing light bulbs Both the freezer and fresh food compartments of your refrigerator include light bulbs that will need replacing from time to time, Some lights have covers that you will need to remove before replacing the bulbs. Always use bulbs that are designed for appliance lighting. CAUTION Wear gloves when replacing avoid getting cut. light bulbs to To replace light bulbs: 1 Unplug your refrigerator's power cord. 2 Wear gloves as protection against possible broken glass.
arranty Your appliance is covered by a one year limited warranty. For one year from your original date of purchase, Electrolux will pay all costs for repairing or replacing any parts of this appliance that prove to be defective in materials or workmanshipwhen such appliance is installed, used and maintained in accordance with the provided instructions. Exclusions This warranty does not cover the following: I.
3G SolutionsTo Common Problems Before you cal ... Ofyou experience a problem with your refrigerator or notice a product behavior or condition you do not understand, you can usually avoid a call to your service representative by referring to this section for an answer. Beginning with the following table, this information includes common problems, causes, and suggested solutions. Running Your Refrigerator Problem Cause Compressor does not run. , Cooling system is turned Off.
SolutionsTo Common Pro TemperaturesAre TooCold Problem Cause Correction Freezertemperature too cold, Refrigerator temperature is satisfactory, Refrigerator temperature too cold, Freezer temperature is satisfactory., Food stored in drawers freezes, Food stored in Meat Keeper freezes (some models), = Freezercontrol is set too cold. + Set freezer control to a warmer setting, Allow 24 hours for temperature to stabilize. ,, Refrigeratorcontrol isset too cold.
3 Solutions To Common Problems Water/Moisture/FrostInside Refrigerator Problem Moisture collects on inside of refrigerator walls. Water collects on bottom side of drawer cover. Moisturecollectsin bottom of drawer. Moisture collects on outside of refrigerator or betweendoors. C8|!$8 ,, Weather is hot and humid. ,, Door is slightly open. ,, Door is opened too often or too long. , Open containers. , Vegetables contain and give off moisture. . Washed vegetables and fruit drain while in the drawer.
Solutions To Common Pro AutomaticIce Maker Problem Ice makeris not makingany ice. Csuse • Ice maker power switch is Off. o Water supply is not connected to refrigerator. • Household water line valve is not open. o Freezeris not cold enough. • Valve on cold water pipe is clogged or restricted by foreign material, tf valve is of the self-piercing type, it may not havecreated a sufficiently sized hole in tube for water to pass through. • Checkto see if the water dispenser is dispensing water.
4 Solutions To Common Problems lee Dispenser Problem Dispenserwill not dispenseice. Cause - Watersupply is not connected. • Icestoragecontaineris empty. . Freezertemperatureis settoo warm. , Householdwater linevalve is not open. ° Freezerdoor is not closed. Ice dispenseris jammed. ° Icedispensingarm hasbeen heldin for morethan4-5 minutes. • ice hasmeltedandfrozen around augerdueto infrequent use,ternperature fluctuations, and/or poweroutages.
Solutions To Common Pro Odorsin Refrigerator Problem Interior is dirty. Cause ,, Interior needs to be cleaned. = Foodwith strong odors is stored in refrigerator. Correction ,, SeeCare & Cleaning Tips. • Cover food tightly. Turn on air filtration system, Air filter may needto be changed more frequently if foods with strong odors are routinely stored in refrigerator.