
Service manual


GGeenneerraall IInnssttaallllaattiioonn
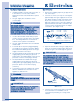
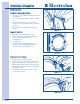
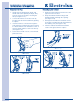
1. Connect the exhaust duct to the outside
exhaust system. Use of a 4” (10.2 cm) clamp
is recommended to connect the dryer to the
exhaust vent system. Use metal foil tape to
seal all other joints. (See Figure 2-15)
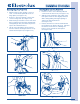
2. Carefully slide the dryer to its final position.
Adjust one or more of the legs until the dryer is
resting solidly on all four legs. Place a level on
top of the dryer. The dryer MUST be level and
resting solidly on all four legs. Rock alternat-
ing corners to check for stability. Remove and
discard door tape. (See Figure 2-16)
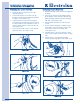
3. Plug the power cord into a grounded outlet.
4. Turn on power at the circuit breaker/fuse box.
5. Perform the “Installation Cycle” to verify proper
installation.
IInnssttaallllaattiioonn IInnffoorrmmaattiioonn
2-14
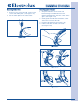
NOTE
OOnn ggaass ddrryyeerrss,, bbeeffoorree tthhee bbuurrnneerr wwiillll lliigghhtt,, iitt iiss
nneecceessssaarryy ffoorr tthhee ggaass lliinnee ttoo bbee bblleedd ooff aaiirr.. IIff tthhee
bbuurrnneerr ddooeess nnoott lliigghhtt wwiitthhiinn 4455 sseeccoonnddss tthhee ffiirrsstt
ttiimmee tthhee ddrryyeerr iiss ttuurrnneedd oonn,, tthhee ssaaffeettyy sswwiittcch
h wwiillll
sshhuutt tthhee bbuurrnneerr ooffff.. IIff tthhiiss hhaappppeennss,, pprreessss ccaanncceell
aanndd wwaaiitt 55 mmiinnuutteess bbeeffoorree mmaakkiinngg aannootthheerr
aat
ttteemmpptt ttoo lliigghhtt..
FFiigguurree 22--1155..
FFiigguurree 22--1166..
IMPORTANT
BBee ssuurree ppoowweerr iiss ooffff aatt aa cciirrccuuiitt bbrreeaakkeerr//ffuussee
bbooxx bbeeffoorree pplluuggggiinngg ppoowweerr ccoorrdd iinnttoo aann
oouuttlleett..
4” Clamp