
Service manual


IInnssttaallllaattiioonn IInnffoorrmmaattiioonn
2-24
DDrryyeerr SSttaacckkiinngg IInnssttrruuccttiioonnss
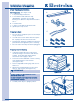
KKiitt CCoommppoonneennttss::
(See Figure 2-49)
• 1 Dryer Stacking Instructions.
A. 1 Front bracket with adhesive strip.
IMPORTANT - DO NOT remove RED
backing from adhesive strip until instructed to
do so.
B. 2 rear brackets.
C. 2 strips of self-adhesive protective film.
D. (6) #10 (16 x 3.75) screws.
PPrreeppaarriinngg ttoo SSttaacckk
1. Be sure there is adequate space to stack dryer
on top of washer.
2. You will need a screw driver with a #2 square
bit, isopropyl alcohol and a clean cloth.
3. Read washer and dryer installation instructions
packed with each appliance prior to stacking.
4. Be sure washer and dryer are both unplugged.
PPrreeppaarriinngg DDrryyeerr ffoorr SSttaacckkiinngg
1. If already installed, disconnect dryer from
electrical and gas connections and exhaust
venting. On models with Steam Option,
disconnect water supply to dryer.
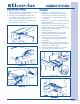
2. Protect floor with cardboard or other covering
and carefully tip dryer onto its back.
(See Figure 2-50)
3. Remove adjustable leveling legs and save for
future use.
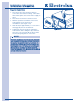
4. Attach front stacking bracket to dryer front
with (2) - #10 screws. (See Figure 2-51)
5. Carefully return dryer to upright position.
A
B
C
D
IMPORTANT
DDOO NNOOTT RREEMMOOVVEE RREEDD BBAACCKKIINNGG FFRROOMM
AADDHHEESSIIVVEE SSTTRRIIPP YYEETT!!
DDOO NNOOTT RREEMMOOVVEE AANNYY EEXXIISSTTIINNGG SSCCRREEWWSS
FFRROOMM FFRROONNTT PPAAN
NEELL!!
FFiigguurree 22--4499..
FFiigguurree 22--5511..
FFiigguurree 22--5500..