
Service manual


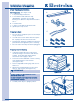


PPrreeppaarree TToopp SSuurrffaaccee ooff WWaasshheerr::
1. Wipe front portion of top with isopropyl alcohol
and a clean cloth. (See Figure 2-52)
2. Carefully remove BLUE backing from clear
self adhesive strips. Apply to each side edge
of the washer top. (See Figure 2-53)
3. Attach each rear bracket to washer top with 2
#10 screws. (See Figure 2-54)
IInnssttaallllaattiioonn IInnffoorrmmaattiioonn
2-25
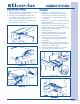
SSttaacckkiinngg DDrryyeerr
1. When washer is within 4 feet of its final
installation site, electrical and water connec-
tions have been completed, and washer is
level, have two or more people lift the dryer
onto washer.
2. Hold the front of the dryer up slightly carefully
slide the dryer back.
3. Slide hook tabs on rear brackets into slots in
back sheet of dryer. Dryer will be approxi-
mately ¼” left of center. Continue sliding dryer
back until tabs are fully engaged.
(See Figure 2-55)
4. Slide dryer approximately ¼” to the right,
centering it on washer and hooking rear
bracket tabs into slots on back.
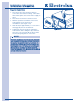
5. Lift front of dryer and remove RED backing
from adhesive strip on front bracket. (See
Figure 2-56)
6. Gently lower dryer to adhere front bracket to
washer top. Align dryer side panel to washer
side panel as you lower dryer.
7. Refer to installation instructions to connect
dryer venting, power and accessories.
FFiigguurree 22--5522..
FFiigguurree 22--5533..
FFiigguurree 22--5544..
FFiigguurree 22--5555..
FFiigguurree 22--5566..