
Service manual


IInnssttaallllaattiioonn IInnffoorrmmaattiioonn
2-26
RReemmoovviinngg SSttaacckkeedd DDrryyeerr
1. Disconnect dryer from electrical and gas
connections and exhaust venting. On models
with Steam Option, disconnect water supply to
dryer.
2. Disconnect washer from electrical source.
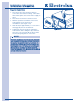
3. With #2 square bit screwdriver, remove two
front bracket screws and save for
reinstallation. (See Figure 2-57)
4. Slide the dryer approximately ¼” to the left to
disengage dryer from rear brackets.
5. Support the front of the dryer, clearing the
front bracket, while sliding the dryer forward.
Have two or more people lift the dryer off the
washer and gently place it on the floor.
NOTE
IIff llaauunnddrryy aapppplliiaanncceess mmuusstt bbee mmoovveedd,, ffrroonntt aanndd
rreeaarr mmoouunnttiinngg bbrraacckkeettss mmaayy rreemmaaiinn aattttaacchheedd ttoo
tthhee wwaasshheerr ttoopp uunnttiill tthhee ddrryyeerr iiss rreessttaacckkeedd.. TToo
ppeerrmmaanneennttllyy uunnssttaacckk tthhee uunniittss aanndd rreemmoovvee tthhee
ffrroonntt bbrraacckkeett,
, uussee aa 2244”” ppiieeccee ooff mmoonnooffiillaammeenntt
((ffiisshhiinngg)) lliinnee ttoo ccaarreeffuullllyy ssaaww bbaacckk aanndd ffoorrtthh
uunnddeerr tthhee aaddhheessiivvee s
sttrriipp.. RReemmoovvee rreessiidduuee wwiitthh aa
ggeenneerraall aaddhheessiivvee rreemmoovveerr..
FFiigguurree 22--5577..