
Service manual


4-5
CCoommppoonneenntt TTeeaarrddoowwnn
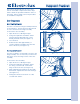
FFiigguurree 44--77..
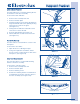
FFiigguurree 44--88..
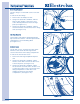
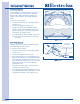
FFiigguurree 44--99..
Door Strike
Screws
LLaattcchh IInnddiiccaattoorr RReemmoovvaall
The latch indicator is secured by retaining latches
to the interior of the door assembly.
To remove the latch indicator:
1. Remove door assembly from unit.
2. Remove the latch plate.
3. Grasp the indicator on the latch side between
finger and thumb and rock it upward, pivoting
away from the center of the glass.
(See Figure 4-7)
4. Gently push the indicator toward the center
of the lens to release the tab.
5. Rock the tab upward. (See Figure 4-8)
6. Pull the indicator out and remove from unit.
(See Figure 4-8)
DDoooorr SSttrriikkee RReemmoovvaall
The door strike is secured with two screws to the
front panel.
To remove the door strike:
1. Open the door to a 90 degree angle.
2. Using a #2 square bit screwdriver, extract
the two screws securing the door strike to the
front panel. (See Figure 4-9)
OOuutteerr DDoooorr GGllaassss RReemmoovvaall
The outer door glass is secured with retaining
latches to the door assembly.
To remove the outer door glass:
1. Remove door assembly from unit.
2. Remove the latch plate.
3. Remove retaining covers.
4. Release the retaining latches around the door
assembly that secure the outer door glass to
the door assembly. (See Figure 4-10)
FFiigguurree 44--1100..
Retaining Latches