
Service manual


4-6
CCoommppoonneenntt TTeeaarrddoowwnn
FFiigguurree 44--1133..
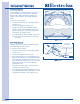
FFiigguurree 44--1144..
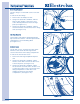
Screws
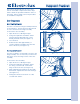
DDoooorr HHiinnggee RReemmoovvaall
The door hinge is secured with screws to the unit
frame.
To remove the door hinge:
1. Remove door assembly from unit.
2. Using a #2 square bit screwdriver, with the
hinge in open position, extract two short,
course thread, panhead screws from hinge
plate. (See Figure 4-11)
3. Using a #2 square bit screwdriver, extract 3
short, fine thread, countersunk screws in hinge
side. (See Figure 4-12)
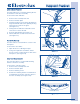
LLiinntt TTrraapp RReemmoovvaall
The lint trap is removed by simply lifting the lint
trap out from the air duct. The lint trap should be
cleaned prior to each load being dried.
(See Figure 4-13)
AAiirr DDuucctt CCoovveerr
The air duct cover is secured to the dryer frame
with two screws under the trim ring and two
screws in the interior of the drying compartment.
To remove the front air duct cover:
1. Remove the trim ring and pull lint trap from
unit.
2. Using a #2 square bit screwdriver, extract
the two screws that secure the air duct cover
to the front panel. (See Figure 4-14)
3. Using a #2 square bit screwdriver, extract
the screw from each side of the air duct cover
securing the air duct cover to the inside of the
drying compartment. Pull air duct cover
straight up until clear of the drying
compartment. (See Figure 4-14)
FFiigguurree 44--1111..
FFiigguurree 44--1122..