
Service manual

4-12
CCoommppoonneenntt TTeeaarrddoowwnn
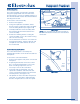
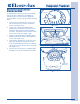
BBeelltt RReemmoovvaall ((WWaavvee TToouucchh
™
))
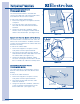
The belt circles the drum and has tension applied
to it by the idler arm assembly.
To remove the belt:
1. Remove the top panel, rear panel, console and
front panel.
2. From the rear of the unit, reach under the drum
and pull the idler arm assembly to the left and
release the belt from the roller guides and
motor pulley. (See Figure 4-28)
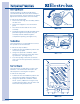
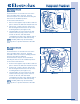
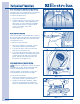
BBeelltt RReemmoovvaall ((IIQQ TToouucchh
™
))
The belt circles the drum and has tension applied
to it by a spring mounted between the idler arm
assembly and the motor mount.
To remove the belt:
1. Remove the top panel, rear panel, console and
front panel.
2. From the rear of the unit, reach under the drum
and pull the idler arm assembly to the right
and release the belt from the roller guides and
motor pulley. (See Figure 4-29)
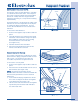
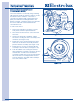
FFrroonntt IInnnneerr PPaanneell aanndd DDrruumm RReemmoov
vaall
The front inner panel, which is secured to the unit
frame with four screws and two retaining tabs at
the top, must be removed to remove or replace a
belt. The front air duct is removed with the front
inner panel as one assembly.
1. Remove the top panel, rear panel, console,
front panel, and interior light, then release the
belt from motor.
2. Using a #2 square bit screwdriver, extract
the four screws securing the inner front panel
to the unit frame. (See Figure 4-30)
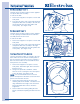
NNOOTTEE::
It is recommended to have a second
person to help remove the drum as the front inner
panel is removed from the unit.
3. Lift the front inner panel up to release the
retaining tabs, then outward. The drums front
edge will fall from the ledge of the inner front
panel and guide rollers unless otherwise
supported.
4. Remove drum from unit by pulling the side
panels outward, then pulling the drum from the
unit.
FFiigguurree 44--2288..
FFiigguurree 44--3300..
Belt
Idler Arm Assy.
FFiigguurree 44--2299..
Idler Arm
Spring
Belt
Screws