
Service manual

4-15
CCoommppoonneenntt TTeeaarrddoowwnn
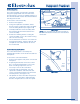
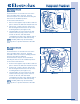
BBeelltt TTeennssiioonneerr RReemmoovvaall
((WWaavvee TToouucchh))
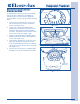
The belt tensioner is secured to the rear of the
motor assembly with a 3/8” bolt. The belt
tensioner may be accessed without removing the
motor from its installation position.
To remove the belt tensioner:
1. Remove the top panel, top rear brace and rear
panel. Release the belt from the belt tensioner.
2. Using a 3/8” socket or wrench, remove the
bolt securing the belt tensioner to the motor
mounting bracket. (See Figure 4-36)
3. The idler pullies are removed from the belt
tensioner arms by using a 7/16” socket or
wrench for the nut, and a flat blade
screwdriver in the flat on the opposite end of
the shaft to prevent the shaft from turning.
NNOOTTEE::
The idler pullies may be removed by
removing the “C” clip from the front of the idler
shaft.
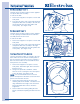
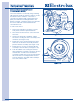
BBeelltt TTeennssiioonneerr RReemmoovvaall
((IIQQ TToouucchh))
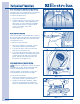
The belt tensioner is secured to the rear of the
motor assembly with a 3/8” bolt. A spring,
mounted to the motor mount assembly, provides
tension to the idler arm and belt.
The belt tensioner may be accessed without
removing the motor from its installation position.
To remove the belt tensioner:
1. Remove the top panel, top rear brace and rear
panel. Release the belt from the belt tensioner.
2. Using a 3/8” socket or wrench, remove the
bolt securing the belt tensioner to the motor
mounting bracket. (See Figure 4-37)
3. The idler pullies are removed from the belt
tensioner arms by using a 7/16” socket or
wrench for the nut, and a flat blade
screwdriver in the flat on the opposite end of
the shaft to prevent the shaft from turning.
NNOOTTEE::
The idler pullies may be removed by
removing the “C” clip from the front of the idler
shaft.
FFiigguurree 44--3366..
FFiigguurree 44--3377..
“C” Clip
3/8” Nut
Idler Pulley
Idler Pulley
Idler Arm
Spring
Lock
Washer
3/8” Bolt
3/8” Bolt