
Service manual

4-16
CCoommppoonneenntt TTeeaarrddoowwnn
MMoottoorr aanndd BBlloowweerr AAsssseemmbbllyy RReemmoovvaall
((EElleeccttrriicc aanndd GGaass MMooddeellss))
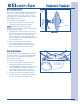
The motor bracket is secured by a large retaining
tab that slides under the unit base and two screws
that fasten into the unit base. The motor is
secured to the bracket with a spring clip at the
pulley end and with a retaining bracket to the
blower assembly. The blower wheel is mounted to
the motor shaft with a left hand thread and
secured with a nut.
To remove the motor:
1. Remove the top panel, rear panel, console,
front panel, front inner panel and drum.
2. Disconnect the wire harness connection from
the motor.
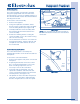
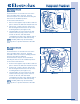
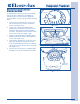
3. Using a #2 square bit screwdriver, extract
the screws securing the motor assembly to the
unit base. (See Figure 4-38)
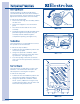
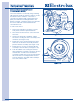
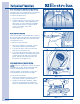
4. Extract the screw securing the blower outlet
thermistor to the blower assembly and then
pull from blower assembly. (See Figure 4-39)
5. Extract the two screws securing the blower
assembly to the unit base. (See Figure 4-39)
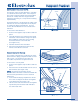
6. Push the rubber seal covering the exhaust
tube and blower assembly connection onto the
exhaust tube. Pull the motor and blower
assembly towards the front of the unit until the
tab on the motor mounting bracket releases
from the unit base, then pull until assembly is
free of the exhaust tube.
FFiigguurree 44--3399..
Screws
Motor Wire Harness
Motor
Mounting
Bracket
Tab
FFiigguurree 44--3388..
Screws