
Service manual

4-17
CCoommppoonneenntt TTeeaarrddoowwnn
MMoottoorr aanndd BBlloowweerr AAsssseemmbbllyy SSeeppaarraattiioonn
((EElleeccttrriicc aanndd GGaass MMooddeellss))
To separate the motor from the blower assembly,
remove the motor and blower assemblies by
following steps 1-6 on the previous page and
shown in figures 4-38 & 4-39, then follow the steps
below.
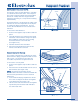
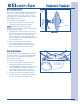
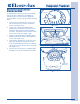
1. Using a 7/16” extended socket, remove the
nut securing the motor shaft to the blower
wheel. (See Figure 4-40)
2. Using a 7/8” extended socket and while
holding the motor shaft from turning, loosen
the blower wheel from the shaft by turning
clockwise. Spin blower wheel clockwise until
free of motor shaft. (See Figure 4-40)
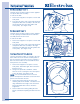
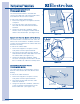
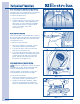
3. Using a small flat bladed screwdriver, lift the
blower housing lock over the tab and pull out
of slot. (See Figure 4-41)
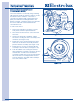
4. Using a pliers, grab the motor clip at its outer
edge, then push down and away from the
motor mounting bracket until free of retaining
tab. Remove motor clip from motor assembly.
(See Figure 4-42
5. Lift the motor off the motor mounting bracket
and pull motor out from the blower assembly.
FFiigguurree 44--4411..
FFiigguurree 44--4422..
Motor
Tab
Grab Here
With Pliers
FFiigguurree 44--4400..
7/16” Nut
7/8” Nut