
Service manual

4-18
CCoommppoonneenntt TTeeaarrddoowwnn
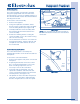
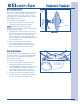
FFiigguurree 44--4466..
Screw
DDrruumm VVaannee RReemmoovvaall ((EElleeccttrriicc aanndd GGaass MMooddeellss))
The drum vanes are secured with screws that pass
through the drum and fasten into the vanes.
To remove the drum vanes:
1. Remove the top panel.
2. Rotate the drum to access the screws on the
exterior of the drum. While supporting the
drum vane, use a #2 square bit screwdriver
and extract the screws securing the drum
vanes to the interior of the drum.
(See Figure 4-43)
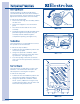
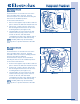
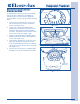
RReeaarr HHeeaatt DDuucctt RReemmoovvaall
The rear heat duct is secured with three screws to
the rear inner panel. A thermistor is mounted to the
rear upper right hand side of the heat duct and is
secured with a screw.
To remove the rear heat duct:
1. Remove the top panel, rear panel, console,
front panel, front inner panel and drum.
2. From the rear of the unit, remove the inlet
thermistor. (See Figure 4-44)
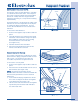
3. From the inside of the inner panel, using a #2
square bit screwdriver and extract the screws
securing the rear air duct to the rear inner
panel. Pull the rear air duct from the rear
inner panel. (See Figure 4-45)
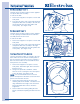
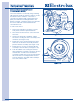
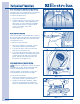
HHeeaatt SShhiieelldd RReemmoovva
all ((EElleeccttrriicc MMooddeellss))
NNOOTTEE::
If unit was used prior to service, the heater
assembly may be hot. Refer to Warnings and
Cautions at the beginning of this section.
The heat shield is secured with a screw to the
mounting bracket for the heater assembly.
To remove the heat shield:
1. Remove the top panel, rear panel, console,
front panel, front inner panel and drum.
2. Using a #2 square bit screwdriver, extract
the screw securing the heat shield to the
heater mounting bracket. (See Figure 4-46)
FFiigguurree 44--4433..
FFiigguurree 44--4444..
Screws
Screws
FFiigguurree 44--4455..
Rear Air
Duct
Inlet
Thermistor
Screw