EKC54504O ................................................ .............................................
www.electrolux.com CONTENTS 1. 2. 3. 4. 5. 6. 7. 8. 9. 10. 11. 12. 13. 14. SAFETY INFORMATION . . . . . . . . . . . . . . . . . . . . . . . . . . . . . . . . . . . . . . . . . . . . . . . . . . . 3 SAFETY INSTRUCTIONS . . . . . . . . . . . . . . . . . . . . . . . . . . . . . . . . . . . . . . . . . . . . . . . . . . 4 PRODUCT DESCRIPTION . . . . . . . . . . . . . . . . . . . . . . . . . . . . . . . . . . . . . . . . . . . . . . . . . 7 BEFORE FIRST USE . . . . . . . . . . . . . . . . . . . . . . . . .
ENGLISH 3 1. SAFETY INFORMATION Before the installation and use of the appliance, carefully read the supplied instructions. The manufacturer is not responsible if an incorrect installation and use causes injuries and damages. Always keep the instructions with the appliance for future reference. 1.1 Children and vulnerable people safety WARNING! Risk of suffocation, injury or permanent disability.
www.electrolux.com • Never try to extinguish a fire with water, but switch off the appliance and then cover flame e.g. with a lid or a fire blanket. • Do not store items on the cooking surfaces. • Do not use a steam cleaner to clean the appliance. • Metallic objects such as knives, forks, spoons and lids should not be placed on the hob surface since they can get hot. • If the glass ceramic surface is cracked, switch off the appliance to avoid the possibility of electric shock.
ENGLISH • The appliance must be earthed. • Make sure that the electrical information on the rating plate agrees with the power supply. If not, contact an electrician. • Always use a correctly installed shockproof socket. • Do not use multi-plug adapters and extension cables. • Make sure not to cause damage to the mains plug and to the mains cable. Contact the Service or an electrician to change a damaged mains cable.
www.electrolux.com • Do not try to extinguish a fire with water. Disconnect the appliance and cover the flame with a lid or a fire blanket. WARNING! Risk of damage to the appliance. • To prevent damage or discoloration to the enamel: – Do not put ovenware or other objects in the appliance directly on the bottom. – Do not put aluminium foil directly on the bottom of the appliance. – do not put water directly into the hot appliance.
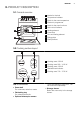
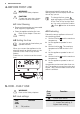
ENGLISH 3. PRODUCT DESCRIPTION 3.1 General overview 1 Knobs for the hob 1 2 3 4 5 6 1 2 Temperature indicator 3 Knob for the oven temperature 4 Electronic programmer 7 8 4 11 3 9 2 1 5 Knob for the oven functions 6 Hob control indicator 7 Heating element 8 Oven lamp 9 Fan and heating element 10 Rating plate 10 11 Shelf positions 3.
www.electrolux.com 4. BEFORE FIRST USE WARNING! Refer to the Safety chapters. After approximately five seconds, the flashing stops and the display shows the time of day you set. CAUTION! To open the oven door, always hold the handle in the centre. To change the time, press again and again until the indicator for the Time of Day function flashes. You must not set the Duration or End function at the same time. 4.1 Initial Cleaning • Remove all accessories and removable shelf supports (if applicable).
ENGLISH 1. 2. Turn the knob to a necessary heat setting. The hob control indicator comes on. To complete the cooking process, turn the knob to the 0position. Use the residual heat to decrease energy consumption. Deactivate the cooking zone approximately 5 - 10 minutes before the cooking process is completed. 5.2 Using the double zone 1. 2. 3. 9 Turn the knob clockwise to position 9. Turn the knob slowly to the symbol until you can hear a click. The two cooking zones are on.
www.electrolux.com Heat setting Use to: Time (min) Hints 2-3 Simmer rice and milkbased 25 - 50 Add at least twice as much dishes, heating up ready-cooked liquid as rice, mix milk dishes meals. at some point during the procedure. 3-4 Steam vegetables, fish, meat. 20 - 45 Add some tablespoons of liquid. 4-5 Steam potatoes. 20 - 60 Use max. ¼ l water for 750 g of potatoes. 4-5 Cook larger quantities of food, stews and soups.
ENGLISH 8.1 Activating and deactivating the appliance 1. 2. 3. Turn the knob for the oven functions to an oven function. Turn the knob for the temperature to a temperature. The temperature indicator comes on while the temperature in the appliance increases. To deactivate the appliance, turn the knob for the oven functions and the knob for the temperature to the Off position. 8.2 Safety thermostat The safety thermostat is a thermal cut-out in an operating thermostat.
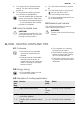
www.electrolux.com 9. OVEN - CLOCK FUNCTIONS 9.1 Electronic programmer 1 2 1 1 Function indicators 2 Time display 3 Button + 4 Selection button hr min 5 4 5 Button - 3 Clock function Time of day Minute Minder Duration End Application To set, change or check the time of day. To set a countdown time. This function has no effect on the operation of the oven. To set how long the appliance must operate. To set when the appliance must be deactivated.
ENGLISH 13 10. OVEN - USING THE ACCESSORIES WARNING! Refer to the Safety chapters. 10.1 Inserting the baking tray Put the tray in the centre of the oven cavity, between the front and rear wall. This ensures that the heat can circulate in front of and behind the baking tray. Make sure that the tray is positioned like in the picture, with the angled slope in the rear. WARNING! Do not push the baking tray all the way to the rear wall of the oven cavity.
www.electrolux.com ting, cooking time, etc.) for your cookware, recipes and quantities when you use this appliance. 11.
ENGLISH Food Tray type and shelf level Preheating time (min) Temperature (°C) Cooking / baking time (min) Christmas cake (2400 g) enamelled tray at level 2 10 - 15 170 - 180 55 - 65 2) Quiche Lorraine (1000 g) 1 round tray (diameter: 26 cm) at level 1 10 - 15 220 - 230 40 - 50 18 3) 180 - 200 60 - 70 10 160 - 170 40 - 50 - 160 - 170 30 - 40 10 - 15 200 - 210 10 - 15 Swiss roll (500 enamelled tray at g) level 1 10 150 - 170 15 - 20 Meringue (400 enamelled tray at g) level 2 -
www.electrolux.
ENGLISH 17 Preheating time (minutes) Temperature (°C) Cooking / baking time (minutes) enamelled tray at level 1 and 3 10 140 - 150 25 - 30 Small cakes (500 + 500 + 500 g) enamelled tray at level 1, 2 and 4 10 150 - 160 25 - 30 Fatless sponge cake (350 g) 1 round aluminized tray (diameter: 26 cm) at level 3 10 150 - 160 30 - 40 Drip pan cake enamelled tray at level (1200 g) 3 - 150 - 160 40 - 50 1) Chicken, whole (1400 g) oven shelf at level 2, baking tray at level 1 - 170 - 190 50
www.electrolux.
ENGLISH 19 Removing the shelf supports 1 1. Pull the front of the shelf support away from the side wall. 2. Pull the rear end of the shelf support away from the side wall and remove it. 2 Installing the shelf supports Install the shelf supports in the opposite sequence. Valid with telescopic runners: The retaining pins on the telescopic shelf runners must point to the front! 12.2 Cleaning the oven door The oven door has two panels of glass installed one behind the other.
www.electrolux.com Removing the oven door and the glass panel 1. Open the door fully and hold the two door hinges. 2. Lift and turn the levers on the two hinges. 3. Close the oven door to the first opening position (halfway). Then pull forward and remove it from its seat.
ENGLISH 4. 21 Place the door on a stable surface protected by a soft cloth. Use a screwdriver to remove 2 screws from bottom edge of door. Do not lose the screws. 1 1 5. 3 2 2 6. 7. Use a spatula made of wood or plastic or equivalent to open the inner door. Hold the outer door, and push the inner door against the top edge of the door. Lift the inner door. Clean inner side of the door. WARNING! Only clean the glass panel with water and a soap.
www.electrolux.com WARNING! Bulb lamps used in this appliance are special lamps for use only in household appliances. Do not use them to illuminate household rooms or parts of rooms. If you need to replace a lamp, the replacement lamp must have the same power and be for use only in household appliances. Removing the drawer 1. Pull the drawer out until it stops. 2. Slowly lift the drawer. 3. Pull the drawer out fully.
ENGLISH Problem Possible cause 23 Remedy The oven does not heat up The fuse in the fuse box is released Control the fuse. If the fuse is released more than one time, refer to a qualified electrician.
www.electrolux.com Minimum distances Voltage 230 V 50 Hz Dimension mm Frequency A 690 14.3 Levelling B 150 14.2 Technical Data Use small feet on the bottom of appliance to set the appliance top surface level with other surfaces. Dimensions Height 858 mm Width 500 mm Depth 600 mm Total electricity power 8147 W 14.4 Anti-tilt protection WARNING! You must install the anti-tilt protection. Install the anti-tilt protection to prevent the appliance to fall with incorrect loads.
ENGLISH 80-85 mm 317322 mm 25 How to install the anti-tilt protection 1. Set the correct height and area for the appliance before you attach the anti-tilt protection. 2. Make sure that the surface behind the appliance is smooth. 3. Install the anti-tilt protection 317 - 322 mm down from the top surface of the appliance and 80 - 85 mm from the side of the appliance into the circular hole on a bracket. Screw it into the solid material or use applicable reinforcement (wall). 4.
www.electrolux.com 15. ENVIRONMENT CONCERNS Recycle the materials with the symbol . Put the packaging in applicable and electronic appliances. Do not dispose appliances marked with the symbol containers to recycle it. Help protect the environment and human health and to recycle waste of electrical with the household waste. Return the product to your local recycling facility or contact your municipal office.
ENGLISH 27
892953848-A-472012 www.electrolux.