EKC603600 ................................................ .............................................
electrolux Electrolux. Thinking of you. Share more of our thinking at www.electrolux.com CONTENTS Safety information Product description Before first use Hob - Daily use Hob - Helpful hints and tips Hob - Care and cleaning Oven - Daily use Oven - Clock functions Oven - Using the accessories 2 5 6 7 7 8 8 10 11 Oven - Helpful hints and tips 12 Oven - Care and cleaning 17 What to do if… 19 Installation 20 Environment concerns 21 GREAT BRITAIN & IRELAND - Guarantee/ Customer Service 22 www.electrolux.
electrolux 3 • Make sure that the appliance is disconnected from the power supply during the installation (if applicable). • Keep the minimum distances to the other appliances and units. • Do not put the appliance on a base. ELECTRICAL CONNECTION • The appliance must be earthed. • Make sure that the electrical data on the rating plate agree with your domestic power supply. • Information on the voltage is on the rating plate.
electrolux • • • • • • • • scratch the hob surface if you move them on the surface. Discoloration of the enamel has no effect on the performance of the appliance. To prevent damage or discoloration to the enamel: – do not put any objects directly on the appliance floor and do not cover it with aluminium foil; – do not put hot water directly into the appliance; – do not keep moist dishes and food in the appliance after you finish the cooking. Do not apply pressure on the open door.
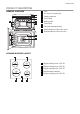
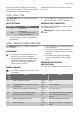
electrolux 5 PRODUCT DESCRIPTION GENERAL OVERVIEW 9 1 2 3 4 5 3 2 1 8 5 1 2 3 4 5 6 7 8 9 Hob Air vents for cooling fan Heating element Oven lamp Rating plate Oven lamp Fan and heating element Shelf positions of the main oven Shelf positions of the top oven 6 4 7 3 2 1 COOKING SURFACE LAYOUT 1 2 145 180 mm mm 210 145 mm 5 mm 4 3 1 2 3 4 5 Single cooking zone 1200 W Single cooking zone 1800 W Single cooking zone 1200 W Residual heat indicator Single cooking zone 2300 W
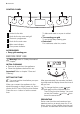
electrolux CONTROL PANEL 1 2 6 1 2 3 4 5 6 Knobs for the hob Knob for the top oven and grill Electronic programmer Knob for the main oven Main oven indicator Oven power indicator 3 4 1 5 To bake and roast or as pan to collect fat. • The roasting pan grid To put in the deep roasting pan. • Oven shelf For cookware, cake tins, roasts. ACCESSORIES • Deep grill roasting pan BEFORE FIRST USE Warning! Refer to "Safety information" chapter. INITIAL CLEANING • Remove all parts from the appliance.
electrolux 7 than in normal use. During this period an odour can be emitted. This is normal. Make sure the room is well ventilated. Preheat the two ovens. Heat up one oven at a time. HOB - DAILY USE Warning! Refer to "Safety information" chapter. HEAT SETTINGS Control knob 0 Function Off position Heat settings (1 = lowest heat setting; 9= highest heat setting) 1-9 2. To complete the cooking process, turn the control knob to the “0” position.
electrolux Heat setting Use to: Time Hints 4-5 Cook larger quantities of food, stews and soups 60-150 min Up to 3 l liquid plus ingredients 6-7 Gentle fry: escalope, veal cordon bleu, cutlets, rissoles, sausages, liver, roux, eggs, pancakes, doughnuts as required Turn halfway through 7-8 Heavy fry, hash browns, loin steaks, steaks 5-15 min Turn halfway through 9 Boil large quantities of water, cook pasta, sear meat (goulash, pot roast), deep fry chips HOB - CARE AND CLEANING Warning! Ref
electrolux 9 ACTIVATING AND DEACTIVATING THE MAIN OVEN 1. Turn the knob for the main oven functions to an oven function. The oven power indicator comes on while the appliance operates. The main oven indicator comes on while the temperature in the appliance increases. 2. To deactivate the appliance, turn the knob for the main oven functions and the knob for the main oven temperature to the Off position. The main oven indicator switches to OFF, when the set temperature will be reached.
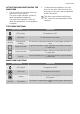
electrolux OVEN - CLOCK FUNCTIONS ELECTRONIC PROGRAMMER 1 5 2 1 4 3 Clock function Time of day Minute Minder Duration End 1 2 3 4 5 Function indicators Time display Button + Selection button Button - Application To set, change or check the time of day. To set a countdown time. An acoustic signal sounds after the time period is completed. This function has no effect on the operation of the oven. To set how long the appliance must operate. To set when the appliance must be deactivated.
electrolux 11 5. Turn the knob for the oven functions and the knob for the temperature to the off position. 2. Press and hold the button -. The clock function goes out after some seconds. CANCELLING THE CLOCK FUNCTIONS 1. Press the Selection button again and again until the necessary function indicator flashes. OVEN - USING THE ACCESSORIES Warning! Refer to "Safety information" chapter.
electrolux To roast larger pieces of meat or poultry on one level: 1. To grill flat dishes in large quantities and to toast: 1. Put the roasting pan grid in the deep roasting pan. The supports of the roasting pan grid must point up. 2. Put the deep roasting pan in the appliance, on the necessary shelf level. Put the roasting pan grid in the deep roasting pan. The supports of the roasting pan grid must point down. 2. Put the deep roasting pan in the appliance, on the necessary shelf level.
electrolux 13 Baking results Possible cause Remedy The cake sinks (becomes soggy, lumpy, streaky) Oven temperature too high Use a lower setting The cake sinks (becomes soggy, lumpy, streaky) Baking time is too short Set a longer baking time Do not set higher temperatures to decrease baking times The cake sinks (becomes soggy, lumpy, streaky) Too much liquid in the mixture Use less liquid.
electrolux Shelf Position Temperature [°C] Approx Cook Time (mins) Fish Pie (Potato Topped) 2 190 - 200 20 - 30 Fruit Pies, Crumbles 2 190 - 200 30 - 50 Milk Puddings 2 150 - 170 90 -120 Pasta Lasagne etc.
electrolux 15 Temperature [°C] Approx Cook Time (mins) Shelf Position Fruit Pies, Crumbles 170 - 180 30 - 50 3 Milk Puddings 140 - 160 60 - 90 3 Pastry: Choux 180 - 190 30 - 40 3 Pastry: Shortcrust 180 - 190 25 - 35 3 Pastry: Flaky 180 - 190 30 -40 3 Food Pastry: Puff Follow manufacturer`s instructions.
electrolux GRILLING Always use the grilling function with maximum temperature setting Important! Always grill with the oven door closed Always pre-heat the empty oven with the grill functions for 5 minutes. • Set the grilling set in the shelf level as recommended in the grilling table. • Grill only flat pieces of meat or fish. TOP OVEN - DUAL CIRCUIT GRILL Shelf Position Adjust shelf position and grilling set to suit different thicknesses of food. The grilling area is set in centre of the shelf.
electrolux 17 Type of food Butter, 250g Shelf Time in minutes Final defrosting mins 2 30-40 10-15 - Comments Cream, 2 x 2dl 2 80-100 10-15 Cream can be whipped even if it is still slightly frozen. Cake, 1400g 2 60 60 - Information on acrylamides Important! According to the newest scientific knowledge, if you brown food (specially the one which contains starch), acrylamides can pose a health risk. Thus, we recommend that you cook at the lowest temperatures and do not brown food too much.
electrolux 2. Pull the rear shelf support rail away from the side wall and remove it. 1 2 1 Installing the shelf support rails Install the shelf support rails in opposite sequence. The rounded ends of the shelf support rails must point to the front! Caution! Make sure that the longer fixing wire is in the front. The ends of the two wires must point to the rear. Incorrect installation can cause damage to the enamel.
electrolux 19 To replace the glass panels obey the procedure in opposite sequence. Before you lower the trim attach the A trim part to the door. Refer to picture. OVEN LAMP Warning! There is a danger of electrical shock! Before you change the oven lamp: • Switch off the oven. • Remove the fuses in the fuse box or switch off the circuit breaker. Replacing the oven lamp 1. You can find the lamp glass cover at the back of the cavity. Turn the lamp glass cover counterclockwise to remove it. 2.
electrolux INSTALLATION Warning! Refer to "Safety information" chapter. TECHNICAL DATA Dimensions Height 900 mm Width 600 mm Depth 600 mm Top oven capacity 40 l Main oven capacity 79 l LOCATION OF THE APPLIANCE You can install your freestanding appliance with cabinets on one or two sides and in the corner.
electrolux 21 1 60 mm inside the bottom edge of the aperture, before you fix the two screws into the top edge of the mains terminal cover. 50 mm A 2 B ELECTRICAL INSTALLATION Warning! Only a qualified and competent person must do the electrical installation. The manufacturer is not responsible if you do not follow safety precautions from the chapter "Safety information". Make sure that the cover is securely fastened. To open the cover of terminal board obey the procedure in opposite sequence.
electrolux Warning! Your appliance should be made inoperable before it is disposed of, so that it does not constitute a danger. To do this, take the mains plug from the socket and remove the mains cable from the appliance.
electrolux 23 • The appliance guarantee starts from the date you first purchased the appliance which will be evidenced by production of a valid purchase document issued by the seller of the appliance. • The appliance guarantee is for the same period and to the same extent for labour and parts as exists in your new country of residence for this particular model or range of appliances. • The appliance guarantee is personal to the original purchaser of the appliance and cannot be transferred to another user.
electrolux Portugal +35 12 14 40 39 39 Quinta da Fonte - Edificio Gonçalves Zarco - Q 35 -2774-518 Paço de Arcos Romania +40 21 451 20 30 Str. Garii Progresului 2, S4, 040671 RO Schweiz - Suisse - Svizzera +41 62 88 99 111 Industriestrasse 10, CH-5506 Mägenwil Slovenija +38 61 24 25 731 Gerbičeva ulica 110, 1000 Ljubljana Slovensko +421 2 32 14 13 34-5 Electrolux Slovakia s.r.o.
electrolux 25
electrolux
electrolux 27
www.electrolux.