EKC603602 ................................................ .............................................
electrolux Electrolux. Thinking of you. Share more of our thinking at www.electrolux.
electrolux 3 GENERAL SAFETY • The appliance and its accessible parts become hot during use. Do not touch the heating elements. • Do not operate the appliance by means of an external timer or separate remote-control system. • Unattended cooking on a hob with fat or oil can be dangerous and may result in fire. • Never try to extinguish a fire with water, but switch off the appliance and then cover flame e.g. with a lid or a fire blanket. • Do not store items on the cooking surfaces.
electrolux • Always be careful when you move the appliance because it is heavy. Always wear safety gloves. • Do not pull the appliance by the handle. • Keep the minimum distance from the other appliances and units. • Make sure that the appliance is installed below and adjacent safe structures. • The sides of the appliance must stay adjacent to appliances or to units with the same height. • Do not install the appliance on a platform. • Do not install the appliance adjacent to a door or under a window.
electrolux 5 • Fats and oil when heated can release flammable vapours. Keep flames or heated objects away from fats and oils when you cook with them. • The vapours that very hot oil releases can cause spontaneous combustion. • Used oil, that can contain food remnants, can cause fire at a lower temperature than oil used for the first time. • Do not put flammable products or items that are wet with flammable products in, near or on the appliance.
electrolux • Remove the door catch to prevent children and pets to get closed in the appliance.
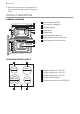
electrolux 7 CONTROL PANEL 1 2 3 4 7 5 1 6 ACCESSORIES • Deep grill roasting pan To bake and roast or as pan to collect fat. 1 2 3 4 5 6 7 Knobs for the hob Knob for the top oven functions Electronic programmer Knob for the main oven functions Knob for the main oven temperature Main oven temperature indicator Top oven temperature indicator • The roasting pan grid To put in the deep roasting pan. • Oven shelf For cookware, cake tins, roasts.
electrolux HOB - DAILY USE Warning! Refer to the Safety chapters. HEAT SETTING Knob 0 1-9 Function Off position Heat settings (1 - lowest heat setting, 9 - highest heat setting) 1. Turn the knob to a necessary heat setting. 2. To stop the cooking, turn the knob to the 0 position. Use the residual heat to decrease energy consumption. Deactivate the cooking zone approximately 5 - 10 minutes before the cooking is completed. to the right (do not turn it thought the stop position). 1.
electrolux 9 Heat setting Use to: Time Hints 3-4 Steam vegetables, fish, meat 20-45 min Add a few tablespoons of liquid 4-5 Steam potatoes 20-60 min Use max.
electrolux 3. To deactivate an oven, turn the knob to the off position. TOP OVEN FUNCTIONS Oven function 100-250 Application OFF position The appliance is OFF. Oven lamp To illuminate the oven interior. Conventional Cooking This function is particularly suitable for cooking larger quantities of food. Dual Circuit Grill To grill food items in medium quantities in the middle of the shelf. To make toast. Full Grill The full grill element is on. To grill flat food items in large quantities.
electrolux 11 INSTALLING THE OVEN ACCESSORIES The deep roasting pan and the oven shelf have side edges. These edges and the shape of the guide-bars are a special device to prevent the cookware from slipping. Installing the oven shelf and the deep roasting pan together Put the oven shelf on the deep roasting pan. Push the deep roasting pan between the guide-bars of one of the oven levels. GRILLING SET The grilling set includes the roasting pan grid and the deep roasting pan.
electrolux To grill flat dishes in large quantities and to toast: 1. Put the roasting pan grid in the deep roasting pan. The supports of the roasting pan grid must point down. 2. Put the deep roasting pan in the appliance and on the necessary shelf level. OVEN - CLOCK FUNCTIONS ELECTRONIC PROGRAMMER 1 5 2 1 4 3 Clock function Time of day Minute Minder Duration End 1 2 3 4 5 Function indicators Time display Button + Selection button Button - Application To set, change or check the time of day.
electrolux 13 2. Press the Selection button again and again until the indicator for the necessary clock function flashes. 4. Press a button to stop the signal. 5. Turn the knob for the oven functions and the knob for the temperature to the off position. CANCELLING THE CLOCK FUNCTIONS 1. Press the Selection button again and again until the necessary function indicator flashes. 2. Press and hold the button -. The clock function goes out after some seconds. 3.
electrolux Tips on baking Baking results Possible cause Remedy The cake is not browned sufficiently below Incorrect oven level Put the cake on a lower oven level The cake sinks (becomes soggy, lumpy, streaky) Oven temperature too high Use a lower setting The cake sinks (becomes soggy, lumpy, streaky) Baking time is too short Set a longer baking time Do not set higher temperatures to decrease baking times The cake sinks (becomes soggy, lumpy, streaky) Too much liquid in the mixture Use less
electrolux 15 Food Shelf Position Temperature [°C] Approx Cook Time (mins) Convenience Foods 2 Fish 2 170 - 190 20 - 30 Fish Pie (Potato Topped) 2 190 - 200 20 - 30 Fruit Pies, Crumbles 2 190 - 200 30 - 50 Milk Puddings 2 150 - 170 90 -120 Pasta Lasagne etc.
electrolux Temperature [°C] Approx Cook Time (mins) Cakes: Apple Pie 160 - 170 50 - 60 3 - Shortbread 130 - 150 45 - 60 1/3 Fish 160 - 180 30 - 40 3 Fruit Pies, Crumbles 170 - 180 30 - 50 3 Milk Puddings 140 - 160 60 - 90 3 Pastry: Choux 180 - 190 30 - 40 3 Pastry: Shortcrust 180 - 190 25 - 35 3 Pastry: Flaky 180 - 190 30 -40 3 Food Pastry: Puff Shelf Position Follow manufacturer`s instructions.
electrolux 17 GRILLING Always use the grilling function with maximum temperature setting Important! Always grill with the oven door closed Always pre-heat the empty oven with the grill functions for 5 minutes. • Set the grilling set in the shelf level as recommended in the grilling table. • Grill only flat pieces of meat or fish. TOP OVEN - DUAL CIRCUIT GRILL Shelf Position Adjust shelf position and grilling set to suit different thicknesses of food.
electrolux Shelf Time in minutes Final defrosting mins Comments Strawberries, 300g 2 30-40 10-20 - Butter, 250g 2 30-40 10-15 - Type of food Cream, 2 x 2dl 2 80-100 10-15 Cream can be whipped even if it is still slightly frozen. Cake, 1400g 2 60 60 - OVEN - CARE AND CLEANING Warning! Refer to the Safety chapters. • Clean the front of the appliance with a soft cloth with warm water and cleaning agent.
electrolux 19 Removing the shelf supports 1. Pull the front of the shelf support away from the side wall. 2. Pull the rear end of the shelf support away from the side wall and remove it. 1 2 Installing the shelf supports Install the shelf supports in the opposite sequence. 1 Important! Valid with telescopic runners: The retaining pins on the telescopic shelf runners must point to the front! Caution! Make sure that the longer fixing wire is in the front.
electrolux Before you change the oven lamp: • Switch off the oven. • Remove the fuses in the fuse box or switch off the circuit breaker. A Put a cloth on the bottom of the oven for protection of the oven light and glass cover. 1 2 Replacing the oven lamp 1. You can find the lamp glass cover at the back of the cavity. Turn the lamp glass cover counterclockwise to remove it. 2. Clean the glass cover. 3. Replace the oven lamp with applicable 300°C heat-resistant oven lamp.
electrolux 21 If you cannot find a solution to the problem yourself, contact your dealer or the service centre. The necessary data for the service centre is on the rating plate. The rating plate is on the front frame of the oven cavity. We recommend that you write the data here: Model (MOD.) ......................................... Product number (PNC) ......................................... Serial number (S.N.) .........................................
electrolux 1 60 mm inside the bottom edge of the aperture, before you fix the two screws into the top edge of the mains terminal cover. 50 mm A 2 B Make sure that the cover is securely fastened. To open the cover of terminal board obey the procedure in opposite sequence. ELECTRICAL INSTALLATION Warning! Only a qualified and competent person must do the electrical installation. TERMINAL BOARD Make sure that the links are fitted as shown.
electrolux 23 IE GREAT BRITAIN & IRELAND - GUARANTEE/CUSTOMER GB SERVICE STANDARD GUARANTEE CONDITIONS: We, Electrolux, undertake that if within 12 months of the date of the purchase this Electrolux appliance or any part thereof is proved to be defective by reason only of faulty workmanship or materials, we will, at our option repair or replace the same FREE OF CHARGE for labour, materials or carriage on condition that: • Appliance has been correctly installed and used only on the electricity supply stated
electrolux with you subject to the following qualifications:• The appliance guarantee starts from the date you first purchased the appliance which will be evidenced by production of a valid purchase document issued by the seller of the appliance. • The appliance guarantee is for the same period and to the same extent for labour and parts as exists in your new country of residence for this particular model or range of appliances.
electrolux 25 Portugal +35 12 14 40 39 39 Quinta da Fonte - Edifício Gonçalves Zarco - Q 35 -2774-518 Paço de Arcos Romania +40 21 451 20 30 Str. Garii Progresului 2, S4, 040671 RO Schweiz - Suisse - Svizzera 0848 848 111 Industriestrasse 10, CH-5506 Mägenwil Slovenija +38 61 24 25 731 Gerbičeva ulica 110, 1000 Ljubljana Slovensko +421 2 32 14 13 34-5 Electrolux Slovakia s.r.o.
electrolux
electrolux 27
www.electrolux.