USER MANUAL Model EKC6044 /EKC6045
IMPORTANT SAFETY INFORMATION Never place plastic or any other material which may melt in or on the oven. Do not leave the grill pan handle in position when grilling as it will become hot. Always support the grill pan when it is in the withdrawn or partially withdrawn position. Always use oven gloves to remove and replace the grill pan handle when grilling. Always use oven gloves to remove and place food in the oven. Ensure cooking utensils are large enough to contain foods to prevent spillage and boil over.
CONTENTS FOR THE USER Important Safety Information Description of the Appliance Getting to Know Your Appliance Before Using the Appliance Rating Plate Preparing to Use your Appliance The Cooling Fan for the Controls Control Panel Indicator Neon(s) Condensation and Steam Cookware Grill and Oven Furniture 2 4 5 6 6 6 6 6 6 6 6 The Timer 7 The Ceramic Hob Using the Hob Recommended Saucepans Hints and Tips 10 10 10 11 The Grill Using the Grill Things to Note The Grill Pan and Handle Hints and Tips Grillin
DESCRIPTION OF THE APPLIANCE SLIP-IN ELECTRIC DOUBLE OVEN Electronic Timer Control Panel Top Oven / Grill Main Oven 4
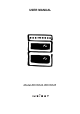
GETTING TO KNOW YOUR APPLIANCE THE CONTROL PANEL E D G F J FEATURES - Hotplate Control Hotplate Control Main Oven Temperature Control Electronic Timer Top Oven/Grill Selector Control Top Oven/Grill Temperature Control Hotplate Control Hotplate Control Main Oven Indicator Neon Top Oven/Grill Indicator Neon 5 4 I A B C D E F G H I J H 4 2 2 C 4 4 2 B 2 A
BEFORE USING THE APPLIANCE RATING PLATE To prevent discolouration, regularly wipe away condensation and also soilage from surfaces. For your safety wall coverings at the rear of the appliance should be securely fixed to the wall. This is situated on the lower front frame of the appliance and can be seen upon opening the door. Alternatively the rating plate may also be found on the back or top of some models (where applicable). The appliance must be protected by a suitably rated fuse or circuit breaker.
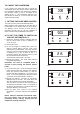
THE TIMER KEY A B C D E F G COOK TIME END TIME COUNTDOWN TIME DECREASE CONTROL SELECTOR CONTROL INCREASE CONTROL A C B D E NOTE: The time of day must be set before the main oven will operate manually. 1. HOW TO SET THE TIME OF DAY The oven has a 24 hour clock. When the electricity supply is first switched ON, the display will show 12.00 and the 'Time' indicator neon will flash as Fig. 1. Fig.1.
TO CANCEL THE COUNTDOWN If you change your mind and want to cancel the 'Countdown', press the Selector Control button until the 'Countdown' indicator neon flashes then depress the decrease control (-) until 0. 00 shows in the display as Fig. 5. The 'Countdown' indicator neon will continue to flash for a few seconds and then return to the time of day. 3. SETTING THE OVEN TIMER CONTROL Fig.5. The main oven only can be automatically timed.
B) TO SET THE TIMER TO SWITCH OFF ONLY i) ii) iii) iv) v) vi) Ensure the electricity supply is switched ON and that the correct time of day is displayed, e.g. 10.00am as Fig. 9. Place food in the oven. To set the length of cooking time, press the Selector Control button until the 'Cook Time' indicator neon is illuminated. Press the increase control ( + ) until the required length of cooking time is displayed, e.g. 2 hrs 15 mins as Fig. 10. Depress the decrease control ( - ) if necessary.
THE CERAMIC HOB Do not use the appliance if the ceramic glass is damaged. If a fault or crack becomes visible, disconnect the appliance immediately from the electricity supply and contact your local Service Force Centre. USING THE HOB The highest number represents the hottest setting and the lowest number represents the coolest setting. Choose a setting appropriate to the quantity and type of food to be cooked. RECOMMENDED SAUCEPANS Only saucepans with flat bases and close fitting lids are recommended.
HINTS AND TIPS • • • • • • • Lift, rather than slide saucepans on and off the hob. This will reduce the risk of scratches and metal marks from saucepans with aluminium bases. Metal marks can be easily cleaned off providing they are not allowed to burn on. Follow any guidelines provided by the saucepan manufacturer, particularly those relating to recommended heat settings. Avoid using thin, badly dented or distorted saucepans. Those with uneven bases should not be used.
THE GRILL CAUTION – Accessible parts may be hot when the grill is in use. Young children should be kept away. USING THE GRILL • • • Turn the top oven/grill function selector to. Turn the temperature control knob to the right as far as it will go. This is the hottest setting. To use the grill at lower settings, tun the temperature control knob so that 110°C or 150°C on the knob lines up with the off dot on the panel. THINGS TO NOTE • • • • The cooling fan for the controls may operate after a time.
HINTS AND TIPS • • • • • • • Most foods should be placed on the grid in the grill pan to allow maximum circulation of air to lift the food out of the fats and juices. Adjust the grid and grill pan runner position to allow for different thicknesses of food. Position the food close to the element for faster cooking and further away for more gentle cooking. Food should be thoroughly dried before grilling to minimise splashing.
THE TOP OVEN The top oven is the smaller of the two ovens. It is heated by elements in the top and bottom of the oven. It is designed for cooking smaller quantities of food. It gives especially good results if used to cook fruit cakes, sweets and savoury flans or quiche. The top oven is also ideal for use as warming compartment to warm dishes and keep food hot. Use the top oven when you want to warm plates. Use the lowest setting on the top oven temperature control.
HINTS AND TIPS • • • • • • • • Arrange the shelves in the required positions before switching the oven ON. Shelf positions are counted from the bottom upwards. There should always be at least 2.5cm (1”) between the top of the food and the element. This gives best cooking results and allows room for rise in yeast mixtures, Yorkshire puddings etc. When cooking cakes, pastry, scones bread etc., place the tins or baking trays centrally on the shelf.
THE MAIN OVEN The fan oven is particularly suitable for cooking larger quantities of food. The advantages of fan oven cooking are: PREHEATING The fan oven quickly reaches its temperature, so it is not usually necessary to preheat the oven. Without preheating however, you may need to add an extra 5 – 10 minutes on the recommended cooking times. For recipes needing high temperatures, e.g. bread, pastries, scones, soufflés etc., best results are achieved if the oven is preheated first.
HINTS AND TIPS • • • • • Arrange the shelves in the required positions before switching the oven ON. Shelf positions are counted from the bottom upwards. When cooking more than one dish in the fan oven, place dishes centrally on different shelves rather than cluster several dishes on one shelf, this will allow the heat to circulate freely for the best cooking results. When batch baking one type of food, e.g. Victoria sandwich cakes, those of similar size will be cooked in the same time.
OVEN COOKING CHART The oven temperatures are intended as a guide only. It may be necessary to increase or decrease the temperatures by 10°C to suit individual preferences and requirements. FAN OVEN FOOD Biscuits Bread Bread rolls/buns Cakes: SHELF POSITION Shelf Small & Queen Sponges Victoria Sandwich Madeira Rich Fruit Christmas Gingerbread Meringues Flapjack Shortbread Casseroles: Beef/Lamb Chicken Convenience Foods Fish Fish Pie (Potato Topped) Fruit Pies, Crumbles Milk Puddings Pasta Lasagne etc.
ROASTING CHART INTERNAL TEMPERATURES – Rare : 50-60°C; Medium : 60-70°C; Well done : 70-80°C MEAT TEMPERATURE COOKING TIME 20-35 minutes per ½kg (1lb) and 20-35 minutes over Beef/ Beef boned 160-180°C Mutton/Lamb 160-180°C 25-35 minutes per ½kg (1lb) and 25-35 minutes over Pork/Veal/Ham 160-180°C 30-40 minutes per ½kg (1lb) and 30-40 minutes over Chicken 160-180°C 15-20 minutes per ½kg (1lb) and 20 minutes over Turkey/Goose 160-180°C 15-20 minutes per ½kg (1lb) up to 3½kg (7lb) then 10 minu
DEFROST FEATURE This main oven function defrosts most foods faster than more conventional methods. It is particularly suitable for delicate frozen foods which are to be served cold e.g. cream filled gateaux, cakes covered with icings or frostings, cheesecakes, biscuits, scones, etc. USING DEFROST FEATURE • • • Turn the main oven temperature control to the defrost setting. When defrost is selected, the oven indicator neon may come ON.
CARE AND CLEANING Before cleaning always allow the cooling fan to cool the appliance down before switching off at the electricity supply. CLEANING MATERIALS Before using any cleaning materials on your appliance, check that they are suitable and that their use is recommended by the manufacturer. Cleaners that contain bleach should NOT be used as they may dull the surface finishes. Harsh abrasives and scourers should also be avoided.
CLEANING THE CERAMIC HOB Make sure the ceramic glass is cool before cleaning. It is important to clean the ceramic hob daily to prevent soilage being burnt on. Take care to avoid the hob trims when cleaning the ceramic glass as they may be damaged by the cleaning agents recommended. DAILY CLEANING Use the recommended Hob Brite Cleaner daily. If soilage is not allowed to burn on it will be much easier to clean off. 1. Apply a small amount of Hob Brite in the centre of each area to be cleaned. 2.
HINTS AND TIPS TO REDUCE HOB SOILAGE: • • • • • Make sure the bottom of the saucepan and the cooking area are clean and dry before cooking begins. Ensure saucepans are large enough accommodate food to avoid boil overs. If possible, wipe up spills and splatters as they occur, but take care to avoid steam burns. Avoid using a dishcloth or sponge to clean the hob. These may leave a layer of soiled detergent on the hob surface which will burn and discolour the next time the hob is used.
CLEANING INSIDE THE OVEN COMPARTMENTS GRILL AND The sides and back of the grill/second oven and main oven compartments are coated with a special Stayclean coating. They should not be cleaned manually. The vitreous enamel main oven base and grill compartment base can be cleaned using normal oven cleaners with care. Ensure that the manufacturers instructions are followed and that all parts are well rinsed afterwards.
CLEANING THE DOOR(S) To prevent damaging or weakening the door glass panels avoid the use of the following: • Household detergents and bleaches • Impregnated pads unsuitable for nonstick saucepans • Brillo/Ajax pads or steel wool pads • Chemical oven pads or aerosols • Rust removers • Bath/Sink stain removers CLEANING BETWEEN THE OUTER AND INNER DOOR GLASS The inner door glass is removable for cleaning. TO REMOVE THE INNER GLASS 1. Open the oven door to gain access to the top of the oven door.
REPLACING AN OVEN LIGHT BULB The type of bulb required is a 300°C 25 watt small Edison Screw. Disconnect the appliance from the electricity supply before replacing the bulb. 1. Make sure the appliance is cool before replacing the bulb. 2. Open the door and remove the shelves and wirework runners. 3. Remove the glass cover by turning it to the left. 4. Unscrew the bulb by turning it to the left. 5. Fit a new bulb and then replace the glass bulb cover. 6.
SOMETHING NOT WORKING? Please carry out the following checks on your appliance before calling a Service Engineer. It may be that the problem is a simple one which you can solve yourself without the expense of a service call. In-guarantee customers should make sure that the checks have been made as the engineer will make a charge if the fault is not a mechanical or electrical breakdown. Please note that proof of purchase is required for in-guarantee service calls.
SERVICE AND SPARE PARTS In the event of your appliance requiring service, or if you wish to purchase spare parts, please contact your local Service Force Centre by telephoning:- 0870 5 929929 Your telephone call will be automatically routed to the Service Force Centre covering your post code area. For the address of your local Service Force Centre and further information about Service Force, please visit the website at www.serviceforce.co.uk.
GUARANTEE CONDITIONS Standard guarantee conditions We, Electrolux, undertake that if within 12 months of the date of the purchase this Electrolux appliance or any part thereof is proved to be defective by reason only of faulty workmanship or materials, we will, at our option repair or replace the same FREE OF CHARGE for labour, materials or carriage on condition that: • • • • • • The appliance has been correctly installed and used only on the electricity supply stated on the rating plate.
TECHNICAL DETAILS Voltage: 230-240 Volts AC 50Hz Wattage: 9.5 - 10.3kW Height: 900mm Width: 600mm Depth: 600mm (excluding handles and knobs) Weight 68.0 kg This appliance complies with: European Council Directive 73/23/EEC. EMC Directive 89/336/EEC. CE Marking Directive 93/68/EEC. Energy Label Directive 2002/40/EC.
INSTALLATION INSTRUCTIONS WARNING: THIS APPLIANCE MUST BE EARTHED If your appliance has been damaged in transit, contact your supplier immediately. Do not attempt to install it. Your appliance left the factory fully packaged to protect it from damage. If it is delivered without packaging and damage has occurred, the manufacturer cannot accept responsibility. Contact your supplier for advice. Once the packaging has been removed the appliance should only be moved by hand.
CONNECTING TO THE ELECTRICITY SUPPLY Warning: This appliance must be earthed. Do not earth this appliance to the gas supply piping. Connect to 230 - 240V AC supply only. • • • • • • • • • • • • The electrical connection should be made using a double pole isolating switch (cooker socket) with at least 3mm contact separation in all poles. The cable must have conductors of sufficiently high cross-sectional area to prevent overheating and deterioration.
NOTES 33
NOTES 34
NOTES 35
IMPORTANT NOTICE In line with our continuing policy of research and development, we reserve the right to alter models and specifications without prior notice. This instruction booklet is accurate at the date of printing, but will be superseded if specifications or appearance are changed. ELECTROLUX MAJOR APPLIANCES, ADDINGTON WAY, LUTON, BEDFORDSHIRE LU4 9QQ. TELEPHONE 0870 5 950950 To buy accessories, consumables and spare parts at our online shop please visit: http://www.electrolux.co.