EKC6051BOX EN Cooker User Manual
www.electrolux.com CONTENTS 1. SAFETY INFORMATION....................................................................................3 2. SAFETY INSTRUCTIONS..................................................................................5 3. PRODUCT DESCRIPTION................................................................................ 8 4. BEFORE FIRST USE......................................................................................... 8 5. HOB - DAILY USE.................................
ENGLISH 1. 3 SAFETY INFORMATION Before the installation and use of the appliance, carefully read the supplied instructions. The manufacturer is not responsible for any injuries or damages that are the result of incorrect installation or usage. Always keep the instructions in a safe and accessible location for future reference. 1.1 Children and vulnerable people safety WARNING! Risk of suffocation, injury or permanent disability.
www.electrolux.com • • • • • • • • • • • • • • • This appliance is not intended to be used on a ships, boats or vessels. Do not install the appliance behind a decorative door in order to avoid overheating. Do not install the appliance on a platform. Do not operate the appliance by means of an external timer or separate remote-control system. WARNING: Unattended cooking on a hob with fat or oil can be dangerous and may result in fire.
ENGLISH • • • • • • 5 Ensure that the appliance is switched off before replacing the lamp to avoid the possibility of electric shock. If the mains power supply cable is damaged, it must be replaced by the manufacturer, its Authorised Service Centre or similarly qualified persons to avoid an electrical hazard. Be careful when you touch the storage drawer. It can get hot. To remove the shelf supports first pull the front of the shelf support and then the rear end away from the side walls.
www.electrolux.com 2.2 Electrical Connection • WARNING! Risk of fire and electrical shock. • • • • • • • • • • • • • • All electrical connections should be made by a qualified electrician. The appliance must be earthed. Make sure that the electrical information on the rating plate agrees with the power supply. If not, contact an electrician. Always use a correctly installed shockproof socket. Do not use multi-plug adapters and extension cables.
ENGLISH • • • • • • • • • – do not keep moist dishes and food in the appliance after you finish the cooking. – be careful when you remove or install the accessories. Discoloration of the enamel or stainless steel has no effect on the performance of the appliance. Use a deep pan for moist cakes. Fruit juices cause stains that can be permanent. Do not keep hot cookware on the control panel. Do not let cookware boil dry. Be careful not to let objects or cookware fall on the appliance.
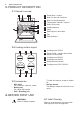
www.electrolux.com 3. PRODUCT DESCRIPTION 3.1 General overview 1 2 3 4 5 10 6 5 4 3 2 1 7 8 9 1 2 3 4 5 6 7 8 9 10 Power lamp / symbol Knob for the oven functions Knob for the temperature Temperature indicator / symbol Knobs for the hob Heating element Lamp Shelf support, removable Fan Shelf positions 3.
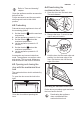
ENGLISH Refer to "Care and cleaning" chapter. Clean the appliance and the accessories before first use. Put the accessories and the removable shelf supports back to their initial position. 4.2 Preheating Preheat the empty appliance to burn off the remaining grease. and the maximum 1. Set the function temperature. 2. Let the appliance operate for 1 hour. 4.4 Deactivating the mechanical door lock 1. Press the door trim B at each side. The seal releases. 2 B 1 2. Pull the door trim up and remove it. 3.
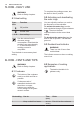
www.electrolux.com 5. HOB - DAILY USE WARNING! Refer to Safety chapters. 5.1 Heat setting Sym‐ bols Function Off position Double zone 1-9 Heat settings Use the residual heat to decrease energy consumption. Deactivate the cooking zone approximately 5 - 10 minutes before the cooking process is completed. Turn the knob to a necessary heat setting. To complete the cooking process, turn the knob to the off position. 5.
ENGLISH Time (min) 11 Heat setting Use to: 1-2 Hollandaise sauce, melt: but‐ 5 - 25 ter, chocolate, gelatine. Mix from time to time. 1-2 Solidify: fluffy omelettes, baked eggs. 10 - 40 Cook with a lid on. 2-3 Simmer rice and milkbased dishes, heating up readycooked meals. 25 - 50 Add the minimum twice as much liquid as rice, mix milk dishes part procedure through. 3-4 Steam vegetables, fish, meat. 20 - 45 Add some tablespoons of liquid. 4-5 Steam potatoes. 20 - 60 Use max.
www.electrolux.com 8. OVEN - DAILY USE WARNING! Refer to Safety chapters. 8.1 Oven functions Symbol Oven function Application Off position The appliance is off. Hot Air To bake on up to two shelf positions at the same time and to dry food. Set the temperature 20 - 40 °C lower than for Conventional Cooking. Conventional To bake and roast food on one shelf position. Pie / Pizza To bake food on one shelf position for a more in‐ tensive browning and a crispy bottom.
ENGLISH 8.2 Activating and deactivating the oven It depends on the model if your appliance has knob symbols, indicators or lamps: • The indicator comes on when the oven heats up. • The lamp comes on when the oven operates. • The symbol shows whether the knob controls one of the cooking zones, the oven functions or the temperature. 1. Turn the knob for the oven functions to select an oven function. 2. Turn the knob for the temperature to select a temperature. 3.
www.electrolux.com The temperature and baking times in the tables are guidelines only. They depend on the recipes and the quality and quantity of the ingredients used. Always preheat an empty oven at the temperature required for the food for 20 minutes before you start cooking. • • • • 9.1 Baking • • Your oven may bake or roast differently to the appliance you had before. Adapt your usual settings (temperature, cooking times) and shelf positions to the values in the tables.
ENGLISH 15 Baking results Possible cause Remedy The cake browns uneven‐ ly. The mixture is unevenly distributed. Spread the mixture evenly on the baking tray. The cake is not ready in the baking time given. The oven temperature is too low. The next time you bake, set a slightly higher oven temperature. 9.
www.electrolux.com Food Temperature (°C) Time (min) Shelf posi‐ tion Fruit tarts, short crust pastry 150 - 160 pre-baking, bases 10 - 15 2+4 Fruit tarts, short crust pastry 150 - 160 finishing 35 - 45 2+4 Fruit tarts, crumble pastry 170 - 180 30 - 40 2+4 9.
ENGLISH 17 Food Temperature (°C) Time (min) Shelf posi‐ tion Fruit tarts, short crust pastry 175 finishing 35 45 3-4 Fruit tarts, crumble pastry 190 - 200 25 - 35 3-4 Marzipan ring cake 210 - 230 10 - 12 2 Food Temperature (°C) Time (min) Shelf posi‐ tion Ciabatta rolls 200 - 220 10 - 20 2-3 Foccacia 220 - 230 10 - 20 2-3 Ciabatta 190 - 200 15 - 25 2-3 Fruit tarts, short crust pastry 170 - 180 35 - 45 2-3 Fruit tarts, crumble pastry 175 - 200 25 - 35 2-3 Pizza, home
www.electrolux.
ENGLISH Food Temperature (°C) Time (min) Shelf po‐ sition Chips, frozen 225 - 250 20 - 302) 3-4 Tarts, home made - pre-baking, roll 190 - 210 15 - 25 3-4 Tarts, home made - finishing 190 - 210 20 - 30 3-4 Tarts, frozen 200 - 225 20 - 302) 3-4 19 1) When frying or boiling fish, the cooking time depends on the thickness of the fish. The fish is finished when the flesh is white. Test by sticking a fork into the fish. If the flesh comes easily away from the bone, the fish is cooked.
www.electrolux.com Veal Food Temperature (°C) Time (min / kg) Shelf po‐ sition Fillet of beef1) 160 60 - 70 2-3 1) Other. Can be browned off after roasting under the grill or with top / bottom heat at 250°C. If you are using a meat probe, remove it before grilling.
ENGLISH 21 Food Temperature (°C) Time (min / kg) Shelf posi‐ tion Rump steak - browning 225 total 10 2-3 Rump steak - roasting 160 50 - 60 2-3 Roast beef 180 90 - 120 1-3 1) Other. Can be browned off after roasting under the grill or with top / bottom heat at 250°C. If you are using a meat probe, remove it before grilling. Veal Food Temperature (°C) Time (min / kg) Shelf posi‐ tion Fillet of beef1) 180 60 - 70 2-3 1) Other.
www.electrolux.com Food Temperature (°C) Time (min / kg) Shelf posi‐ tion Turkey breast 200 70 - 80 2-3 1) Other. Can be browned off after roasting under the grill or with top / bottom heat at 250°C. If you are using a meat probe, remove it before grilling. 9.
ENGLISH 23 Poultry Food Temperature (°C) Time (min / kg) Shelf posi‐ tion Chicken 180 55 - 65 2-3 Duck1) 150 55 - 65 2-3 Duck slow roasting1) not suitable total around 5 hours 2-3 Roast turkey, stuffed 150 50 - 60 1-2 Turkey breast 175 70 - 80 2-3 1) Other. Can be browned off after roasting under the grill or with top / bottom heat at 250°C. If you are using a meat probe, remove it before grilling. 9.12 Grilling in general • Grill only flat pieces of meat or fish.
www.electrolux.com Vegetables Shelf position Food Temperature (°C) Time (h) 1 posi‐ tion 2 posi‐ tions Beans 60 - 70 6-8 3 2/4 Peppers 60 - 70 5-6 3 2/4 Vegetables for sour 60 - 70 5-6 3 2/4 Mushrooms 50 - 60 6-8 3 2/4 Herbs 40 - 50 2-3 3 2/4 Food Temperature (°C) Time (h) 1 posi‐ tion 2 posi‐ tions Plums 60 - 70 8 - 10 3 2/4 Apricots 60 - 70 8 - 10 3 2/4 Apple slices 60 - 70 6-8 3 2/4 Pears 60 - 70 6-9 3 2/4 Fruit • 9.
ENGLISH Food Quantity Defrosting time (min) Further Comments defrosting time (min) Cake 1.4 kg 60 60 25 - 10. OVEN - CARE AND CLEANING WARNING! Refer to Safety chapters. 1. Pull the front of the shelf support away from the side wall. 10.1 Notes on cleaning • • • • • • Clean the front of the appliance with a soft cloth with warm water and a cleaning agent. To clean metal surfaces, use a dedicated cleaning agent. Clean the appliance interior after each use.
www.electrolux.com 3. Hold the door glass panels on their top edge one by one and pull them upwards from the guide. 1 2 4. Clean the door glass panels. 1. 2. 3. 4. Open the door fully. Move the slider until you hear a click. Close the door until the slider locks. Remove the door. To remove the door, pull the door outwards first from one side, and then the other. When the cleaning procedure is completed, insert the oven door in the opposite sequence.
ENGLISH WARNING! Make sure that the heating element is correctly installed and that it does not fall down. 10.7 Replacing the lamp 10.8 Removing the drawer Put a cloth on the bottom of the interior of the appliance. It prevents damage to the lamp glass cover and the cavity. WARNING! Do not keep flammable items (such as cleaning materials, plastic bags, oven gloves, paper or cleaning sprays) in the drawer. When you use the oven, the drawer can become hot.
www.electrolux.com Problem Possible cause Remedy Residual heat indicator does not come on. The zone is not hot be‐ If the zone operated suffi‐ cause it operated only for a ciently long to be hot, short time. speak to an Authorised Service Centre. You cannot activate the outer ring. Activate the inner ring first. The oven does not heat up. The oven is deactivated. The oven does not heat up. The necessary settings are Make sure that the settings not set. are correct.
ENGLISH 29 CAUTION! Be careful when you put the appliance on the floor, there is a risk of damage. Lay the appliance on sheets of cardboard or polystyrene foam for protection. Changing the height of the cooker min. 894 mm max. 902 mm F 16 mm * h2 h1 H5 H4 H3 H2 H1 F min. - max.
www.electrolux.com 1 2 Use a screwdriver to adjust the wheels (1). Use a key to adjust the small feet on the bottom of the appliance (2). 12.3 Anti-tilt protection CAUTION! Install the anti-tilt protection to prevent the appliance from falling under incorrect loads. The anti-tilt protection only works when the appliance is put in a correct area. Your appliance has the symbols shown on the pictures (if applicable) to remind you about the installation of the anti-tilt protection.
ENGLISH Applicable types of cables for different phases: Phase Min. size cable 1 3x10.0 mm² 3 with neutral 5x1.5 mm² WARNING! The power cable must not touch the part of the appliance shaded in the illustration. • • • 31 The recommended cross-section area is six square millimetres (6 mm²). When you refit the mains terminal cover, make sure that the lower tabs are located inside the bottom edge of the aperture, before you fix the two screws into the top edge of the mains terminal cover.
www.electrolux.com Energy consumption per cooking zone (EC electric cooking) Left front Left rear Right front Right rear 184.8 Wh/kg 181.8 Wh/kg 192.3 Wh/kg 192.3 Wh/kg Energy consumption of the hob (EC electric hob) EN 60350-2 - Household electric cooking appliances - Part 2: Hobs - Methods for measuring performance. • 13.2 Hob - Energy saving • You can save energy during everyday cooking if you follow below hints. • • • • When you heat up water, use only the amount you need.
ENGLISH General hints Make sure that the oven door is closed properly when the appliance operates and keep it closed as much as possible during the cooking. Use metal dishes to improve energy saving. When possible, do not preheat the oven before you put the food inside. When the cooking duration is longer than 30 minutes, reduce the oven temperature to minimum 3 - 10 minutes before the end of the cooking time, depending on 33 the duration of the cooking.
www.electrolux.
ENGLISH 35
867319956-C-512016 www.electrolux.